Fancy Sunbonnet Bride

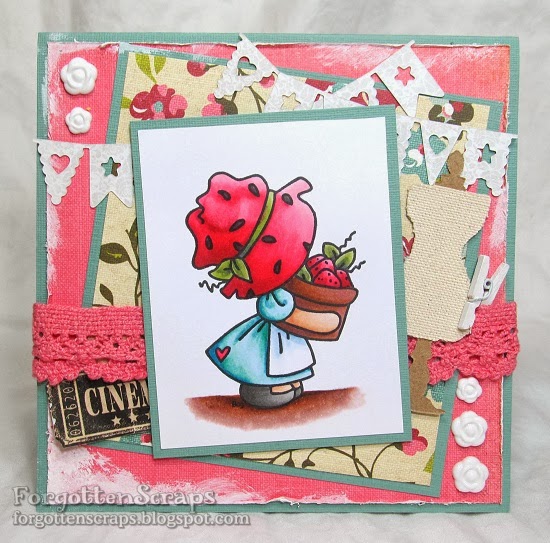
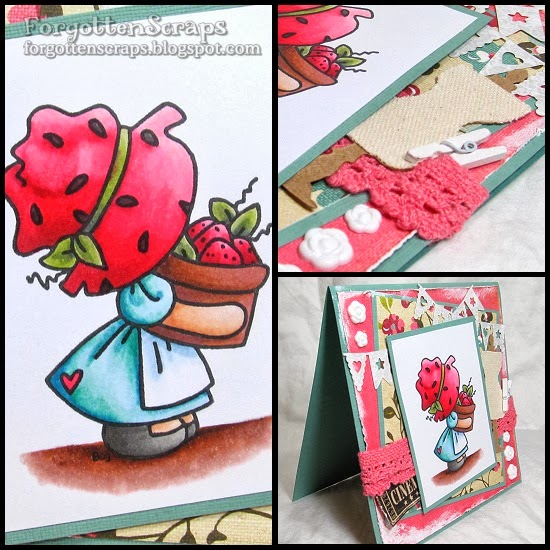
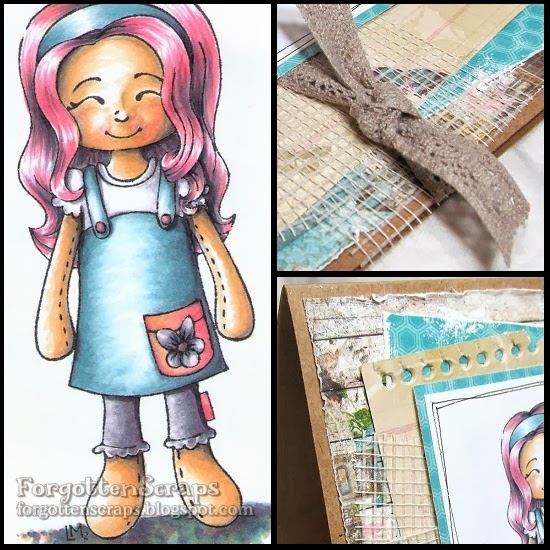
At Little Miss Muffet Challenges this fortnight we have a dainty challenge for you to take on and one that I always find difficult to master.  The theme is “White on White” but you’re image can be colored if you want to add some color to your project.  I’ve been wanting to use Fancy Sunbonnet Bride for a while and thought this is the perfect challenge to use on it.  However, doing it completely white on stark white wasn’t what I was in the mood for.  So I tweaked the colors a little into the cream spectrum and this is what I came up with…

The rubber stamps I used is Fancy Sunbonnet Bride from Little Miss Muffet Stamps and was colored with Copic E50, E51, E53 and a little E44.  I also used the Birds on a Wire Metal Die from Little Miss Muffet Stamps and double cut it out of felt.  Then I used some of the birds from one piece and added them to this project – they reminded me of doves and I wanted to pair some of them up… since it was a wedding card and all.

The rubber stamp can be found in the LMMS Store along with a bunch of new products that were added this month!!  This “White on White” challenge is at the LMMS Store Blog and be sure to check out all the other projects – you might be surprised, as I was, at how easy the challenge can be!

Animal Cracker Circus Elephant

Moan and groan… I hate feeling miserable.  But I don’t think anyone likes feeling miserable!  One of the disadvantages to living in a different climate than what you grow up in are the unexpected seasonal allergies.  Not everyone has them, I’m sure, but I do. 😦

Anyway, I can still post a project I made a while back and if I fake it long enough then I’m sure to make it.  After all, Moms aren’t allowed to be sick!

The image on this card is Imaginisce Animal Cracker Circus Elephant and was colored with Le Plume alcohol markers.  I hope you like.  😉

Sunbonnet Strawberry Basket

Lately I’ve been part of a vegetable share group and so I have been up to my eyeballs in things I normaly don’t eat… like green stuff and fresh fruits!  Sometimes I can be creative in making something good, like ginger pear jam, and other times my cooking is less than desirable, like the soggy apple strudel.  LOL  Anyway, my husband can get quite resourceful too, when he wants to, and one of his favorite canning recipes are “Fibblesnork™ Über-Garlic Pickles.”  What are those?  And what does it have to do with strawberries?  You’ll find out… just keep reading…

The image I used on this project is Sunbonnet Strawberry Basket from Little Miss Muffet Stamps and I also used the Party Banner Metal Die, also from LMMS.  I thought this image was the closet thing I could get to for pickles, and I’m sure if I wanted to I could have colored them green.  But I liked the strawberries, so I kept them as such.  😀

Now on to the recipe for some strange pickles!  This is a creation from one of my husband’s friend, Todd Lehman, and used to be posted online but it’s hard to find now days.  We didn’t want to loose it and so where sharing it here.  You should try it one of these days… it’s totally worth it!  Enjoy.  😀

Fibblesnork™ Über-Garlic Pickle

Stolen from without permission, because he let fibblesnork.com lapse, and the recipe needs to be preserved.

Ingredients

  • 1 (one) 32-oz. jar Claussen® half-spears
    For top quality, use only Claussen pickles, found in the refrigerator section. Do not use any other brand unless they are uncooked and refrigerated. Cooked pickles are limp and soggy. Uncooked pickles (like Claussen) are firm and crunchy. If you know of any other uncooked refrigerated brands, I’d like to hear about them.
  • 2-3 Habenero peppers, sliced
  • 4-5 Serrano peppers, sliced
  • 2-3 Jalapeño peppers, sliced
  • 24 cloves garlic, pressed or finely chopped
    That’s not 2-4, as in 2-to-4, that’s twenty-four cloves — a whole head of garlic.
  • 1 tbsp. crushed red pepper flakes

Procedure

First day

  1. Drain and discard 1 oz. picklewater from jar.
  2. Remove pickles from jar, cut into ¾″ slices, and return pickles to jar.
  3. Add garlic and peppers to jar.
  4. Cover jar (close lid tightly) and shake vigorously for 2 minutes.
  5. Refrigerate.
  6. Scrub hands thoroughly.

Subsequent days

  1. Shake for 5 seconds every 24 hours.
  2. Taste becomes fuller with each passing day.

Lavender

Welcome to the LMMS and MMCS blog hop! We have some amazing new for you … did you know you can now get Little Miss Muffet Stamps from My Mum’s Craft Shop?! To celebrate, the Little Misses have got together with the DT from My Mum’s Craft Shop to showcase some of the images Kitty is now carrying in store.

You should have arrived here from the fabulous AUDREY!
But if you get lost along the way, you can start HERE.

As with all blog hops, be sure to leave some love along the way, as there are prizes (you’ll have to Hop to the end to find out what they are!) to be had for 3 randomly drawn commenter’s!  Winners will be announced on Saturday 16 November at the My Mum’s Craft Shop Blog.

For my project, I used the Sugar ‘n Spice Dolls Lavender and this is one I actually colored a couple of months ago but thought this was the perfect opportunity to show the final project.  This is one of the images I colored using only four colors which was a challenge the started with Faye.  😀  I’ll eventually find a similar challenge to challenge Faye and toss some glitter over on her court.  He he he

I used Copic markers and the colors I used are RV34, B52, YR20 and BV23.  I also used the blender and some study paper too!

You’re next stop on the hop is the awesome CARLA!
See you at My Mum’s Craft Shop… Have Fun 🙂

Fancy Sunbonnet Witch

Ack!  I can’t believe it!  I had this project all set to be scheduled for Halloween and then I completely forgot to publish it!  So it’s been sitting in draft mode for a while but I’m still going to share it.  LOL  It also give me an opportunity to remind you about the buzz going on over at Little Miss Muffet Stamps today – the challenge blog is featuring the LMMS Super Saturday projects showing off the spotlighted rubber stamp for the week as well as the freebie for today! 

For this project, I used Fancy Sunbonnet Witch from Little Miss Muffet Stamps and kept the layout simple. I was at my Mom’s house and she didn’t have much in the way of Halloween papers so I made do with some red and oranges that worked well together.  Then when I got home, I added the black to tie it all in… something about orange and black that just screams “Halloween!”  Right?!

This was such a fun project to color and I have to confess a little bit about the black lace.  It’s actually a hard commodity to find.  Really, it’s true!  So when I discovered in the store (after months of searching), I ended up giving in to my hording instincts and bought the whole roll!  Gasp!  I know, sorry I couldn’t share, but maybe next time I’ll leave some on the spindle.  LOL

Girl Hug

Today (well actually, two days ago) is my opportunity to add a project to the MiC Store Blog!  This is a project that I did for the Whimsy Magazine last month and I’ve combined images using Whimsy and Make it Crafty to create this scene.  The Make it Crafty images are all set on the sides of the images and then cropped so I only show half of it – in effect, it creates a more personal image and one that looks more like a real picture.  After all, how often are our pictures taken where *something* hasn’t been cropped!  LOL

Make it Crafty Images:
 
Other Images:
Girl Hug (Whimsy) 
Papers: K&Company TC Blossomwood, Recolections The 12 Days, brown cardstock

Ink/Coloring Medium: Copics

E43, 21, 11, 000, R20, C3
E29, 27, 25, 23
R37, 35, 32, 30
R59, 46, 14, 21
YG67, 63, 61, G20, YG21
C1, 3
E43, 42, 41
E19, 17, 13, 11
B91, 93, 95, 97
BG70, B91, 93
W4, 5
Y26, 11
BV23, 20

Other: blue ribbon, red tape measure ribbon, pink glitter

You can see the background was created using several elements from different themes… such as Paris Elements (to create the bottom of the wall), Winter Scene Elements (for the snow, of course) and the door, windows and Christmas tree were also included.  Why the window is open on a cold winter day?  I don’t know but maybe they burnt the turkey and needed to air out the house a bit.  LOL 

Once the background was built, I added the characters.  Even though these are everyday characters, I thought they would be perfect for a Christmas themed card and that big hug says it all!  😀

Thanks for coming by today and I hope you have a great weekend!