Baby Fairy Flora

I had such a wonderful time at the Texas Coloring Retreat that it’s easy for my new pals to convince me to organize another!  So start marking your calendars for next year and we’ll be having another.  😀  For the next two weeks I’m going to post all the things we colored and did at the activity and share the fun.  But first, I need to photo graph everything.  This isn’t one of them but it’s something along the same lines… faces!

This image is Baby Fairy Flora from Mo Manning which had a face but there were two lines that looked like the bottom parts of eyelids so I went with that idea.

Here’s the image before it was colored.  This is a rubber stamp that I have but I think it also comes in a revised digital form.

I think the eyes are a bit too far apart but she still looks cute, I think, and better with eyes.  I added a couple extra bees around the edges to fill out the white area.  I hope you like it and thanks for dropping by!  Have a great mid-week and come back soon, ya’ll hear!

Little Avatar Navi Scene

Here’s a fun project I wanted to share using two images, Baby Fairy Flora from Mo Manning (Stampavie) and Anthuriumns Garden from Make it Crafty. I had recently watched the Avatar movie and wanted to color something using the bright fluorescent colors from that world.  So I had used a bit of creativity and decided to color up the fairy rubber stamp and the large flower background.

This was one of those coloring jobs where I went over everything about a hundred times and wasn’t sure what it would look like until I was nearly finished.  It was a new challenge and touch and go for a while.  LOL  To get the Avatar look, I colored with blues, green, blue/greens and even some yellows to create the skin tone and strip pattern.  Then once the skin was finished I added the white dots with the gel pen.  The eye were colored with greens and yellows and the lips were colored with a little bit of pink/purple.  Here’s a before and after slice of the fairy.

At first, I wasn’t sure what color to do the clothes but decided to bring in some neon purples and pinks which coordinated well.  The hair was done by dotting the gray tones and was a lot easier than I had anticipated. 

The background image is one that I’ve colored using some blues (BG and B).  For this one, I wanted a bright fluorescent type color of blue so I blended in some green (YG and G) on the tips of the leaves and some purples (BV) for the darker parts of the leaves.  I like how the effect really changes the blue/green color.

I wanted to keep the ground the same neon colors as the flowered background but I also wanted grass.  So I later went in and added green strands for grass and then placed my fairy image on top of that.  The mixture is a little different for me and I’d probably go for all green/grass the next time.  But I think in the end, this might be considered a “happy accident” which is always a bonus!  LOL

Finally the last thing I needed to do was place the images on a card – this was a challenge all in itself! But I managed to find some scraps that didn’t fight with the image and chose to go with something very basic and simple.  I hope you like it and maybe you’ll be trying a little Avatar Navi image in your future! Yes?!

I’d like to enter this into the following challenges:
DP2 Challenge E217 – “Something New” (coloring blue skin)
Card Mania #38 – Anything Goes
Make it Monday #175 – Anything Goes

Cheers Kaylee and Tropical Mae

Click, click, click – testing, 1, 2, 3.  It works!!  😀  I can’t tell you how I felt when I found my laptop computer in shambles with keys missing and parts spewn all over the floor!  I’m usually not one to be surprised by anything but this time I actually gasped in such an alarm that all the kids came running to see if I was ok!  LOL But the good news is after I initiated “quiet time” and spent some effort tinkering that I was able to get it all back togehter.  Phew… ok so on to todays cards… tada!

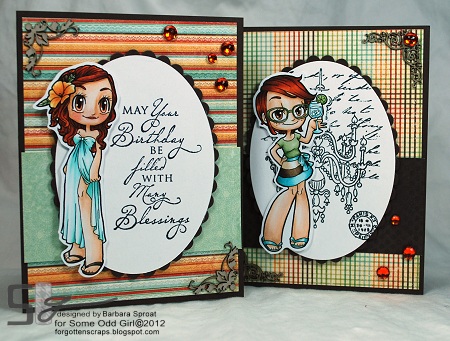
These two cuties are new from Some Odd girl and are part of the new digi releases this week!  These two cuties are Tropical Mae and Cheers Kaylee and are available in the store right now.  Tropical Mae was previewed on the SOG Blog yesterday and today it’s time to show off Cheers Kaylee – so be sure to check out the rest of what the DT has created.  😀

These two cards were fun and quick to make – sometimes those are the best.  I grabbed the paper choices before coloring then just worked off the papers to select my markers.  I usually add some ribbon but skipped out by using scraps or the reverse side of the decorative paper to create the horizontal interest that I seem to be attached to – it just looks weird if I don’t include that on my cards so I guess you coudl call that my odd quirk for the day!

I used the same colors, papers and even the layout on both projects if you haven’t noticed already.  He he he.  In addition, the background stamps I used are the Chandelier from Stampavie and I still can’t find where the sentiment stamp is from… but somewhere as I’m sure it’s not that old.  LOL

That pretty much wraps this up and I hope you’ve enjoyed the card for today.  Thanks for coming by and I hope you have a great mid-week.  😀

Renew

I have a fun project today using one of the gorgeous Nouveau Girls from Some Odd Girl!  This one is Renew and she was released last month in a clear stamp.  I love using real stamps because I can be posh about the paper I use – unfortunately, my printer is too picky about the paper it will accept when printing digi stamps so it’s always blissful to enjoy a good blending card stock.  😀  Anyway, back to my project… today is my day to post a project on the SOG Blog and whit is what I made.

The project I made today is a gift for a teacher which I call an A+ Grading Block and can be very helpful when grading papers!  All the teacher has to do is spin the dial on the top to figure out which grade to give to the students.  LOL  I thought it would be a fun desk decoration and even the students would love to come up and give it a spin, I’m sure.

I had made a similar one before using Grow (click HERE) but I needed at least one more so my girls would stop fighting over which one got to give it to their teacher.  😀  Luckily it was Teacher Appreciation week last week so they each got a block with some goodies.  I started off with a 3″x3″ wooden cube and covered each side with decorative paper.  Then I used an inkpad to age the edges with a dark brown.

The image on the top is Take a Spin from Stampin’ Up and I added a spinner I found in my stash.  This time I mounted the spinning wheel on a petite scalloped circle and added a banner tag on the top with a charm.  The spinning wheel is popped up to leave room for the twine and still give it a flat plane to spin freely.

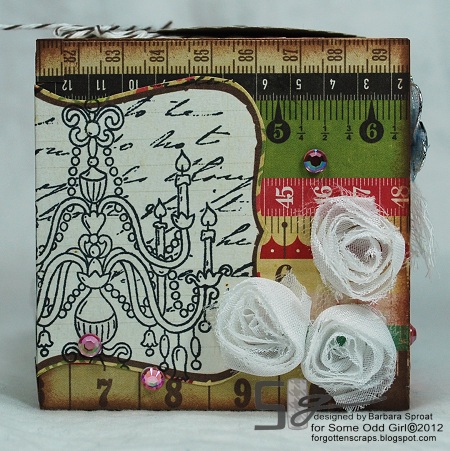
On one of the sides I stamped a label with the Chandelier from Stampavie then wrapped the label around the corner to spill over on the other side. This side uses a busy decorative paper and I wanted rulers to show so I tried not to cover them up too much and added some ribbon roses and a few sparkling gems.

The side that the label spins over on I added more details and also used the daisy accessory stamps that come with Renew from Some Odd Girl.  Then I used a couple more diecuts including the grass and dress form which I covered with burlap linen fabric.  This side was basically finished except I had two ribbon roses left over and couldn’t let them go to waste.  The grass diecut was just the right size to wrap around the other side of the block so I thought why not?!

The final side uses a Protractor stamp from Jenni Bowlin which I also thought was perfect to tie in with the teacher theme.  I don’t remember where the banner diecut came from but I used dimensions to apply them to the block then added two Baker’s Twine bows on the end.  Then to fill in some gaps I used more of the daisy stamps from Renew, some gems plus a tiara sticker.

I think that sums up everything I used for the project.  It was actually really simple to make and a lot like making five different tags.  They were a big hit with the teachers so I’m glad that they enjoyed them.  Now I have two more cubes left and will have to come up with something new… any ideas?

Thanks for coming by and checking out my project.  I hope you’ve been inspired and don’t forget about the fun festivities coming up with weekend too – it’s going to be a smashing fun day!  (May 19, SOG FB Party).

Royal

Are you ready for some Royal Treatment today?  He he he.  Some Odd Girl is releasing two Nouveau Girls this week and we’re starting off with a beaut who can be the queen of anything.  Meet Royal


The images I used are Royal from Some Odd Girl and Chandelier from Stampavie in the background.  Then on the post-it notepad I used the accessory stamps from Royal for the sentiment and crown.  Yep, that crown is seperate from the image so it’s going to come in handy!


If you are a regular Follower then you’ve seen this type of project before and know it’s for a special Teacher.  It’s the fourth and final one I’ve been working on… unbeknownst to the Teachers, they were suppose to be Valentine’s gifts but sometimes my creative process is a bit slow.  However, at least I have them finished before Teacher Appreciation week and can now start working on those!


These cute post-it note holders are great for the desk and they’ve been so fun to create.  The plastic picture frames were found at the local general store and the HUG ticket was found at Oriental Trading Co.  They’ve been fun to use as incentive for my kids to earn rewards with and I’ve been able to snatch a few here an there.  After all, I can earn tickets too, right?!  LOL


There are some gorgeous samples at the SOG Blog that you don’t want to miss out on so make sure to head on over there next.  Then mark your calendars and come back again tomorrow morning to meet the second Nouveau Gril because I have an exciting project to show off!

Grow

Today is my day to show off a project over at the Some Odd Girl Blog and I’ve got a fun project to share using one of the Nouveau Girls from Some Odd Girl… Grow! Check it out…


I’ve had four cubes for the longest time and was going to do decorate something with the word “READ” for the bookshelf. However, when I was cleaning, I had place them next to a spinner I had stamps and well, one thing led to another and I sacrificed one of the reading cubes to make this block.


I thought this would be a great teacher gift (yes, I need lots of those!) and so I chose to use the image Grow from Some Odd Girl because of the apple. I also used the flowers from Believe, another of the Nouveau Girls from Some Odd Girl. The other stamps on this block that I used are Stylized Notables 1 and coordinating die from Whimsy plus the N1 Fancy Frame chipboard from Make it Crafty. The top of the block uses Take a Spin from Stampin’ Up and on two of the side I used the Chandelier from Stampavie in the background.

Here are the five decorated sides going around the block…


The paper I used is from My Mind’s Eye (Howdy Doody) and I started the block by glueing down a square on each of the sides. Then I sanded down the edges/corners so the paper wasn’t sticking out (but next time i’ll just cut it a bit smaller for the same effect) and then used brown ink to smudge around the edges. After that, each side it was like decorating a tiny card or small tag!


There are a few metal dies I used including two news ones I got this week from Memory Box… Modern Landscape Border and Chloe Stem. It was also fun to dig out the Notebook Edge and Flat-Bottom Clouds from My Favorite Things.

I think that’s about all the details on the block. 😀 I hope you enjoyed it and thanks so much for stopping by and for your wonderful comments. *Hugs