Rocker Chick

Let us Entertain You!!
It’s SHOWTIME at Make it Crafty!
We’re a tapping our heels together with a tap a tap tap,
Clanging the symbols and beating the drums with a bang a bang bang,
Pulling rabbits from hats and lifting our legs – oooooohhh ahhhhhhh,
Singing our hearts out and jamming to the beat –  doo do do daaaaa…
You should have arrived here from the amazing JENNY!
(If you’re lost you can start at the beginning with ZOË.)

It’s time to be entertained at Make it Crafty with the
new Entertainers Collection of digi and rubber stamps!
You’ll find all the new digital stamps here and you can now pre-order the rubber stamps here!
You can’t have a GRAND SHOW without a DOORPRIZE!
Hop on through to be inspired and leave comments along the way for your chance to
win hidden prizes and be in the draw to win one of the grand door prizes!
One person will win the full collection of digi stamps
and another will win the full collection of rubber stamps!
ENJOY THE SHOW!!

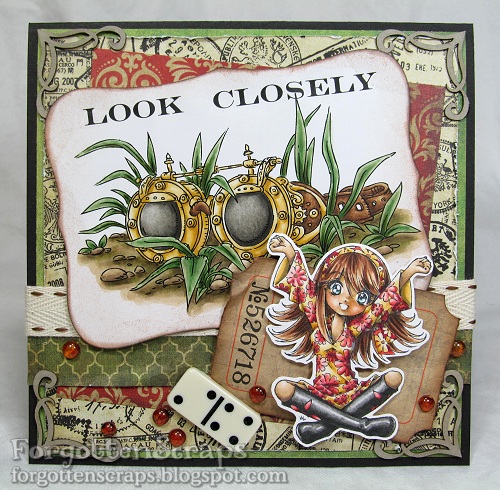
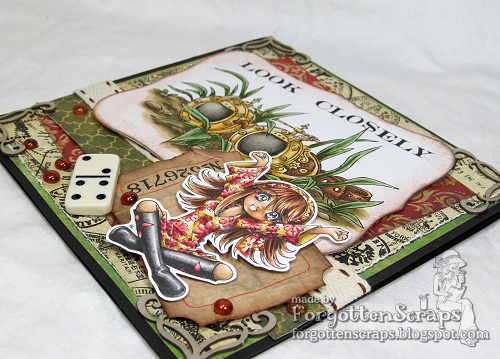
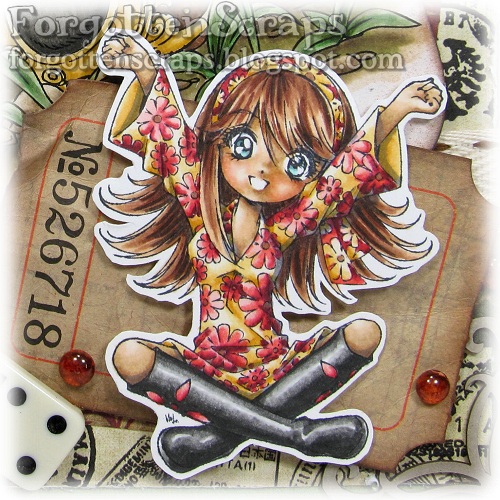
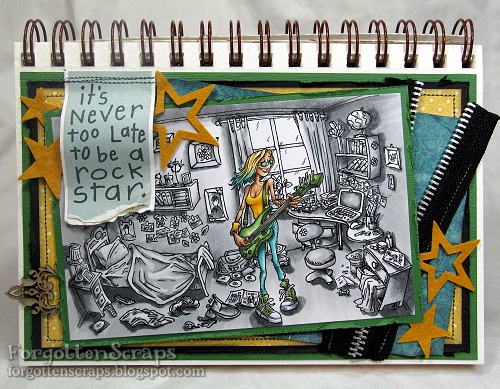
I’ve been wanting to color the Messy Room for a while and when I saw this Rocker Chick, I thought it would be the perfect combination!  Plus I’ve had the sentiment on the shelf just screaming to be used!  LOL  The official names of the products used from Make it Crafty are Rocker Chick (which is part of the Paper Rock Scissors Band – very humorous and a perfect band name), Girl’s Messy Bedroom and the Fancy Ribbon Sliders chipboard.  I think the quote is Inkadinkado Rockstar.

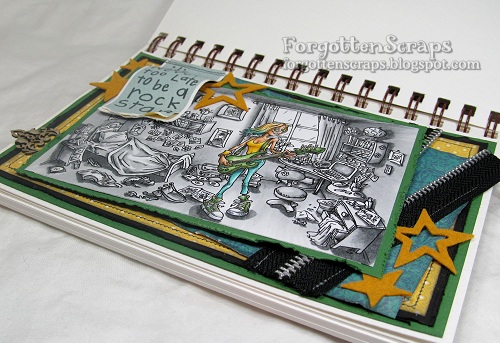
So is anyone a guitar player?  If you are, you can probably figure out the chord she’s strumming!  My fingers are all thumbs when it comes to music but that doesn’t mean I don’t try!  LOL  Now if I can only get more than my dog to sing along with me.  He he he

You’re next stop in the hop is the talented ÅSA!

Thanks for coming by and we hope you’ve enjoyed the show!!

Far Away Castle

It’s my week to choose the theme at Make it Crafty and we wanted to challenge you to “Void the Warranty” or in more common terms, to think outside the box!  Take a second look at your products and see what you can do differently… use half of a ribbon slider as a tag, color a summer scene to look like winter, use a tool as an embellishment or even as simple as recycling something you normally toss out.  I think I’m guilty of falling into a rut more often than not and this type of thinking allows me to pull myself out and try something new.  Who know… maybe you’ll be starting a new trend with your ideas!!

For my project today, I tried a couple things that I normally don’t do.  The most obvious one, perhaps, is the way I colored my image.  I normally use a lot of colors but this time I only used three… B21, B34, B45 and the Blender marker.  Plus I printed the image out in blue instead of black ink.  Before I printed it, I merged my images together, including the ribbon border – all of them are from Make it Crafty.

Specifically, here are all the fabulous Make it Crafty products used on this project:

The center is merged from three images (Far Away Castle, Daddy & Lucy Butterflies and at the very front-bottom is the Pebblestone Path).  However, what you may not recognize is the border which was created from the Ribbon Swing.  I used the ribbon-ropes four times and “snapped” it into a circle shape using Adobe Photoshop.  This border technique is in reality altering the stamp so make sure you know which companies allow for that.

My goal was to create a project that resembles the blue and white porcelain dishes.  I have a small collection of egg cups (representing the countries I’ve traveled) and one is an authentic Royal Copenhagen “Blue Fluted” pattern that is my favorite.

That leads right into the next “outside the box” idea I used which was to use the Shadow Box Circle Frame Kit as the base of the plate instead of as a shadowbox.   That was simple enough and I only used the two flat round pieces that come in the kit.  From that point, the project was simple – print in blue, color blue, cut out and paste on the chipboard.  Done!  However, I couldn’t resit taking a picture with some felt play-food to give the full effect as the final touch.

Melody

I have a little twist on the theme for this week at Make it Crafty. The theme is Wonderland and I’ve taken two images that normally wouldn’t be paired together and used them on the same project! I figured this could be one of the times Alice went to Wonderland and ate something to make her small which resulted in her finding these lost goggles. I could happen right? Anything can happen in Wonderland. LOL

The images I used on this project are the Steampunk Goggles digi stamp, Melody rubber stamp and also the Ornate Corners Two chipboard, all from Make it Crafty.

The goggles in the background was a digi I printed off and colored long ago and the girl in the front is a rubber stamps that I’ve been wanting to color for a long time. So old meets new, Steam-punk meets retro and everything else in between. The papers and embellishments were selected at random but the large ticket tag was added as the last minute to help the foreground image stand out more.

Here’s a close up of Melody and I had a little fun coloring her face with a button-nose. I’ve struggled with how to color the noses on this style girl but I think I’ve figured out something I’m happy with. I’ll try it again on the next one and see if it turns out just as cute. 😀 Thanks for coming by and checking out my project – hope you’ve like it and that it’s given you some ideas on your next craft day!

Dylan and Sam Fishing

Welcome to the Make it Crafty Spring Blog Hop!  Today a bunch of MiC gals are getting together and sharing some spring fever creations for you and you can get the list of everyone HERE!  Plus EACH blog will draw a random winner from their comments on Tuesday and the winner will win a free surprise ‘Spring Themed’ digi stamp not yet released!!  How awesome is that?!  And something you don’t want to miss out on!  So here’s my project…

I’ve used the image Sam and Dylan Fishing from Make it Crafty plus a few chipboard embellishments to help finish this project off, including Fancy Ribbon Sliders and N2 Simple Frame.  The N2 Simple Frame actually coordinates with Whimsy diecuts and labels which all together make quick fancy labels.  I used one of the Fancy Ribbon Slider and cut it in half so I could use it as sort of a tag.

The papers are Shine On from BasicGrey which provided a nice bright color pallet.  Around where I live, things are either brown and dead or green and vibrant – so unfortunately this isn’t any other season.  So spring to me, means lots of flowers, green grass and bright colors!  I was even able to spend an hour outside gardening this even too – it was great!  Anyway, here’s a close up of Dylan and Sam Fishing…

What does spring mean to you?  Or what are your favorite spring colors, activities or whatnot?  Leave a comment below for a chance to win a free surprise ‘Spring Themed’ digi stamp from Make it Crafty which as not yet been released!  Thanks for dropping by today and I hope you have a great Easter weekend.  😀

Witchy Wanda

This week Make it Crafty‘s inspiration is all about layers and I have a card that I created with Witchy Wanda which has up to seven layers (if I count everything!).  Yep, remember way back in October last year?!  I had shared a tip about how I colored that image and so now I finally have a project finished!  Yeah, I know, but better late than never and I’ve been doing really well keeping up with my New Year’s resolution… I think I’m down to 20 colored images that I still need to make projects.  I thought I started with a small amount but the more I’ve been working with my older projects the more I keep finding.  he he he  BUT I’m excited to say all of my MiC images (except for one) has had the honor of making it onto a card or journal page!!  Anyway, long story short… here’s Witchy Wanda with “Loads of Layers!”

The papers were part of a Halloween Kit from my local scrapbook store which also included the sticker embellishments.  I searched online for some layout ideas and combined a few to come up with this one.  Then I added the sewing and ribbon elements to finish it off.   Thanks for coming by today and have a great weekend!!

Maritime Abode – Two Ways

I’m so excited to share today’s Product Feature over at the Make it Crafty store blog and I even dive into memory lane.  He he he.  But here’s the shortened version:  The very first Make it Crafty image I purchased was way back in 2010 when there were only a few images to choose from and I had to buy them all!  I was so scared to color them and didn’t even know where to start, let alone what colors to use!!  So what did I do?  He he he… I looked at the store sample Zoe had posted and colored it exactly to match.  Wow, that was hard for me and such a change from doing regular characters!  Plus I was so worried I would mess it up but after several hours I managed to complete it.  (That was the Slimy House, click HERE.)

Then I started to experiment with the skies and with each background I became more confident and brave in trying something new.  And after the second attempt, I was hooked!  (That was the Haunted Halloween House, HERE.) I knew this was going to be enjoyable and so I continually stalked the Make it Crafty store continually looking for new backgrounds.  LOL  It’s true!  But don’t tell Zoe that!  He he he.  The next two background I colored was really challenging.  (Alchemist Chamber, HERE, and Old Oak Tree, HERE.)

By this time I was comfortable with the ideas of a background (i.e. a super large image to color) but I was still working on other aspects such as lighting and color choices.   Meaning there was still a lot of mental pondering going on and these projects were spread out over days.  However, it was around this period that I started looking at the backgrounds as puzzles to solve and I love puzzles!

Now let me fast forward into the present and share another aspect about Make it Crafty’s backgrounds that I love.  There is actually two aspects… first the backgrounds are detailed enough that they can be the main focus such as the next two projects I’ll share below.  And second, the backgrounds are so versatile that simply changing the sky or the colors used will change the whole scene!  For example, Maritime Abode in this post.  The windows are open and it looks like a perfect sunny day to run around in the grass and maybe even enjoy a picnic.  This house is something akin to what my Father would make provided he had the resources and I can imagine myself as a child running all through the inside into every nook and cranny.  LOL

Now I’ve taken the same image, Maritime Abode, and changed the scene to be under water instead of above ground!  The main change that I made, of course, is the sky – er, um, the sea with the fish and algae.  Instead of grass there is now seaweed and instead of yellow windows I’ve changed them to a light green.  Plus I’ve removed all the copper metal and made it all steel because in the long run I think it would last longer under water.  Right? I hope so!  LOL  However, I had forgotten to add bubbles but even without those it’s easy to see that it’s under the water.  (Details on the water technique for this version found HERE.)

I hope this has inspired you to color this week and make sure you check out all the backgrounds in the MiC store – there are so many to choose from I’m sure you’ll find something just right!  For more information on the older projects above, you can click on the links below.  Thanks for coming by today and have a great weekend!!

Make it Crafty Images: