Graffiti Party

Here’s my attempt at creating a grunge rock band in the garage – and it may look ok, but this one is actually on my yuck list.  We’ve all got to have them right?  Well, this one is mine for the week.  I think it’s the colors of the background and wish I had done that differently. 

The images I used on this project are many…  from Little Miss Muffet I used Graffiti Party and from Make it Crafty:  Drummer Dude, Rocker Dude, Rockstar Singer, and an element from the Paris Building Digi Elements to create the floor.
 

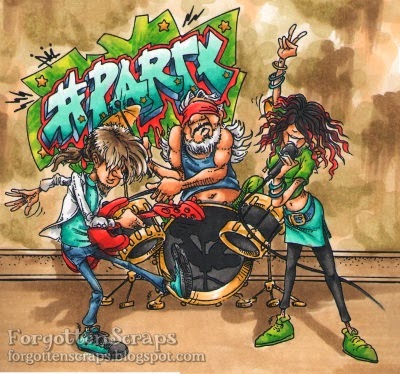
Then once I figured I had “lost” the image, I decided to see what a spotlight would look like and if I could add a disco ball effect… disco and grunge?  Yeah, I know, it’s just another example of a bad decision.  LOL  I don’t think the effect turned out well either but you can decide… for me it looks like it’s snowing.

It’ll probably make an ok boy card but I think I should have left it alone when I had the chance.  Calling it good and packing up my bag is something I need to work on.  😀

Melyssa and April

The challenge this month at Make it Colourful is all about the eyes and I’ve colored two more projects for inspiration!  Check out all the details and other DT inspiration on the Make it Colorful blog and you can also find more buzz in the MiC FB group as everyone shares their creations.

For my projects today, I’ve colored two Make it Crafty images, 

This first one is Melyssa.  I started off coloring up some rainbow eyes as a challenge from Amy Heffernan.  I found my inspiration from sanguisGelidus Universe Eye and loved how the universe what reflected in them.  Here’s a little break down of how I did that part…

First I added the rainbow colors; then brought in the blue.  After that, I should have done the black but I did the highlights instead!  LOL  And then that’s when I remembered I got a little carried away and went back in to shade the white part of the eye and to also add the black and eyelash shadows.  I also used the star highlights and brought that out into the sky.

The next part was to add the colors around the eyes using PixieCold Cold Fire Eye as inspiration.  This was a challenge set up by Zoe and I almost didn’t think I could pull it off until I added the white gel pen which seemed to fix the problem.  Phew, problem solved and I don’t have to try this one again.  LOL

This second image is April and she was inspired by my teamie Michelle who colored this same image with pencils.  It was amazing and I thought if I could do just half as good that I’d learn something!  However, as a little twist, since I knew I wouldn’t be able to color it exactly, I wanted to play around with wrinkles.  So this is the Senior version of her original… older and still beautiful! 

Lastly, since I’ve been inspired by all sorts of people, you might have noticed this image has a turtleneck sweater on instead of her normal tank top.  That was Anne Liese Johannessen who said it was a mistake but I thought was a brilliant idea!

Henry Claus

There is some exciting news over at Make it Crafty and we’re having a little inspiration hop to celebrate. I’m excited to share that the full range of Make it Crafty rubber stamps is now available for sale direct out of the USA from CC Designs Rubber Stamps!
You’ll be able to order the MiC backgrounds and Characters or as we have done today, mix up your MiC backgrounds with the gorgeous CC Designs characters! You’ll see below that they make a perfect scene when used together.
The MiC range is not only available direct to MiC fans, but will also be available to craft stores through CC Designs. If you would like to order MiC stamps for your store direct from the USA, please do contact Christine for details. If you’re an MiC fan in the USA and would like your local store to carry your favourite rubber stamps, make sure to let them know you’d love them to contact CC Designs for details.
You should have arrived here from the amazing NICOLETTA
Or if you’ve gotten lost you can start at the beginning: Make it Crafty Blog Post.
For this project, I’ve used these three images to make the scene:  

Remember that Roberto’s Rascals Henry Clause counts towards the 
Toys for Tots fund raiser at CC Designs too!
For a chance to win a CC Designs Character & MiC Background, make sure you comment below!
 There are a couple of hidden prizes along the way too!
Your next stop in the hop is the wonderful JENNIFER!
Thank you for hopping along with us today!!

I’d like to enter this into the following challenges:
Brown Sugar Challenge #63 – Anything Goes
Card Crafter’s Circle Challenge #96 – Three Embellishments
Crafts-Too Challenge #4 – Christmas Festivities
The Paper Shelter Challenge #132 – Charm Us
QKR Stampede Challenge #60 – Anything Goes with Circles

Update: I was lucky winner at The Paper Shelter for this project!

Skeleton Luka

It’s October and that means the scary images are out and ready to be colored!  This project features Skeleton Luka from La La Land Crafts combined with images from Make it Crafty (Egyptian Chair, Egyptian Vase #1 and Egyptian Vase #4) to create this spooky scene.  Looks like the LLLC Customer Gallery is gone but if it comes back up then I’ll enter this into the mix.

The face was directly inspired by Jennifer‘s amazing skeleton image she colors with another Make it Crafty image – one, that I’m proud so say, that I own!  Eeek!  Jennifer put it in an awesome frame and I’ve got it out for the season – it’s amazing!  (If she doesn’t post pictures soon then I might leak a few of my own.  LOL)

One of the challenges at Make it Colourful this month is to color eyes and so this one, though red and yellow, is one of my attempts at doing realistic eyes.  I goofed on the highlights and should have kept the white parts the same on both eyes instead of mirroring it – but hay, learn and live.  😀

I’d like to enter this into the following challenges:
Stamp and Create October Challenge – Halloween or Thanksgiving
(I remembered the flat part but didn’t see the A2 size until now)
Cards in Envy Challenge – Now That’s Scary! (Just for fun only)

Maiden with Long Golden Hair

I’ve adored the fantasy collection ever since it’s come out and for some reason it’s taken me this long to get to them – for shame on me!  LOL  For this scene that I created, I cropped the character and then reduced the background.  This, I hoped, created a photo look as if she was on holiday at some famous location.  But hay, maybe this is her backyard and she has this awesome view everyday!  LOL

The hair color is actually what inspired me to color this image – they’re the same colors I did the “Demon Clown Mommy” but this time I wanted to see how it looked on a princess image.  It was such a gorgeous combo!   The colors were Copics YR31, YR14, YR27, E07, E18 and E49.

The images I used on this project are:

Make it Crafty Images:
Forbidden Tower

I’d like to enter this into the following challenges:

Artistic Inspirations Challenge #62 – Anything Girly
Lunagirl Moonbeams Challenge – Lady Blue
Make it Monday Link #161 – Anything Goes
Make My Monday Challenge – Elegant Ladies

Graffiti MiC

We’re having a fab time with all the urban style image released between Make it Crafty and Little Miss Muffet Stamps and today we’re updating ya’ll with even more fab inspiration!  Plus Little Miss Muffet Stamps has released ten more images to the collection that you’ll want, fo’sure!

Click HERE to get to the action over on the GraffitParty blog!

For my card I’ve used the Graffiti MiC from Little Miss Muffet Stamps then combined it with Urban Nico and the Urban Elements from Make it Crafty to create this scene.  I went with a monochromatic theme again ad a little splash of colors – but I’ve honestly colored several full colored images in between – it’s just that this is all you’re “seeing” here on the blog lately.  LOL  But I love the look and it draw attention to both areas equally, I think.

One thing I tried to do with this is create a hole in the wall and use the wood fence element to make it look like it was boarded up.  Then I could color the circles on the end of the board slats as nails but I’m not sure that they look any more like nails that before!  LOL  Next time, I’ll have to go heavy on the highlights and really give them a shine.

Click HERE to get to the action over on the GraffitParty blog!
And click on these links to go shopping: