Dancing Party Tilda

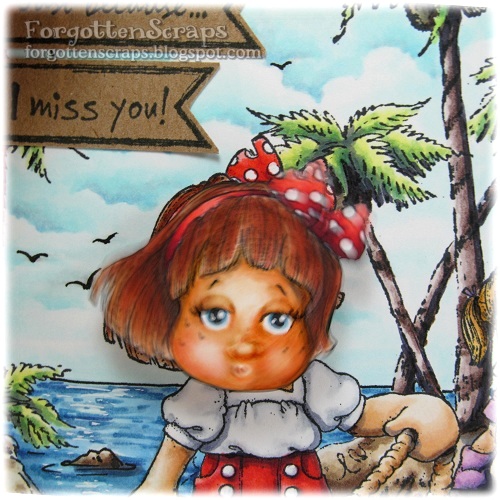
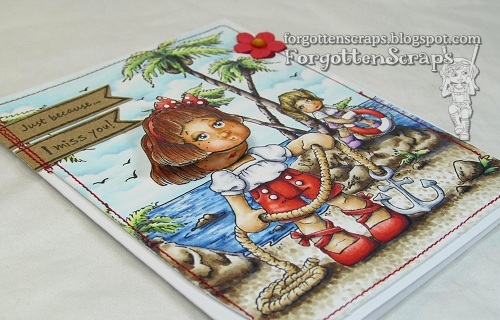
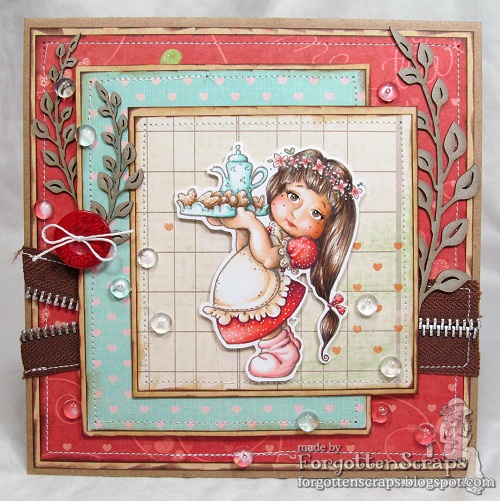
Yeah!  I’m so excited and wanted to share the news that I passed my courses this last semester!!  I thought for sure one of them was no good and I’d have to take it over again, but I was taken by surprise on the very last day – and oh what a surprise it was too!  It’s lifted me up out of my funk and I’m looking forward to what this summer has in store for me.  😀  And somehow all that reminds me of this project that I’m sharing with you today – I suppose it’s because Tilda is tossing up her arms and looks like she’s celebrating too!

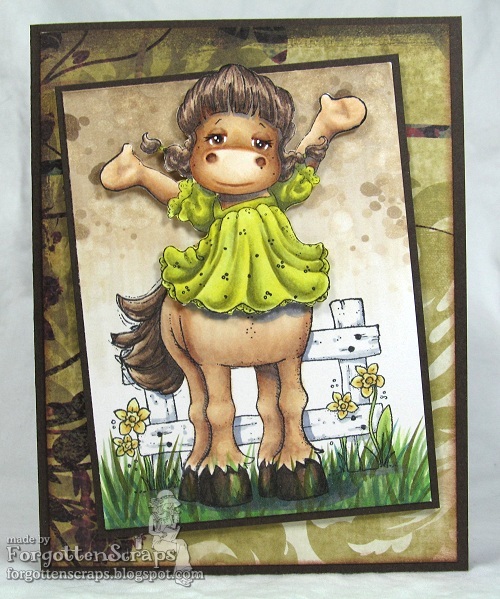
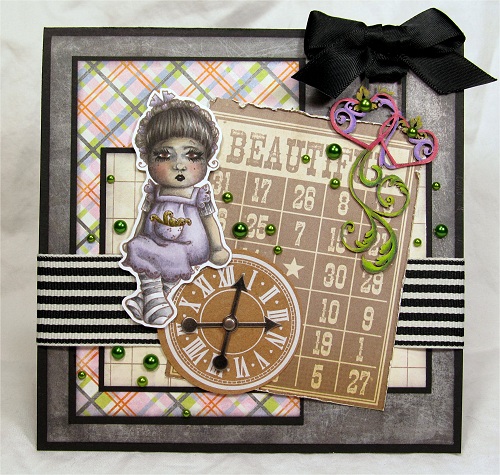
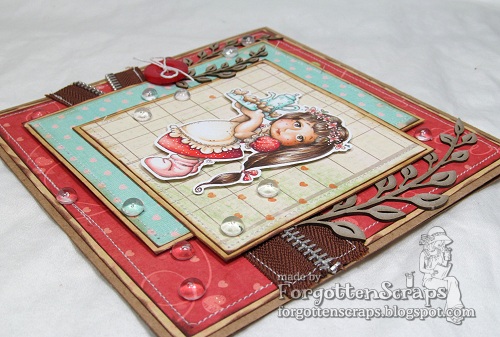
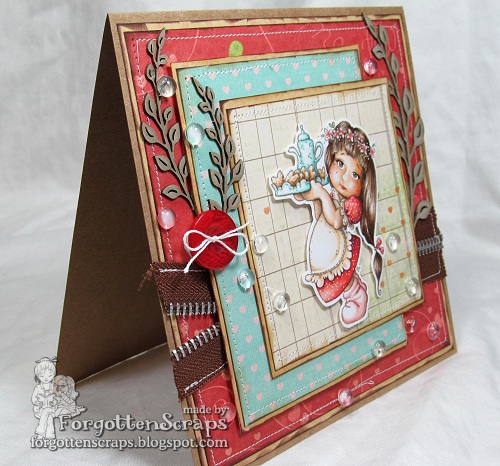
Have you ever wondered what a clothed female centaur would look like?  I image something like this.  After all, they don’t all have to be naked.  I understand this project might not be for the week of heart but I love how it turned out.  This is a Magnolia project and these are the stamps (below) I used to create it using the same techniques as my last project (click HERE).  The rest of the card was kept simple and embellishment free.

Dancing Party Tilda
Tilda’s Brunte Horse
Spring Fence

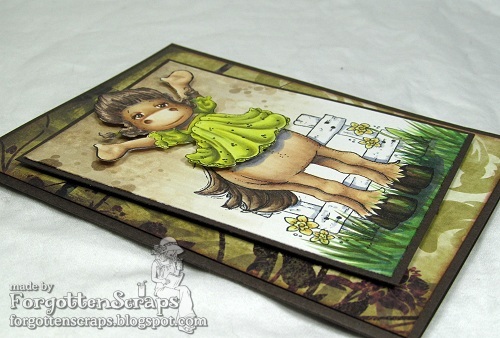
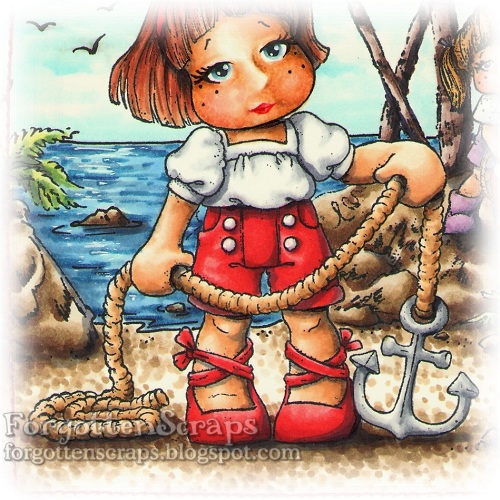
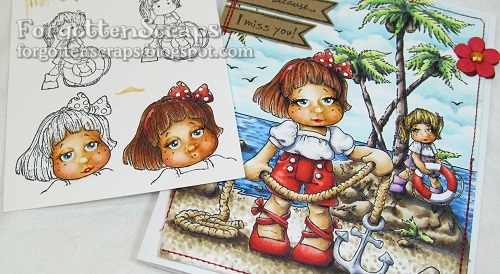
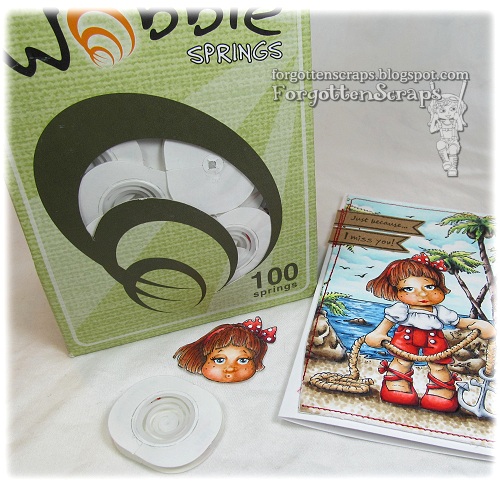
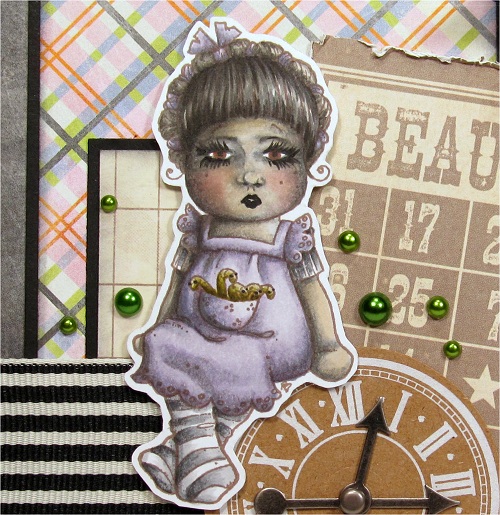
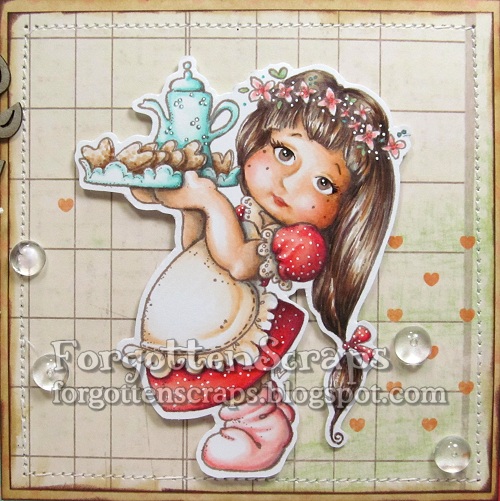
To create the scene, Tilda’s Brunte Horse was inked up half way and stamped on the page and masked.  Then the Spring Fence with the daffodils was stamped behind it.  Dancing Party Tilda was stamped on a separate sheet of paper and then cut out so she could be popped on the project with foam dots.  Of course, I colored her before transferring her over.

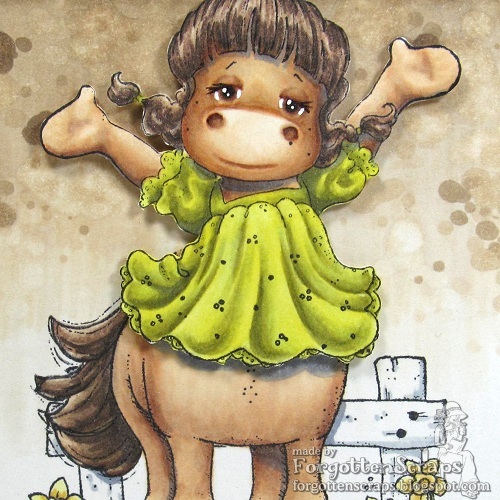
I used a new set of greens to color her dress and now I wish I had written down the colors.  I know many of them were YG colors with some brighter yellows and I’m going to try it again sometime because I think the combination is stunning.  The background was colored with E40 through E44, first with a blend from dark to light then adding splotches.

Thanks for coming by today and I hope you have a great weekend planned!  I have some work all day Saturday then plan take a quiet rest on Sunday if possible.  ;D

I’d like to enter this into the following challenges:
Inky Chicks Challenge #5 – Use Magnolia Stamps
Fashionista Challenge #16 – Use Magnolia Stamps

Tilda with Cross Stitched Heart

Brace yourself… I’ve created a Magnolia scene and colored it full scale!  You’re probably not surprised on what I’ve added through coloring but I’m sure you’ll be shocked at what I didn’t color… the face!  LOL  Now I can finally “officially” join the Magnolia fan club … but it’s short lived since this is probably the only project that will count towards that “membership.”  He he he.

Anyway, before I start describing the project, I am excited to say this project has been approved 100% by Magnolia!  It’s true… I’ve been in communication with Ginny and she said the techniques I used on their images here are acceptable and approved.  (Mon, May 20, 2013 at 1:00 AM CDT)  So in other words, the possibilities to my creativity are endless.

I’ve used several images on this one and they’re all form Magnolia too!  There were five stamps that were masked and/or cut out to create this scene, including: Tilda with Cross Stitched Heart, I Love You (I’ve left off the “You” portion), Lovely Balloons (only one of them), Tilda and Her Bunny (just the bunny was used), and finally Tilda’s Tin Boxes. 

The main Tilda image is a Christmas themed stamp but I wanted to show that it could be used for other seasons too and I picked a Valentine’s Day theme.  This works perfect with Tilda’s Tin Boxes and I accentuated the theme with bright pinks, reds and purples.  The tin with the hearts shows each of the various colors.  As an after thought I wish I had added more browns or at least swapped the colors for the red tin and brown one.  But overall, the image colors still work.

Here’s the first surprise… I kept track of the colors I used!!!  Gasp!  I know… but here they are broken down into the groups used, listed left to right from the darkest to the lightest…

V17, V15, V12, V01
V99, V95, V93, V91
R39, R37, R17, R22, R12
R59, R56, R83, R81
RV29, RV14, RV32, RV10
RV69, RV66, RV63
E29, E25, E23, E21
C7, C5, C3, C1
E79, E77, E74, E71, E70
E23, E53, E21, E00, E000
Y23, YR23, YR07
BV25, BV23
BG99, BG96, BG93, BG90

The second most shocker, well for me at least, is that I colored a standard face on Tilda!  It was hard… I mean really hard to restrain myself.  In face, over the weekend it took me three tries to keep it simple but I finally managed to do it on this one.  LOL  And yes, that means I have two more Magnolia projects to show off!  I’m not going to tell you what I did … but suffice it to say, Magnolia lovers are sure to LUV this project and non-Mangolia lovers will LUV the others.  (Oops, I might have said too much!)

I experimented a lot on this project and if you haven’t noticed the subtle differences by now, I thought I’d divulge the hidden treasures. There are several things that I think would be considered “out of the norm” with various difficulty levels.  Here they are, in the order of creation…

(1) Masked multiple images together
(2) Omitted portions of the stamp when inking (x2)
(3) Cut the image up and only used a portion of it
(4) Added a Valentine picture to the balloon
(5) Changed the Santa Stocking to a Beanie Hat
(6) Converted the sweater into two shirts (a short sleeved over a long sleeved)
(7) Added a large stripe to the shirt
(8) Created a hole in Tilda’s shoe
(9) Gave the bunny patches of color
(10) Drew bunny whiskers with a black pen

Here you can see the big hole that I put in Tilda’s shoe.  I get a good chuckle out it because it looks like a bullet hole blasted out from the inside.  LOL  Next time I’ll make sure the inside is the same color as the socks and also try to have the toe showing a big.  ;D  Finally, the last thing I did was add the green background to help counteract all those pinks and purples.

I hope you like it and thanks for dropping by today!

I’d like to enter this into the following challenges:
(Not necessarily for the prizes but just to share the project.)

Magnolia-licious Challenge – Weather (It’s storming outside and the power is out?)
Dutch Magnolia Lovers Challenge – Song (“Can I get there by candlelight” by David McWilliams)
Lovely hAnglar or Sweet Magnolia Challenge #69 – Picture Inspired (yummy desserts)
Magnolia Down Under Challenge #197 – Lace & Flowers (Lace on the tin, flowers on paper?)
Tilda’s Town Challenge #53 – Background Stamps

Update: I was the chosen winner in the Dutch Magnolia Lovers Challenge!

Update: I was in the Top 3 in the Lovely hAnglar or Sweet Magnolia Challenge!

Update: I was in the Top 5 in the Magnolia Down Under Challenge!

Tilda with Anchor

I had a little time to play around this week… well, actually, I rebelled and skipped out on my homework!  LOL  But that aside, I had fun with this project and it took me the whole night too.  Of course, I might have been able to get it done faster if I hadn’t stopped to clean the craft room or just to turn off the TV would hae helped.  But it was rewarding!

My project was inspired by Chris who does amazing work with her scenes and I’m always in awe how they turn out.  Plus she was the first one that I spotted who used a regular and mini Magnolia image on the same project!  So I took inspiration from two of her cards which you can see HERE and HERE.

The images I used on this project were all rubber stamps and I masked areas to create the scene.  the characters are Tilda with Anchor and Ahoy Tilda from the 2012 Summer Memories collection, Magnolia Stamps.  (I think!)  The background and sentiment stamps are from Make ti Crafty and include the Palm Trees and Just Wanted to Say.  The rest of the scene was filled by me.

I experimented a little with the face and ended up coloring her four different times!  The main problem was my paper was giving out and wasn’t able to blend after a while.  This was Nenah paper and though it did fine with everything else on the page, the layers on the face was just a little beyond it capability.  I already knew this so why I didn’t think ahead before choosing my paper is unbeknownst to me.  (You can click HERE on what I’ve discovered about the papers I have.)  Anyway, I finally gave up and went a different route… Wobbles!

 I discovered these fun gizmos just recently and lucky for me the shipment arrived just the day before – so you know what that means!  It was on my desk just staring at me begging to be used!  LOL  I decided to take the surprised Tilda face and give it some ‘action.’  These Wobble springs are sticky on both sides with a plastic spring between the two layers.  Once it’s attached to your project, you can spring it and the image will shake/rotate back and forth.  Here’s a picture of the actual springing… so as you can imagine how much fun this might be! 

The clouds were used as part of the tutorial that I posted earlier this week.  So if you’re interested in how to make these clouds you can click HERE for some ideas.

Thanks for dropping by today and I hope you’re having a great weekend!   Ciao, a presto!

Sitting Tilda with Candy

I’m not sure if I’m ready to share this project but here goes anyway!  And some of you might want to close you’re eyes for this one.  He he he  I think this image is Sitting Tilda with Candy from Magnolia which I think was part of the So Jolly Under the Mistletoe Christmas 2009 Collection.  However, those are no longer candy canes in her pocket and she is no longer the Tilda you might recognize either!

Perhaps we can now rename her to Sitting Goth Tilda with Worms!  The inspiration for this one was actually initiated over a year ago with Anneth’s awesome creations.  She had posted a Goth Tilda and a Wolverine Tilda that really sparked my interest.   I have already posted my attempt at Wolverine but this one has sat on my desk unfinished since that time and I figured it was about time to just finish it.  So I colored the clothes and set her up on a card. 

The main reason she was sitting on my desk for over a year was because I wasn’t happy with how the face turned out… just not Gothic enough and the features are a little out of proportion for what I was aiming for.  However, I thought it would be good to post my successes along with my failures.

On the card I used a ribbon chipboard embellishment from Make it Crafty and colored it with Prismacolored pencils.  I started out with all one color but changed my mind half way through – luckily enough I was able to build upon the colors and cover up the first layer.  Coloring them with colored pencils has been fun so when I have the time you’ll see that more often.

I thought the skin tone was interesting and I might play with that a little more.  I think my Mom has a couple Tilda images that I haven’t seen yet – maybe one of those will be next on my coloring list.  😀  Thanks for coming by and I hope she didn’t freak you out too much.  LOL

Joyful Tilda

I had a little fun the other day and actually selected an image from my forgotten collection of stamps.  Ooooh, it felt good thumbing through all those image and it was hard to choose!  But I settled on this cute Magnolia image from the Christmas Story collection which was also perfect for a Valentine theme.  Check it out…

Did you notice anything different by chance??  LOL  I’m sure you did!  This is Joyful Tilda from Magnolia and I’ve shading in a face with details using my Copic markers.  I’ve colored others with faces (just click on the Magnolia tag and you’ll seen them) however, I think this one is my favorite by far! 

I stamped the image in brown so it was easy to use her existing eyes as the color of her new eyes.  Plus I think I like how the brown stamping turned out so I’ll certainly be using it more and more.  As long as I’m not using black to color parts of the image with then the brown blends in more giving the image a softer look. 

My colors were inspired by the zipper I bought over the weekend and I had to come home straight away and use it on a card!  I even used my sewing maching to stitch it down and add more elements to it.  Too bad most of it is colored up but it stll counts as being used.  ;D  Now I just need to find my missing needle (the one the kids got to) so I can use my sewing maching again.  LOL

But wait, there’s more!!  For those who are joined in the Magnolia-religion, I also have a “pure” Maggie to share.  😀  This is Tilda with Peony Tails that my daughter colored up.  I think she did this card back when I was doing the Backyardigans Magnolia set.  Shhh… just don’t tell her it took this long to post it.  (o.o)

Thanks for coming by today and whether or not your a Magnolia purist or not, hopefully there was something here today to spark your creativity.  ;D  Have a great week!

Ice Skate Rio & Rock N Roll Rio

Simply B Stamps has another release this week and the design team has been busy making lots of inspiration for you eyes.  😀  There are eight new images in the Miss Rio Collection and I’ve made cards using Ice Skate Rio and Rock N Roll Rio for the holidays.  Well, actually, the Rock n Roll Rio is for a birthday using the same paper pack but the birthday girl won’t know that.  LOL!  Check them out…

Ice Skate Rio from Simply B Stamps and
Park and Pond from Magnolia Alota Rubber Stamps

Rock ‘n Roll Rio from Simply B Stamps

Stay tuned for another look at the Miss Rio Collection when I’ll be back this evening with two more holiday cards.  Also don’t forget to head on over to the SBS Blog to see all the other projects using this fun images.  😀