Mermaid and Mason Jar

I was able to take some time out today and color up an image that has been on my wish list for quiet some time.  🙂  Why I put these two together?  I don’t know other than I wanted to color this mermaid and this jar so why not together.  LOL  These images are Sweet November images from CC Designs and were colored with Prismacolor pencils on Balsa Wood

This was a good challenge for me to try coloring metal and glass.  She is swimming in distilled water – that is instead of murky water although there is some color reflection that I’m not sure if it looks like murky water or just reflection on the glass?  Then after it was completely finished, I went back in a smeared straight lines to help it look like she was inside the glass instead of out in front.  That was a scary moment but I’m breathing ok now.  🙂

Thanks for dropping by and have a great weekend!

Sugarplums Cherry Emma

Remember the tutorial I did with the waterfall background?  I have finished coloring the character and placed this image on a card.  😀  To finished this project, I went with some Extreme Color Placement and went with another Avatar image.  This project uses the Ivy Swing rubber stamp from Make it Crafty plus a Sugarplums Cherry Emma from CC Designs.

At first I wasn’t sure how I would like the background and was biting my nails through half of it.  But after cropping the image and finishing the card, it actually looks better than I thought!  Ya, that was a bonus!  LOL  I hope you like it and thanks for stopping by today.  😀

Waterfall Tutorial with Ivy Swing

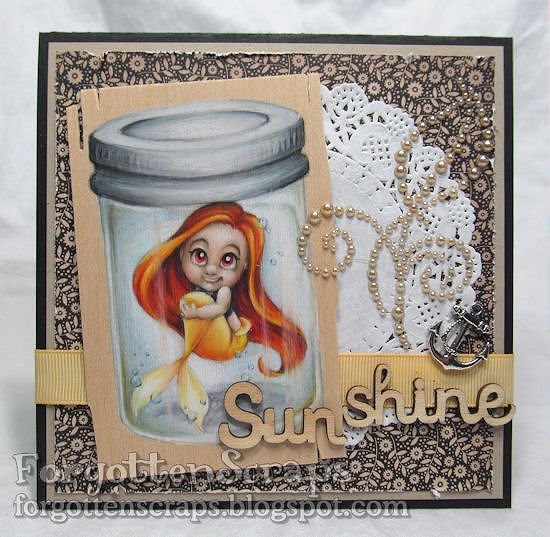
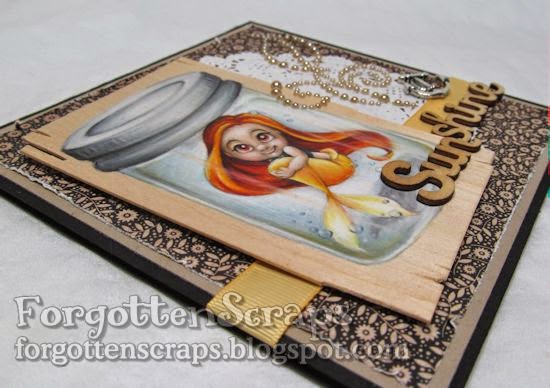
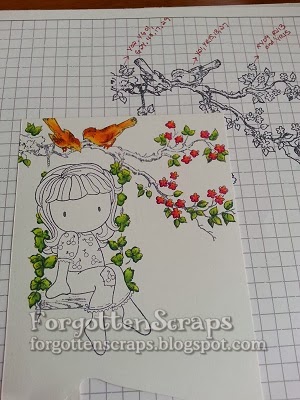
I have a background tutorial that I wanted to share on coloring a distant waterfall on a tropical world, far, far away!  The planet of Avatar to be exact, however, you can use this same technique for a waterfall on any of your projects.  First of all, my project uses the Ivy Swing rubber stamp from Make it Crafty plus a Sugarplums Cherry Emma from CC Designs.  The character was stamped first and masked with a sticky-note then the Ivy Swing was stamped on top of that.  The positioning was tricky but I was lucky this time.

I started with the Ivy Swing and colored the leaves, flowers and birds.  The colors are actually listed down on my paper if you’re able to see them but you’re going to need better eye sight than me at the moment.  LOL  Unfortunately, I don’t have the originals either.   But the tutorial is more about the technique than the colors so you can substitute for the colors that you like.

The next plan of action was to sketch in where the water would be falling.  I looked at waterfall pictures and thought it would be something like this.  Next time I would watch the direction of the splashed a little more but this works for now.  I used a lighter color for this step and will bring in the darker colors later.

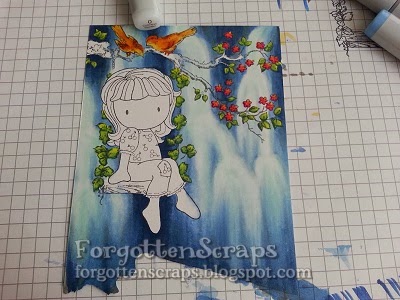
Here’s the darker colors I was talking about!  I went all the way to the darkest color in the spectrum and then I’m going to work back to the lightest color.  I wasn’t sure what I was doing at this point and was starting to get second guesses – I thought for sure I messed it up.

For the next couple of steps, the basic idea is to work from the darker colors into the lighter colors.  I’m not going to worry about blending at this point and I just want to layer in the colors.  I used colors from dark blue, gray to light blue and light turquoise.


The final step was to use the blender pen and the lightest colors to blend in all the layers.  The lower part fades off but when I get that cut off it actually looks better.  That’s the end of the tutorial – the next steps are the finish coloring the character and make a card… to be continued!  But you can find the end of that story on another day!  😀

Henry Claus

There is some exciting news over at Make it Crafty and we’re having a little inspiration hop to celebrate. I’m excited to share that the full range of Make it Crafty rubber stamps is now available for sale direct out of the USA from CC Designs Rubber Stamps!
You’ll be able to order the MiC backgrounds and Characters or as we have done today, mix up your MiC backgrounds with the gorgeous CC Designs characters! You’ll see below that they make a perfect scene when used together.
The MiC range is not only available direct to MiC fans, but will also be available to craft stores through CC Designs. If you would like to order MiC stamps for your store direct from the USA, please do contact Christine for details. If you’re an MiC fan in the USA and would like your local store to carry your favourite rubber stamps, make sure to let them know you’d love them to contact CC Designs for details.
You should have arrived here from the amazing NICOLETTA
Or if you’ve gotten lost you can start at the beginning: Make it Crafty Blog Post.
For this project, I’ve used these three images to make the scene:  

Remember that Roberto’s Rascals Henry Clause counts towards the 
Toys for Tots fund raiser at CC Designs too!
For a chance to win a CC Designs Character & MiC Background, make sure you comment below!
 There are a couple of hidden prizes along the way too!
Your next stop in the hop is the wonderful JENNIFER!
Thank you for hopping along with us today!!

I’d like to enter this into the following challenges:
Brown Sugar Challenge #63 – Anything Goes
Card Crafter’s Circle Challenge #96 – Three Embellishments
Crafts-Too Challenge #4 – Christmas Festivities
The Paper Shelter Challenge #132 – Charm Us
QKR Stampede Challenge #60 – Anything Goes with Circles

Update: I was lucky winner at The Paper Shelter for this project!

Toys for Tots

Welcome to the C.C. Designs Toys for Tots Blog Hop! I am so excited you could join us for the preview of “Henry Claus” and “I want that” which are two new Roberto’s Rascals images to play with.  This is a very special stamp as C.C. Designs will be donating 30% of the sales of these 2 adorable stamps to Toys for Tots from Today October 4th 2013 to December 23rd 2013.  How awesome is that?!  Love it!

You should have arrived from the incredible DELPHINE!
If you didn’t you can start the hop HERE.

For my project I combined a monochromatic look with a no-lines technique and then added a little bit of coloring so the characters would pop out.  There are so many fun things in this stamp but I really wanted to focus on the kids at the window.  😀

Here’s a list of Copic colors that I’ve used:
C0, 1, 3, 4, 6, 8
E27, 23, 33, 21, 41
E49, 47, 44
E70, 71, 74, 77
YG63, 67, 95, 61, G20
R46, 35, 32, 30
R59, 46, 17, 14
W3, 4, 5, 6, 7, 8
B00, 91, 95, 95
BV23

I used the rubber stamp and stamped it in London Gray Memento ink.

This was the perfect themed stamp for me to color as I love the scene and that it’s generic for all types of winter holidays!  Of course, I used a Christmas paper for my color selections so this one is defininatly for Christmas.  He he he  The paper ripping frame was something that “dawned” on my and half way through curling all the edges I had remembered that Jennifer just sent me a project with the same effect.  So thank you Jennifer for the burst of inspiration!  LOL

Your next stop on the hop is the fantastic ELISE!
This is a shorter hop and I know you’ll want to see everyone’s incredible project!  
Thanks for stopping by and have a great Friday!  😀

I’d like to enter this into the following challenges:

Christmas Challenge #93 – Sketch
Sister Act Card Challenge #27 – Anything Goes
4 Krafty Girlz Challenge #3 – Anything Goes
Crafty Ribbons Challenge #64 – Anything Goes w/Ribbon

Itzie Inkies Halloween Candy

I’m wrapping up a few Halloween projects before putting all my extras away for next year. This card was created as a reincarnation of a Gift Bag I never used. I figure it’s easier to store cards than miscellaneous projects.


Main Stamp:
Itzie Inkies Halloween Candy (CCD)
Patterned Paper: Halloween (K&C)
Copic Colors:
-cat: W1. W3, W5, W7, W9, R21
-clothes: R22, R24, R27, R29
-other: YR12, YR16, YR18

Did you know? Velvet is a type of woven tufted fabric in which the cut threads are evenly distributed, with a short dense pile, giving it a distinct feel. It is woven on a special loom that weaves two pieces of velvet at the same time. The two pieces are then cut apart and the two lengths of fabric are wound on separate take-up rolls.
[Velvet, Wikipedia.org]