Far Away Castle

It’s my week to choose the theme at Make it Crafty and we wanted to challenge you to “Void the Warranty” or in more common terms, to think outside the box!  Take a second look at your products and see what you can do differently… use half of a ribbon slider as a tag, color a summer scene to look like winter, use a tool as an embellishment or even as simple as recycling something you normally toss out.  I think I’m guilty of falling into a rut more often than not and this type of thinking allows me to pull myself out and try something new.  Who know… maybe you’ll be starting a new trend with your ideas!!

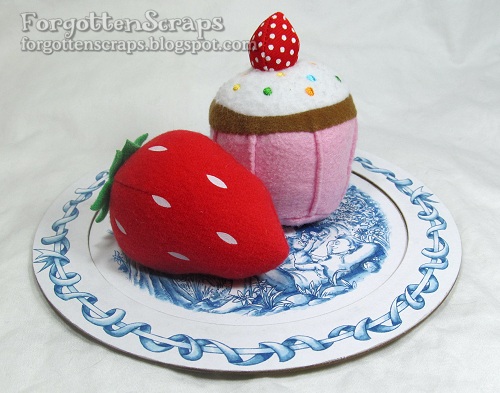
For my project today, I tried a couple things that I normally don’t do.  The most obvious one, perhaps, is the way I colored my image.  I normally use a lot of colors but this time I only used three… B21, B34, B45 and the Blender marker.  Plus I printed the image out in blue instead of black ink.  Before I printed it, I merged my images together, including the ribbon border – all of them are from Make it Crafty.

Specifically, here are all the fabulous Make it Crafty products used on this project:

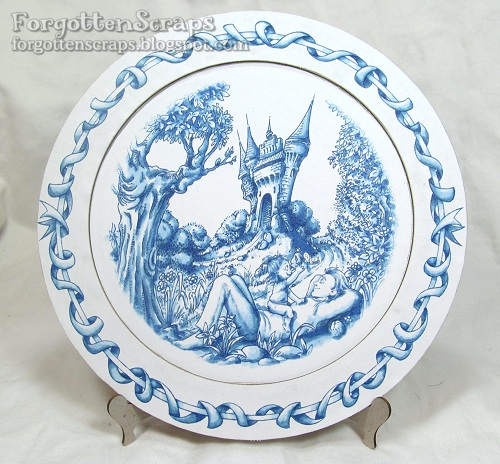
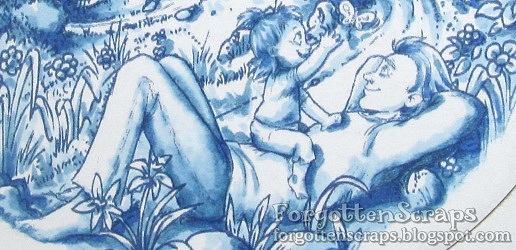
The center is merged from three images (Far Away Castle, Daddy & Lucy Butterflies and at the very front-bottom is the Pebblestone Path).  However, what you may not recognize is the border which was created from the Ribbon Swing.  I used the ribbon-ropes four times and “snapped” it into a circle shape using Adobe Photoshop.  This border technique is in reality altering the stamp so make sure you know which companies allow for that.

My goal was to create a project that resembles the blue and white porcelain dishes.  I have a small collection of egg cups (representing the countries I’ve traveled) and one is an authentic Royal Copenhagen “Blue Fluted” pattern that is my favorite.

That leads right into the next “outside the box” idea I used which was to use the Shadow Box Circle Frame Kit as the base of the plate instead of as a shadowbox.   That was simple enough and I only used the two flat round pieces that come in the kit.  From that point, the project was simple – print in blue, color blue, cut out and paste on the chipboard.  Done!  However, I couldn’t resit taking a picture with some felt play-food to give the full effect as the final touch.

The Stolen Kiss

I have another project I wanted to post this weekend for some inspiration.  It’s actually a project I did back in February for Valentine’s but never got around to sharing it until now.  Also, I’m still in the middle of income taxes so this post will be equally as short as yesterday…. after all, they say a picture is worth a thousand words?  Then that means I’ve tallied up 2,141 words today!!  LOL

The image used on this is Le Baiser Volé also known as The Stolen Kiss from Little Miss Muffet Stamps.  It’s a vintage Victorian style so I decided to add odds ‘n ends to the project too – such as film strip, clock, bingo-type card and even lace adds to the feel.  Oh… and sewing too!  He he he 

Hope you like it and have a great weekend!

Taylor and Cozy Café

We have an inspirational day at Little Miss Muffet Stamps and I’ve created a project using some of the stamps released last week plus one that fit perfectly into the scene.  This scene idea was actually thought up by Zoe and I’ve wanted to put it together ever since she told me.  😀   

This scene uses two rubber stamps from Little Miss Muffet Stamps…

I was able to use some old paper that I’ve had for a while and I’m going to be excited when I finally use the rest of it too – which is my goal for this week.  😀  I think I have enough for one or two more projects – the black and white striped pattern paper is my favorite and so I tried to color the chair cushion with the same pattern.

I wish I had more to add to this post but I’m in the middle of calculating my income taxes this week so I’m short on time.  I hope you’ve enjoyed my project today and have a great week! 

Melody

I have a little twist on the theme for this week at Make it Crafty. The theme is Wonderland and I’ve taken two images that normally wouldn’t be paired together and used them on the same project! I figured this could be one of the times Alice went to Wonderland and ate something to make her small which resulted in her finding these lost goggles. I could happen right? Anything can happen in Wonderland. LOL

The images I used on this project are the Steampunk Goggles digi stamp, Melody rubber stamp and also the Ornate Corners Two chipboard, all from Make it Crafty.

The goggles in the background was a digi I printed off and colored long ago and the girl in the front is a rubber stamps that I’ve been wanting to color for a long time. So old meets new, Steam-punk meets retro and everything else in between. The papers and embellishments were selected at random but the large ticket tag was added as the last minute to help the foreground image stand out more.

Here’s a close up of Melody and I had a little fun coloring her face with a button-nose. I’ve struggled with how to color the noses on this style girl but I think I’ve figured out something I’m happy with. I’ll try it again on the next one and see if it turns out just as cute. 😀 Thanks for coming by and checking out my project – hope you’ve like it and that it’s given you some ideas on your next craft day!

Betty Dorm Mouse Tea Party

Today is the third and final day of the combined release with Simply B Stamps and Little Miss Muffet Stamps and we have lots more inspiration and games for today!  If you’re just joining in on the celebration be sure to check out the details at the LMMS Blog or SBS Blog which is also where the two games will be hosted today – Guess Who (at SBS) and a Scavenger Hunt (at LMMS).  My project is in the Scavenger Hunt and I was in charge of all the clues too.  😀 

(Create your own at http://www.festisite.com/)

I thought about a Rubus, like the example about, but I took the easy route and gave you picture clues!  You can start the game HERE with instructions on how to leave your Scavenger Hunt answers on the LMMS Blog and you have until Wednesday, April 10th to participate.

As you already know, this release as many images!  So for this card, I used elements from the following combination packs to create this scene.

There are so many combinations with the Tea Party elements and I love what I’ve seen from the DT and Guests.  They’ve done a fantastic job and very creative too!  I experiments with stacking the tea cups in several different configurations and yesterday I saw one with the saucer plates that was adorable – wish I had throught of that one!  LOL  However, this is what I was able to come up with and even merged one of the Skull and Crossbones onto a cup for that Simply Betty twisted touch.  😀

If you read my tip from yesterday, you’ll also notice the shadows on this project too.  The ones cast by the sugar cubes is from the Copic BV20 marker so that will give you an idea of how light the color is so it won’t be so scary to use.  It’s easy to blend out if you don’t like it too.  ;D  Then the darker shadows are from BV23.

Thanks for coming by today and we hope you’ve enjoyed all the inspiration this week!  You can find all the new images in the What’s New section at Little Miss Muffet Stamps or in the New Items at Simply B Stamps.  These Tea Party elements are priced just right and the combo packs are even offered at 75 to 85% off!  So pick them up while you can then show us what you create in the “Anything Goes” challenge at LMMS.  😀   Cheers!

Betty in Wonderland Tea Party

Welcome back to the Mad Tea Party Release with Simply B Stamps and Little Miss Muffet Stamps!  If you’re just joining in on the celebration we have a 3-day event with games, sales/discounts, prizes, a freebie, a blog hop, tutorials and lots of inspiration!  This is one event that you don’t want to miss out on!  😀  Check out all the details at the LMMS Blog or SBS Blog.  This is Day 2 and today we’re sharing tips, tutorials and inspirational cards.

My project today combines images from both companies to create a generic Birthday card.  Along with chipboard from Make it Crafty, buttons/flowers from Stampin’ Up and a zipper from my local craft store, here are the elements I merged together to create this image …

My tip I wanted to share today was about casting shadows.  I’m starting to get more brave when coloring in shadows and I think it’s something you can do to… the hardest part is taking the first plunge!  On this image here I’ve used Copic color BV23 and sometimes I’ll use BV25 if I don’t think the shadows is showing up.  However, you can start out with BV20.  When applying shadows I try to remember when my light source is coming from then I draw the shadow (no blending needed) where needed.  This is done after I’ve colored my entire project.  The purple-gray color seems to overlay on other colors well without standing out too much.

That’s my inspiration and tip for today and I hope it was helpful and inspiring.  😀  Next you can head back over to the the LMMS Blog or SBS Blog and check out the other gal’s fabulous creations!  Thanks for coming by today and I hope you’ll take the plunge and try shadows on your next project!  😀