Gazebo Overlook

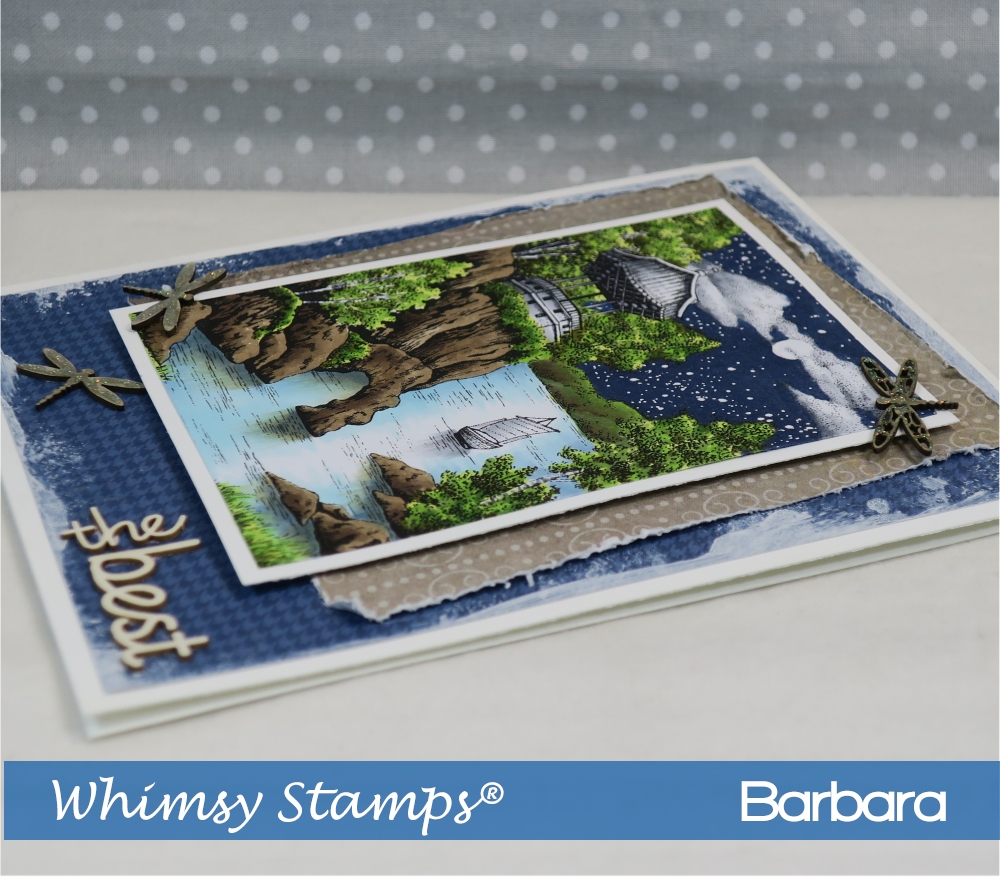
For my project today, I’ve used Gazebo Overlook by DoveArt for Whimsy Stamps. When I started out, I had a bunch of ideas on how to make the scene stand out but the one that I wanted to try out the most was a night time sky. So that is what I started with.  It might have been better to leave that until last because once I got that dark blue on there, I had trepidation that this wouldn’t work out.  But I persevered and the final image came out.

These are the Copic colors I used on Gazebo Overlook:
C1, 3, 5, 7, BV23
B39, 000, 91, 93, 95
YG97,67, 63, 23, 21
E47, 44, 43, 42
white gel pen
This and other Whimsy Stamps are also available at Little Miss Muffet Stamps.

Bunny Picking Flowers

It’s new release week at Whimsy Stamps and today I’m showcasing Bunny Picking Flowers. I have also used the Shaker Maker Rectangle Die Set for the frame in the middle and Pinwheels Stencil in the center.  Even though it’s a bunny card, I wanted to make it generic so I went with this soft color pallet that included lots of neutral colors.

The Copic marks I used on Bunny Picking Flowers are:
E41, 42, 43, 44
BG11, 15, 93
YG21, 23, 63
Y35, YR31, 30
 

For the sentiment I used Make it Crafty chipboard embellishments. I left them naked since it seemed to go well with the papers and color theme and I didn’t want them to stand out more than the bunny. With the darker edges from cutting, I think it works out well.
 

Unicorn Framed

Welcome to the April release from Whimsy Stamps! This is Day 1 and I have a project that features the Unicorn Framed rubber stamp. In the background, I’ve also used the Swish Stencil with white gesso because I wanted a horizontal elements but didn’t want to use ribbon, which I typically use.

Here are the Copic markers that I used on Unicorn Framed:
C3, 1, W8, 6, 4, 1, BV23
YG21, 23, 63, G94
YR30, 31
BG57, 15, 10
 

My goal for this card was to see if I could create a boy-themed card even though the image was a unicorn. I have a hard time deciding but maybe it works for a younger boy.  Some of the things that I thought would help was boy-themed paper, metal star embellishments and a black horn instead of pink or yellow.  I tried to stay away from ribbon or circles but in the end I added a little glitter to the horn and border just because a unicorn IS magical, right?!

Fairy and Her Bunny

This is Fairy and Her Bunny from Whimsy Stamps and I have a picture tutorial on how I colored her face. This fairy has been colored wonderfully in so many ways that I had a little trepidation starting. But I thought some pink hair would help me out and decided to get started nonetheless. The tutorial shows how I colored this fairy and I use the same techniques on all the faces that I color in this way. Hope you enjoy it.

Thanks for those asking for a tutorial. It’s nice to know what is helpful to show and what isn’t. 😀 So this is how I color a face when I give it larger eyes. I first define the features with the skin tones, then add the pupil, shading and finish up with a white gel pen. The face doesn’t really sparkle until the white is added so keep pressing forward to the end.
(Click on the photo for a larger view.)

These are the Copic markers I used on Fairy and Her Bunny:
E30, 31, 35, 0000, R12, B01, 69, 05, C3, C1, E49, W8, BV23
E04, RV14, R21
BG93, YG11, G21
YR30, 23, Y35
B52, 01, 00, 000
YG63, 17, 99

For the wings, I didn’t color them and made sure to color the clothes and hair under them. Then I used a glitter pen to color the wings and the white gel pen to make some highlights. I also used the glitter pen on the “Hello” sentiment, which is a Make it Crafty chipboard embellishment.

Polly

For my project today, I’ve used Polly rubber stamp from Whimsy Stamps.  I did a little creative color placement on her face to define it more and give her larger eyes.  The paper I selected only had yellow so I tried not to pull in too many other colors.  Making her outfit black and white helps draw attention to her head, rose and envelope.  Then I also kept the accessories and paper toned down.

These are the Copic markers I used on Polly:
E0000, 000, 21, 33, 35, BV20, R11
YG01, 23, 97
C1, 3, W8
E47, 08, 19, YR14
YR24, 23, 31, 30, Y23, E23
W9, 6, 5, 3
BV23
This and other Whimsy Stamps are also available at Little Miss Muffet Stamps

I’ve added details to the face and gave her larger eyes. 
As a comparison you can see the before and after of her face. 
These characters are adorable and I love the added color in the eyes.

Farmhouse Shiplap Background

For my project I used and colored the Farmhouse Shiplap Background from Whimsy Stamps. I wanted to go for a re-purposed look so I colored the planks different shades of gray, brown and even one or two of them blue. I also added seams with nails.  I thought the background was good enough for a card so I skipped coloring a character to put on top of it.  I simply added a few odds and ends to create this fun maze card.

Here are the Copic markers I used:
W2, 3, 4, 6
E00, 31, 35, 43
E42, 43, 44
B91, W6, 4, 3
T4, 3, 1
C8, 7, 3
BV20
0.2 Multiliner and white gel pen