
Here’s a tip for cutting around images without leaving a white border. It can be difficult to cut tightly around the image and consistently stay just on the outside edge of the image. However, once the image has been cut out, mistakes can be hidden by drawing around the cut edge with a small black marker. Also, lines that have been cut in too much can be drawn back and white spots can be “erased” in areas that the scissors couldn’t reach.
Tag: … Tutorials and Tips
Tips, Tricks & Techniques 0x017
When embossing with the Spellbinders’ Nestabilities die templates it is not necessary to reposition the paper on the flip side of the die. In addition, embossing can also be done with a stylus in lieu of running it through the press machine. Either technique will achieve an even embossing border without a fuss. Personally, I like to use an embossing stylus which gives me a good depth of embossed detail.
Tips, Tricks & Techniques 0x016
Paper-piecing is a fun technique but sometimes a single piece layered on the image looks out of place. I have a tip that might help camouflage the layering. When cutting around the outline of the paper-pieced section, I take into effect how the image is suppose to look if it was 3D. If that line is naturally behind or underneath another part of the image then I cut just inside the line. When it’s suppose to be a higher part of the image, then I cut just on the outside of the line. After placing the piece on the image, this technique will help the mind better interpret the image in 3D.
Tips, Tricks & Techniques 0x015

Here’s a simple solution for displaying cards in your hobby room and it will work on any smooth vertical surface, including cupboards, doors, windows and walls. I had four plain hutch doors above my work area and mounted eight rulers; in all, I can display up to sixteen cards.
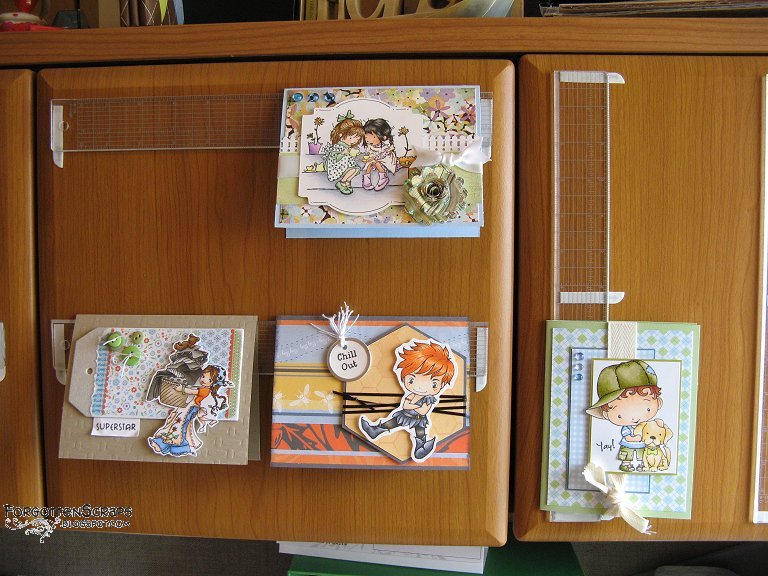 For this project, the supplies needed are acrylic rulers and 3M Command mounting strips (removable double-stick foam strips). I cut the Command strips lengthwise, and mounted the rulers with one half on each end. In the center of the vertical rulers, I added an additional half strip so the top card wouldn’t slide down. Voila!
Tips, Tricks & Techniques 0x014
Cutting off the unwanted areas on a stamps is probably an old-hat by now, however, here are a few tips that might help anyway. When cutting cling-mounted rubber stamps, keeping the paper backing on while cutting will help the scissors make a straighter cut through the foam and gives the stamp a cleaner edge.
As for cutting, I prefer to make cuts vertically straight through the rubber and foam. However, I know some like to cut angled outward so the foam base is slightly larger than the rubber. Either method will help achieve a clean stamped image. Just be wary of cutting inward on an angle (where the foam is smaller than the rubber) which might cause a slightly blurred edge when stamping. For this reason, I also make short straight snips with the scissors and avoiding longer curved cuts.
Most stamps are round or square in shape and therefore are easy to cut around. However, concave areas, areas that curve in or are hollowed inward, are the most difficult to get to. In this situation, instead of making a curved cut with the scissors, I’ve found best tool is a hobby knife or Xacto knife. This allows me to finish cutting those areas while still preserving the clean straight edges that I aim for.
Tips, Tricks & Techniques 0x013
Didn’t quite have enough decorative paper to paper-piece with? Don’t sweat it! You can always cut out the center area that will be covered over with other layer. I use an Xacto knife or paper trimmer to get to the center without cutting the edges. Then once the card is all finished no one will know the middle is missing!
