Cleopatra in the Ancient Egyptian City

Make it Crafty this week is having a “Walk Like an Egyptian” theme which matches perfectly with the latest release.  If you haven’t seen all the fun images you need to check them out! I’m joining in on this week for fun because I was lucky enough to have two projects using those image and wanted to share them both.  This time I created a journal page.

Many time on my journal pages I color the background and the characters separate.  Then I cut out the characters and place them on the side of the image or next to the background image.  However, this time I wanted Cleopatra to be standing in the center of the action and didn’t feel like fussy cutting.  So I merged the images before printing then only had to fussy cut part of the character. 

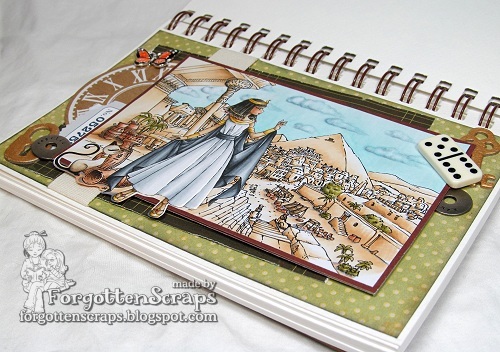
On the journal page, I switched things up a bit and add my ribbon vertically instead of the traditional horizontal.  I think it helps with the illusion of the pillars being tall but in reality, it just looked better to me.  😀  Then the rest of the embellishments were grabbed here and there and added.  Not sure that there is much meaning into it other than my thought process was … old, Egyptian, collections, then trinket box.  Does it work?!  LOL

The sky was colored with blues then I went back in with grays and darker blues to color in clouds.  Finally the blender marker was used to take away those colors in the clouds and this is the effect that it creates.  They’re kinda fluffy looking and I liked how they turned out.  It was pretty easy so I’ll be trying that again!

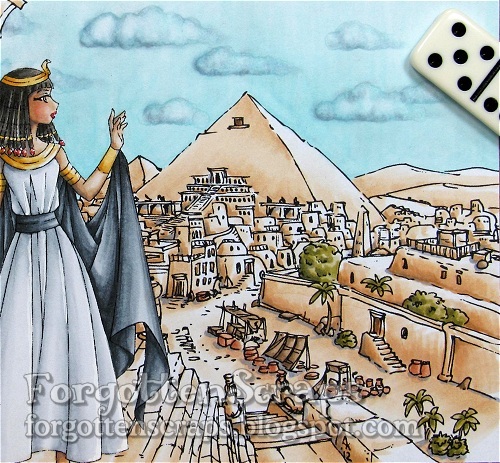
I debated how to color the city and finally decided to color it all the same to look like sun-bleached sand on a dry desert day.  Then I added some shadows with BV23 and a little color here and there on the greenery, baskets and market stands.  For the most part, the sun is shining down from the upper right corner of the image so I could have Cleopatra’s face stand out more.  This was a different spot from where I normally put the sun (upper left) so there are a few mistakes – lucky for me, none of them stand out.  he he he

I was able to contrast Cleopatra in a white and black dress with lots of gold.  Compared to the town, I really wanted her to stand out like royalty would have.  The dress uses cool gray colors and I used warm grays for her hair.  The shadows were added with BV23 which seems to be working out with most colors.

This project was colored with Copic Markers on printer paper.  Thanks for checking out my project and I hope this has given you some inspiration to play along with us this week!  Here are the images I used…
Make it Crafty Images:

Jackie and the Egyptian Pyramids

Come join the celebration with a combined release!!  Make it Crafty and Tiddly Inks have joined together to bring you an Egyptian theme!!  Everyone has done a fabulous job with their projects and you don’t want to miss out on the games with lots of prizes too.  You have arrived on Day 2 of the hop and for all the details on the hop visit the main site HERE.  But before you go, check out this project…

For my project I merged together Jackie and Jackal from Tiddly Inks with the Egyptian Pyramids in the background from Make it Crafty.  I brought Jackie up into the foreground because I really wanted to focus on her and get some details colored in her face.  Then I also wanted to do something different in the background and settled on a pink sky instead of the traditional blue.

For the card I didn’t want to add too much to distract from the main image so I found a good decorative paper that worked out to take the place of embellishments.  Then I added a clock face to fill in an empty space and some ribbon to complete it.  Oh, and yes, I had to use the sewing machine around the border too.  ;D  Here’s the image up close…

Thanks for dropping by and I hope you’ve enjoyed my project!  If you haven’t already you’ll want to be sure to hop around and check out what everyone else has created too!  Remember, this is Day 2 of the hop and for all the details on the hop visit the main site HERE.  See ya later!

Sonny Honeycloud Poetry

Check it out we have new releases over at Little Miss Muffet Stamps and tons of fabulous projects showing up over at the Little Miss Muffet Challenges Blog!  There are many new rubber stamps added to the store and today we’re adding three more!!  The DT gals and I are also featuring images from the last release and you can see them all in the What’s New section at LMMS.

For my project I used Sonny Honeycloud Poetry rubber stamp and paired her with the Party Banner Diecut, both from Little Miss Muffet Stamps.  Then the sentiment is Just Wanted to Say from Make it Crafty along with the chipboard embellishment.  The layout of the card is actually CASE’d from Mary J who created a beautiful birthday card.  Thanks Mary for the inspiration!

I have loved using the rubber stamps lately because I can stamp them in brown and/or choose my favorite papers to color on – I think the colors are coming out so much more vibrant and I can spend a little more time on the details such as the shadows and the texture on her sweater.  

This was one of my favorite Pollycraft images and one of the first ones I picked out – I love reading and actually just got another book from my sister that I can’t wait to get started on!  Anyway, I hope you’ve enjoyed the inspiration and I hope you get a chance to check out all the other projects from the DT – you can see them at the LMM Challenge Blog.  😀

Elizabeth J

Happy Monday Ya’ll!  I wanted to pop in today and share my project on the Make it Crafty Blog for this week using Make it Crafty chippies to convert sweet Elizabeth J into a sparkling faerie!  In addition, I’ve taken on the extra challenge for this week and put away my Copic markers to bring out the Prismacolor Pencils for the Kraft challenge.  However, hold on, my one-up actually doesn’t count since the bonus challenge *IS* to use Copics on Kraft paper!!  Yikes – maybe I need to get more sleep.  LOL  Anyway at least I have the faerie portion working out for me… and for you too  since I can still share my project!

For this challenge I selected to use Elizabeth J from Make it Crafty and add the Fluttering Wings chipboard embellishments (also from Make it Crafty) to convert this gal into a butterfly faerie.  To do this I colored my image first then used a hobby knife to cut around both her left and right side.  I was careful to stay on the outside of the line so the black line-art would still be noticeable later on.  I frequently checked with the wings to see how far I needed to cut then added an extra half-inch so I wouldn’t rip the paper.  Also another helpful hint, if you are using diecuts to cut the shape around the image, make sure you do that before inserting the wings.  That way the image will be flat when going through the diecutter.

The wings were painted with acrylic paint daubers, a type of metallic white, and then set off to the side to dry until I had finished the rest of the project.  Once the wings were dry, I inserted them into the side slits (that were cut from before) and then taped them down from the back side of the paper.  The chipboard embellishments are thin enough that it didn’t cause any problems when I layered it onto the scalloped oval but that’s still something you’ll want to watch out for depending on where they are in relation to the edges.  But not to worry – nothing that a lot of glue can’t handle so you’ll be fine!  LOL

Lastly I have another project from my crafty daughter who also wanted to use the Fluttering Wings chipboard embellishments on her project.  By placing the wings off to the side of the sticker, her project came together much quicker than mine.  Which gave her plenty of time to convince me that she could use the sewing machine!  She’s been getting better and better with the sewing after making a small quilt and a doll blanket with Grandma.  😀

Thanks for checking out my project and I hope this has given you some inspiration to play along with us this week!  Also make sure you visit the Make it Crafty Blog and check out everyone’s projects – you’re going to love them!!

Frenchie Claudine

We’re having a Valentine Blog Hop with Make it Crafty and if you haven’t started at the beginning be sure to back up in this hop and check out everyone’s projects because this is the end!

You should have arrived here from the incredible STEPHANIE!!

For my project I’ve merged Frenchie Claudine with the Fair Carousel which are both from Make it Crafty.  Plus I one of the chipboard embellishments up in the corner from Fancy Ribbon Sliders that I thought would be fun as a type of “tag” sticking out the corner.  Did you notice the red stitching!!  Boohya!  What you didn’t know was I’ve only had one bobbin spool for my sewing machine until today – now I’m setup with four and spooled the first one with red thread!  😀  Yea, I’m excited for that – thanks Mom!!

Ok, so like I mentioned before, I’m the last on the blog hop but here the complete list so you can make sure you’ve seen all the awesome Valentine projects today!

Our Guest – Emily
Barbara {here}

Thanks for dropping by and be sure to leave a comment as there are 6 hidden prizes across the blog hop each PLUS you can use the coupon code VAL10 to get 10% off ALL digi stsamps (valid until Monday 11th).   Have a great weekend!

Crackered Elf

It’s been a bummer of a day but this image gives me a little bit of a smile and thought I’d share it with ya’ll.  I know, I know, it’s Christmas – but hay, it’s never too early to start on those holiday cards!!  And this one is almost perfect for mailing since everything (well, except the flower button) is actually flat and will therefore go through the mail easily.  Has anyone noticed the mail has it’s definite “mood swings?”  I think December and January are the worst but things quickly get back to normal, as with everything else. Anyway, let’s get to the happy project!!

The image is Cheeky Elves Collection from Make it Crafty and these cheeky elves are super fun to color.  This is the third one I’ve posted out of three and I used the same color scheme on each of them – going for the muted cheery colors. 

Rather than use papers from my holiday collection, I’ve gone for more of the muted manly color.  Then there is a splash of color through the reds/yellows that brings it to life.  Hopefully it says merry and cheer and will bring a smile to the recipient.  😀  Thanks for dropping by and I hope you have a great week!