Sailboat of Dreams

Welcome to the first ever Little Darlings Blog Hop by Love to Stamp! You should have arrived here from Myrna, however, if your just joining in, you can always start at the Little Darlings Challenge Blog. There is even sweet blog candy up for grabs and a contest that runs until June 8th with prizes!


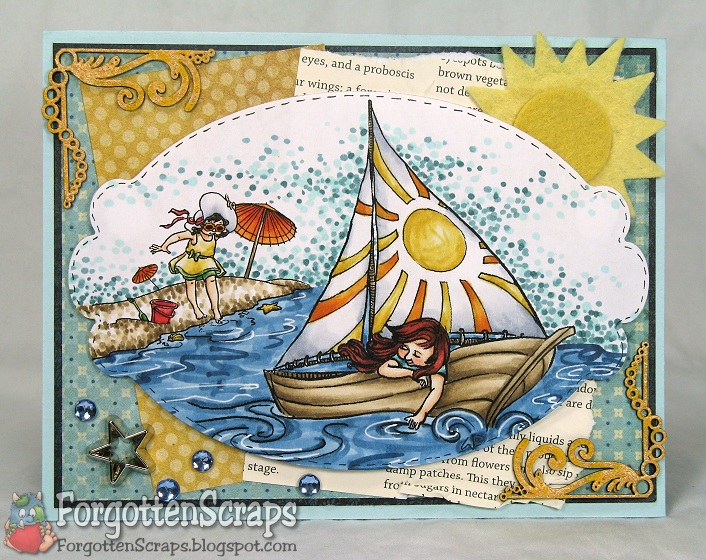
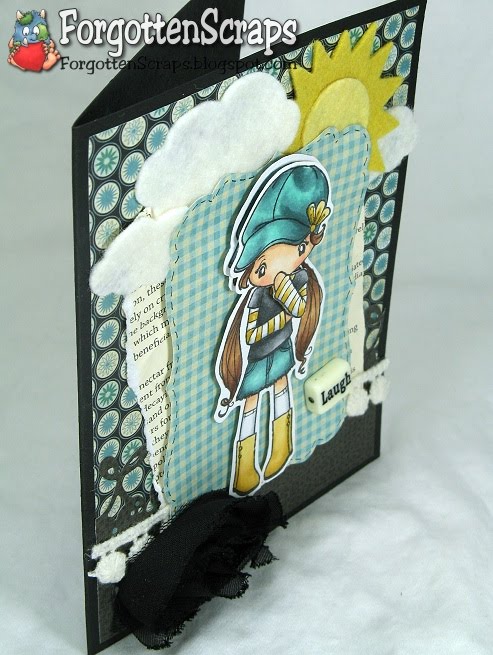
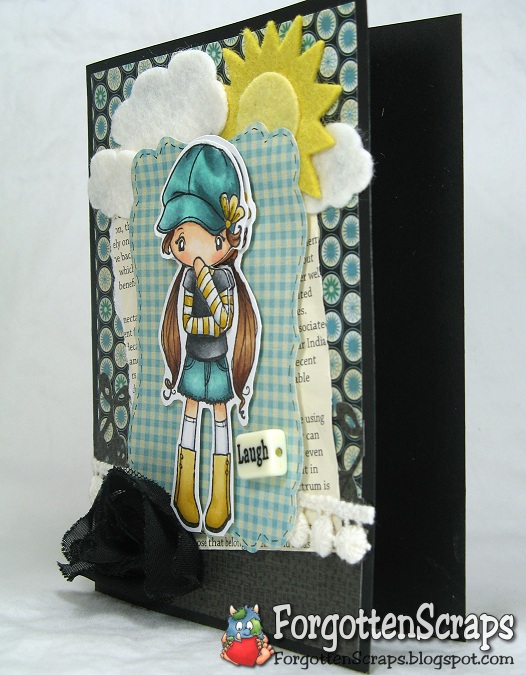
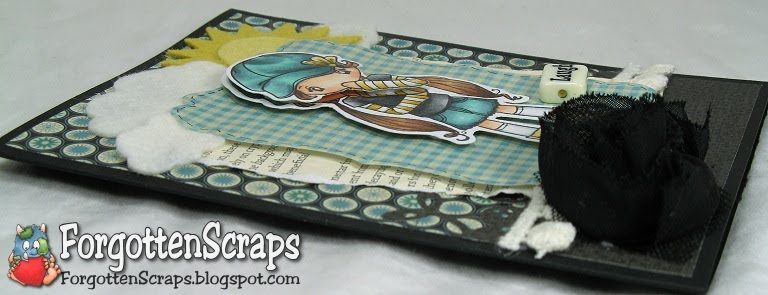
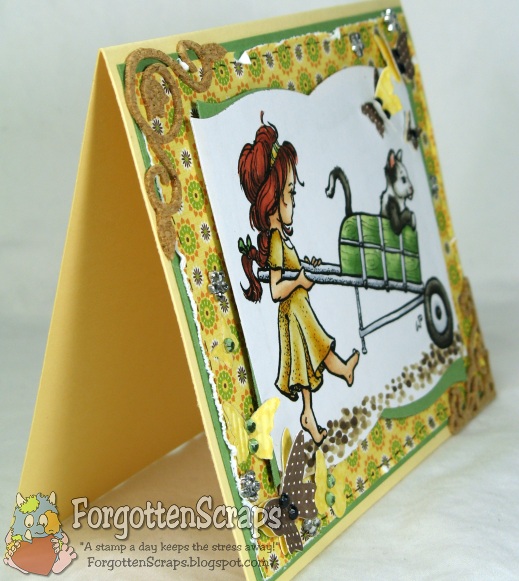
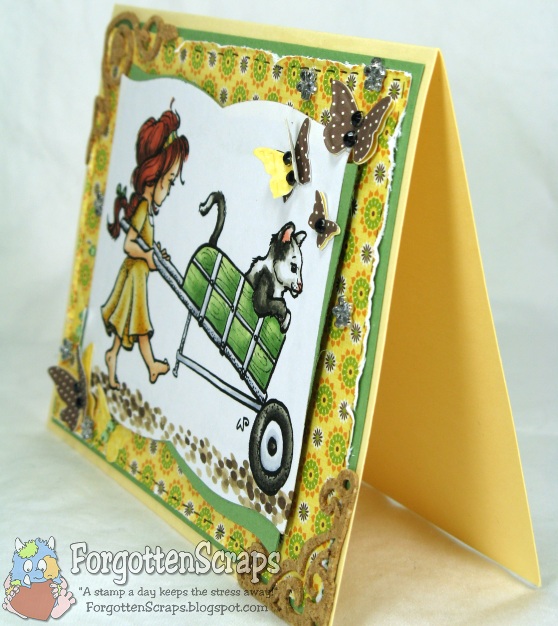
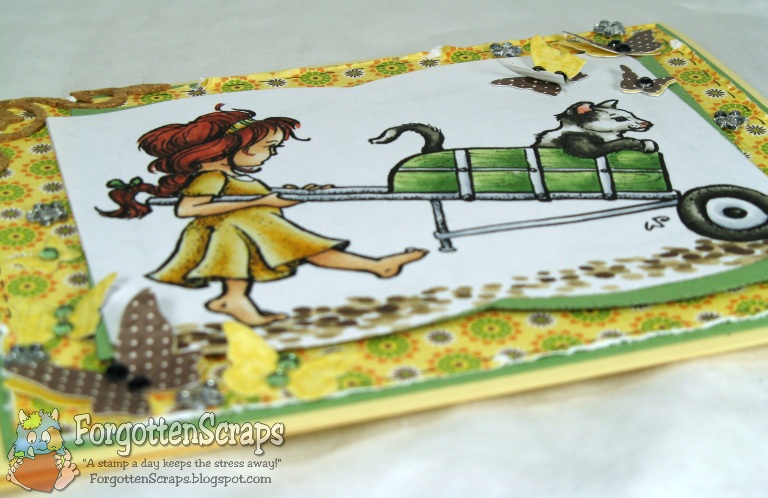
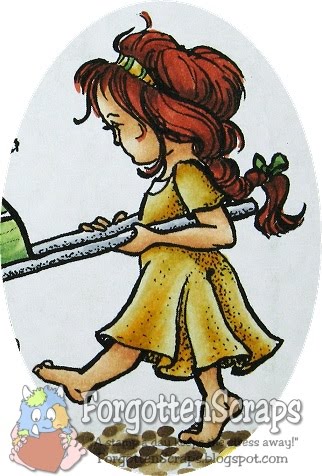
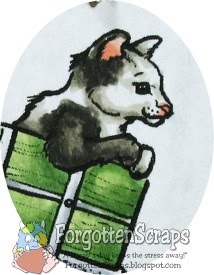
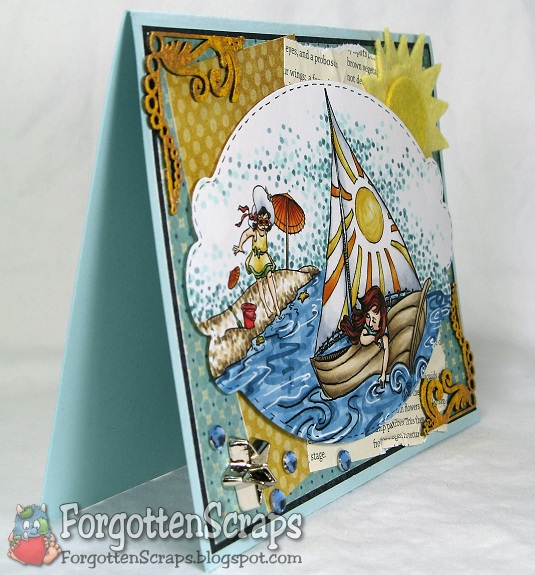
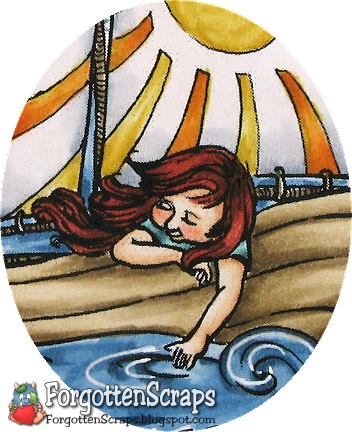
For this card I used Sailboat of Dreams and had to place Testing the Waters behind her to create a scene! I colored the water quickly with all the blues in the B90s range then went back in with a white gel pen to give it some highlights. I wanted the effect to look a little chaotic like water usually is.


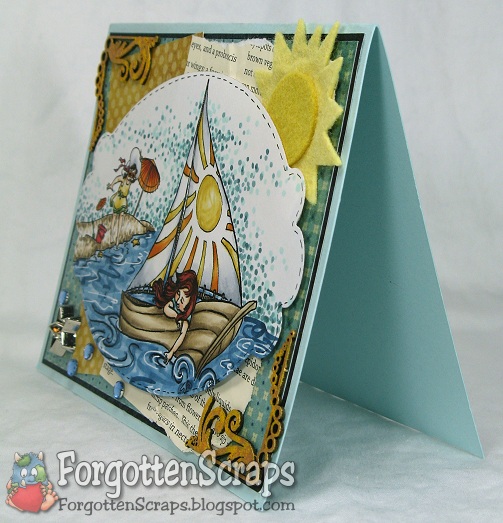
I used another felt sun, mainly because it was left over on my desk, but also it just seemed to fit. ;D The corners are new laser cut embellishments from Make it Crafty that I just got in the mail so of course I had to use them! They’re covered with yellow and gold acrylic paint. (Supply list below.) Hope you like it!


Remember there will be a candy offered on the Challenge blog for those who complete the hop, so leave a comment for a chance to win the Love to Stamp Blog Candy!

Your next stop on the hop is our special guest, Sandie!

I’d like to enter into the following challenges:
CES Challenge #36 (on holiday)
Creative Cowgirls Challenge (anything goes)
Stamps R Us Challenges (anything digital)

DT Hop: Little Darlings Blog Hop
Main Stamp:
Sailboat of Dreams (LTS) and Testing the Waters (LTS) [digital versions]
Patterned Paper: Stella & Rose Hattie (MME)
Chipboard: Swirly Corners (MiC)
Adirondack Acrylic Paint Dabber: Gold and Sunshine Yellow
Metal Die: Spellbinders Nestabilities Labels Ten

Copic Markers colored on Copy Paper:
-skin tone: E000, E00, E11, R11, R12
-browns: E41, E42, E43, E44; E07, E09, E18
-reds: R21, R24, R29
-oranges: YR12, YR14, YR18
-yellows: YR30, Y21, Y26

-greens: YG61, YG63, YG67
-blues: B91, B93, B95, B97, B99; BG70, BG72, BG75, BG11
-grays: 0, C1, C3

Did you know? The CSI effect, also known as the CSI syndrome and the CSI infection, is any of several ways in which the exaggerated portrayal of forensic science on crime television shows such as CSI: Crime Scene Investigation influences its public perception. The term most often refers to the belief that jurors have come to demand more forensic evidence in criminal trials, thereby raising the effective standard of proof for prosecutors. Although this belief is widely held among American legal professionals, several studies have shown that crime shows are unlikely to cause such an effect.
[CSI Effect, Wikipedia.org]

Update: I was a top pick at Creative Cowgirls for this challenge!

Miss Anya Hats Off

Today I’ve got some exciting news to share AND a give away! I made this card using one of my favorite characters from The Greeting Farm, Miss Anya, which is part of the trio set Miss Anya Hats Off. How would you like to win this very set? Read on for the details. ;D


Today I was featured in The Greeting Farm‘s newsletter and because of it they have generously offered this 4×6 set as a freebie!! The newsletter features my paper expirements, The Paper Project, plus there are previews of their new releases! So if you haven’t received it yet, head on over and sign up for it.

** Give Away Details **

Here’s the details – For a chance to win this set, all you have to do is leave a comment on THIS post! You have from now until this Wednesday night at 11:00 pm Central Time and a random winner will be posted on Thursday! And speaking of freebies – you can also head on over to Little Miss Muffet’s Challenge blog for some delicious Blog Candy!


I started this card over at my Mom’s house and snatched up some of her paper scraps – I loved the blues and blacks she was working with and I couldn’t resist. ;D So when I got home I finished it up with some felt embellishments and a cheery yellow sun for contrast.


When I started stamping Miss Anya I was working on an uneven surface so I didn’t get the whole image. Then thinking I could get the better of my work desk I tried it again in the same spot pressing harder – but this time I ended up with the other half of the stamp missing! LOL Little did I know that my stubbornness to clean off my desk would eventually lead to this enjoyable technique of raising a portion of the image with foam dot – unfortunately, I haven’t a clue what it’s called but I love the effect! ;D Her hat, head and fore arm were raised.


I’d like to enter into the following challenges:
Crafty Ann’s Challenge #40 (happy birthday)
Joyful Stamper Inspire Me Fridays #6 (anything goes)
Stamp Something Challenge (anything goes)
Craft Us Crazy Challenge #8 (favorite embellishment – felt diecuts)
Rainbow Lady’s Challenge #152 (texture – felt)
Main Stamp: Miss Anya Hats Off (TGF)
Patterned Paper: scraps
Metal Die: Spellbinders Nestabilities Labels Seventeen, Magnolia Doohickey Cherry Lace Border, My Favorite Things Die-namics SunShine and My Favorite Things Die-namics Cloud Trio

Copic Markers colored on Georgia Pacific White Card Stock:
-skin tone: E00, E11, R11, R12
-browns: E33, E23, E27, E29
-yellows: YR31, Y32, Y26
-blues: BB70, BG72, BG75, BG11
-grays: 0, C1, C3, N2, N4, N6, N8

Did you know? A beanie is a head-hugging brimless cap with or without a visor that was once popular among school boys. However, a tuque is a knitted cap, originally of wool though now often of synthetic fibers, that is designed to provide warmth in winter. Most tuques are tapered; they sometimes have ear flaps, and may be topped with a pom-pom, this style of tuque is sometimes referred to as a boggan or sherpa. Tuques may have a folded brim, or none, and may be worn tightly fitting the head or loose on top although the latter is considered more standard.
[Beanie and Tuque, Wikipedia.org]

Maya Making Wishes

Welcome to another day and a new challenge with Make it Colourful! This week we’re challenging you to color with the “dotty” technique, also known as stippling or pointillism, depending on the application. Check out the challenge post for a tutorial link and come play in the challenge this week!


I used two images on this card, the foreground being Maya Making Wishes from our sponsor this week, Chrissy’s Art ‘n Heart, and the background is Forest Flowers from… yep you guessed it, Make it Crafty! I loved how these two images came together to form a common theme.


I used the stippling technique on the ground to create rocks and again around the images to help give the illusion of a sky. I always start with the darkest colors and work my way to the lightest, then go back with some of the darker colors for more depth. On the sky, sometimes I like to give the image a uniform “glow” all around, however, this time I kept it sporadic on purpose to help with the fantasy look – like it’s got a mystical energy to it or sprinkled fairy dust. LOL


As you might have noticed, I gave it another go coloring raindrops. It’s my THIRD attempt however I’m not sure if any improvement was made towards the true challenge. I originally started with an all Copic technique, however, being a gluten for punishment and foolish use of plain copy paper, I had to finish each raindrop with a black liner pen and white gel pen. It really helped define the edges better and it matched the two raindrops that were already on the image.


Because the images were already busy with color I used solid ribbons to embellish the card and help tone down the business. Plus I have somehow accumulated quite the collection of ribbons that appears to be impossible to depleate! Although, I’ll sure try! ;D


I’d like to enter this into the following challenges:
My Mum’s Craft Shop Challenge #5 (to die for, diecuts)
Penny’s Challenge #53 (anything goes)
Creative Belli Blog Challenge #117 (S is for stippling)
Divas by Design Challenge #1
(anything goes)
Crafty Creations Challenge #118 (aything goes)
DZ Doodles Digital Stamps Challenge #10 (phot inspiration)

DT: Make it Colourful Challenge #11 (dotty backgrounds)
Main Stamp: Maya Making Wishes (CAH) and Forest Flowers (MiC)
Patterned Paper: Spotted Owl Soup (Jillibean Soup)
Metal Die: Spellbinders Nestabilities Labels One

Copic Markers colored on Copy Paper:
-skin tone: E000, E00, E11, E13, E04
-browns: E41, E42, E43, E44, E45, E47, E49
-yellows: Y32, Y35, Y26, YR30
-greens: YG11, YG13, YG17, G28
-blues: BG000, BG01, BG02, BG05, BG07, BG09; B00, BG01, BV20, BV00
-grays: W2, W4, W6, W8

Did you know? Stippling is the creation of a pattern simulating varying degrees of solidity or shading by using small dots. Such a pattern may occur in nature and these effects are frequently emulated by artists. In a drawing or painting, the dots are made of pigment of a single colour, applied with a pen or brush; the denser the dots, the darker the apparent shade—or lighter, if the pigment is lighter than the surface. This is similar to—but distinct from—pointillism, which uses dots of different colours to simulate blended colours
[Stippling, Wikipedia.org]

Anise Soccer

Today starts a new challenge over at Little Miss Muffet Challenges and the Blog Candy winners are also announced over there today. The challenge this fortnight is tags or banners! I chose to add a Magnolia tag to my project along with Anise Soccer, a Sugar ‘n Spice Doll.


I found this cheery paper in my scraps pile so I don’t know where it came from. But it’s a high gloss double sided paper so I used both sides on the card. I love this fresh color scheme of pinks, oranges, blues and greens. I was even lucky enough to find matching Baker’s Twine! 😀


The button brads were made with an Imaginisce iTop Brad Maker – I used a punch to create the star-shaped circle then the tool to crimp the paper onto the brad. Two of the buttons use the background paper but the third one is actually the extra soccer ball that I colored with Anise! It was the perfect size for the small brad and I could resit seeing what a soccer-brad would look like! 😀


I’d like to enter this into the following challenges:
Bee Crafty – Challenge #50 (digi + birthdays for little kids)
Bugaboo Stamps Challenges (anything goes)
Elephantastic Challenge #26 (birthday part)
The Secret Crafter Saturday Challenge #133 (neglected stash – paper)
Wee Memories Challenge #55 (color, floral, twine, stamp)

DT: Little Miss Muffet Challenges #9 (tags or banners)
Main Stamp:
Anise Soccer (LMMS)
Patterned Paper: scraps
Metal Die: Magnolia Doohickey Vintage Lace Tag and Provo Craft Cuttlebug Vintage Corners

Copic Markers colored on Copy Paper:
-skin tone: E000, E00, E21, E11
-browns: E55, E57, E59
-blues: B91, B34, B37
-pinks: R20, R21, R22, R24
-grays: W2, W4, W6, W8, 0, C00, C1, C3

Did you know? A baker’s dozen, long dozen, or long measure is 13, one more than a standard dozen. The oldest known source, but questionable explanation for the expression “baker’s dozen” dates to the 13th century in one of the earliest English statutes, instituted during the reign of Henry III (1216–1272), called the Assize of Bread and Ale. Bakers who were found to have shortchanged customers could be subject to severe punishment. To guard against the punishment of losing a hand to an axe, a baker would give 13 for the price of 12, to be certain of not being known as a cheat. Specifically, the practice of baking 13 items for an intended dozen was insurance against “short measure”, on the basis that one of the 13 could be lost, eaten, burnt, or ruined in some way, leaving the baker with the original legal dozen.
[Baker’s Dozen, Wikipedia.org]

Going For A Ride

I have another sneak peek today showing off Going For a Ride which will be available from Love to Stamp on May 16th! Check out all the sneak peeks at the Love to Stamp Store Blog where we have something for you every day until it’s open!


I’ve been wanting to work with yellow a lot lately and I found some yummy decorative paper to inspire me from Jillibean Soup. This pack had a wonderful selection of yellow, green, orange and browns and is perfect for the spring time weather in my area.


I also experimented putting cork through the Cuttlebug and used some corner dies from Provo Craft. The cork was self adhesive so it worked out nicely even though they were very delicate.


For the butterflies I used an Embosslits die folder which cuts and embosses at the same time. This one was from Stampin’ Up and includes five butterflies on a little 2×2″ square which was perfect for this size card. I cut two colors out to give them dimension and depth.


DT Previews: Love to Stamp Sneak Peeks
Main Stamp:
Dutch Mustard Soup (Love to Stamp)
Patterned Paper: Dutch Mustard Soup (Jillibean Soup)
Metal Die: Spellbinders Nestabilities Labels Seven, Stampin’ Up! Embosslits Beautiful Wings, and Provo Craft Cuttlebug Vintage Corners

Copic Markers colored on Copy Paper:
-skin tone: E000, E00, E21, E11
-hair: E08, E09, E18
-browns: E42, E43, E44, E47
-yellows: YR30, Y32, Y38, Y26
-greens: G20, G21, G24
-grays: C1, C3
-cat: W2, W4, W6, W8, R12

Did you know? Calligraphy is a type of visual art. It is often called the art of fancy lettering. A contemporary definition of calligraphic practice is “the art of giving form to signs in an expressive, harmonious and skillful manner.” Modern calligraphy ranges from functional hand-lettered inscriptions and designs to fine-art pieces where the abstract expression of the handwritten mark may or may not compromise the legibility of the letters. Calligraphy continues to flourish in the forms of wedding and event invitations, font design/typography, original hand-lettered logo design, religious art, announcements/graphic design/commissioned calligraphic art, cut stone inscriptions and memorial documents.
[Calligraphy, Wikipedia.org]

Tips, Tricks & Techniques 0x023

I needed a revamp of my craft area because I was literally being “pushed off” my own desk by two up and coming hobby enthusiasts! (See previous post.) ;D So I recently moved everything around to provide a better space for us all… and when I say everything, I mean everything that could possible move was moved!

So how do you get a craft room? Squeeze all the kids’ beds into one room then take over the extra space and fill it floor to ceiling. Make sure it’s organized enough so the kids “think” they got an playroom out of the deal too. ;D


I’ve set up the right side of the room with my desk and the left side with a table for the kids plus all their toys accessible from the shelves. With the new setup, we can get Grandma, all three misfits and myself together on special days and still get a little crafting done. It’s hard to see from the angle but there is actually two 4-feet tables arranged perpendicular to each other.


For extra, extra storage I’ve had these two large …. cabinet things… ok, I confess, wardrobes from Ikea. (You see, in Texas we have massive closets that are the size of spare bedrooms so we wouldn’t really know what a wardrobe is! LOL) These were the only two things I couldn’t move, mainly because I didn’t want to empty the shelves and also because they’re freakin’ heavy. The picture only shows one unit and just the edge of the second unit – together they’ve doubled my closet space.


Now on to some details. This is an ink pad storage shelf that I used for my Copic Various refills. It will hold about 160 in the top portion and I’m sure I can squeeze a few on the bottom row. The shelf is now provided by Organize More and I like the sturdy yet lightweight feel so it can be mounted on the wall. They even come in colors!


For my rubber stamps, I use the cling mount storage cases from Stampin’ Up! They’re the same size as DVD cases so I bought a cheap shelf at Walmart and filled it. Eventually I’ll get all the labels on the sides and alphabetize them! Yeah!! LOL I set up another DVD shelf on the other side of the closet door where I hold my Cricut cartridges.


Many years ago when a local scrapbooking store was going out of business, they put everything up for sale and I scored this awesome paper rack! (This is hard to find but it’s a Paper Station Merchandiser which is currently found at Display Dynamics.) It’s for 12×12″ paper but I’ve doubled up on each tray and store my 8.5×11″ cardstock. For labels, I cut a small sample from each cardstock color and added a label with the color name, then taped that to the front of the trays so I know which colors to reorder.


So the side of the paper is where the desk starts and that’s where I keep my decorative paper. The 12×12″ paper is in the white box (I think it’s a Jetmax Modular Storage) and the 6×6″ and smaller paper is right next to it in and in the green box (an office box from Walmart). Next to that are my book boxes – boxes that look like books – where I keep some ebellishments such as pearls, brads, tags, metal and and so on. The rest of my embellishments are up in the hutch and most of my tools are stored under the desk.


Continuing left, I have my cubbies for the Copic markers. I got these from Studio3Solutions and I love them! I have three units and each shelf cubbie is slightly slanted back so when I pull one out all the others stay in. When I first purchased them I didn’t have very many markers and now I wish I had at least one more shelf to add to it. Next to the shelves is a pencil sharpener (for those Prismacolor Pencils I’m afraid to use), a lamp that used to be my Grandmother’s, and then just out of view is my paper cutter leaning against the hutch edge.


My newest addition is how I store my cuttting dies. I got this idea from a fellow design team member and had to put one together. Excpet when I purchased the “Magnetic White Board” I didn’t realize it wasn’t actually magnetized so I had to use strips of magnets to actually get the the final result. If I need to upgrade, then next time I’m going to look for a “Magnet Board.”


That’s about it for this revamp and hopefully you got some ideas as well. Good luck!