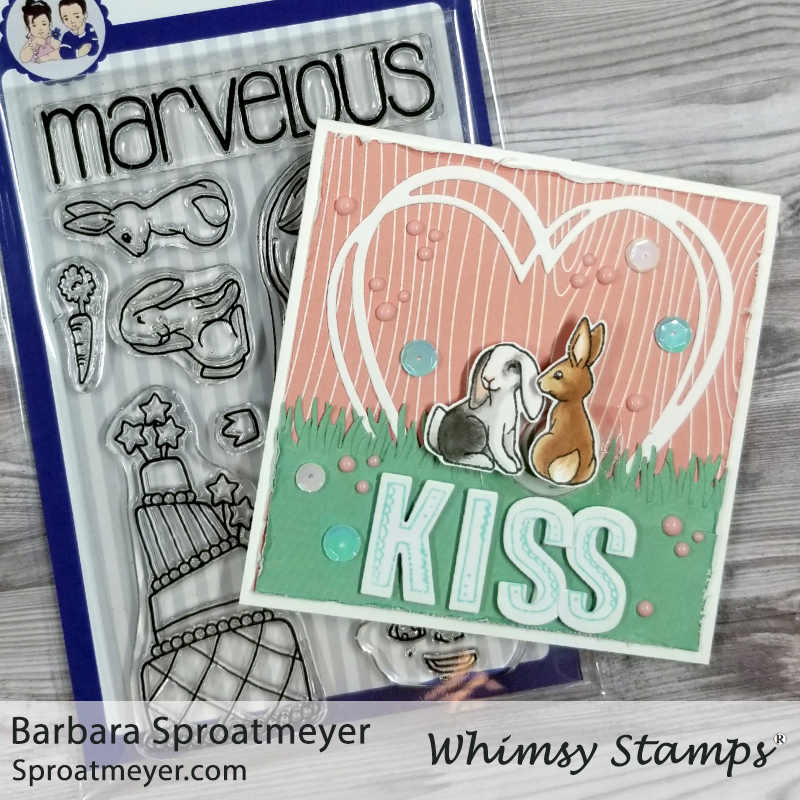
I made a card – it’s been a while but I made one. This one is a Valentine card using the two bunny accessory stamps from Polka Dot Pals Ophelia. These two make a great couple and I decided to create an action card. Read below for more details on how I created this card using these key products:
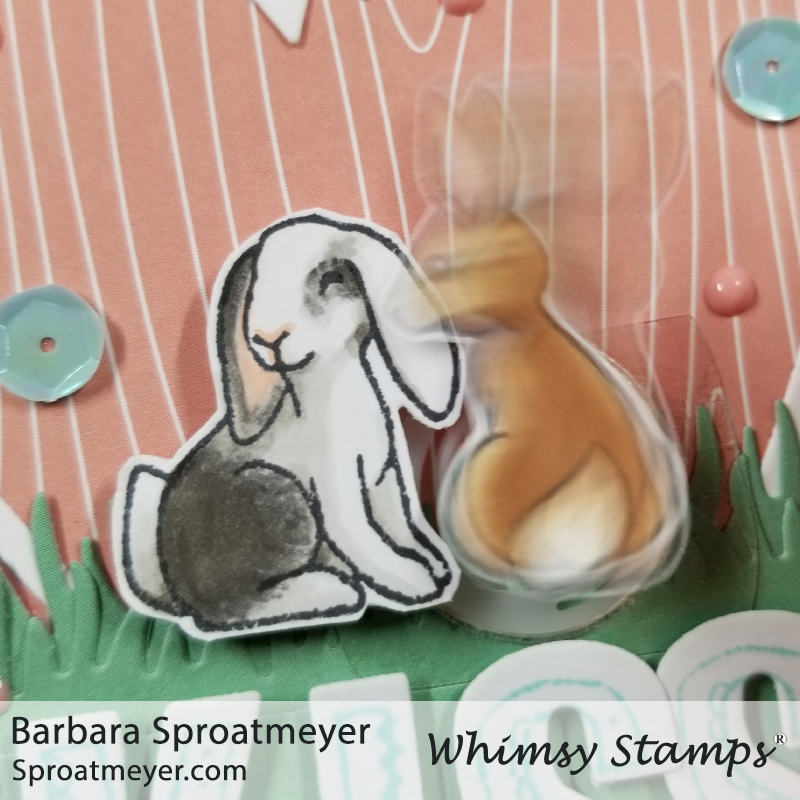
The base of this card was created with decorative paper and a grass die for the green. Then I used the Connected Hearts Frame Die for the heart in the background. The sentiment was created using the AlfaDoodles stamp and Bold ABC Die lettering. Then finally I added some sequins and Nuvo drops.The action comes from a wobble action spring and I placed it under the brown bunny. It was placed towards the bottom so when it springs, the bunny looks like he’s giving a bunch of kisses to his girl bunny. It’s cute.
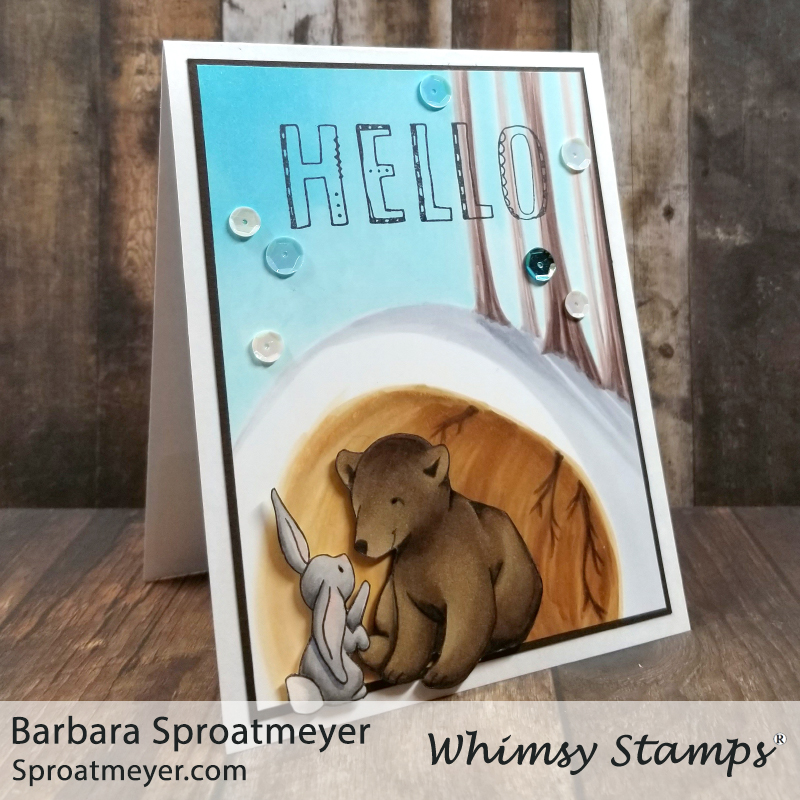
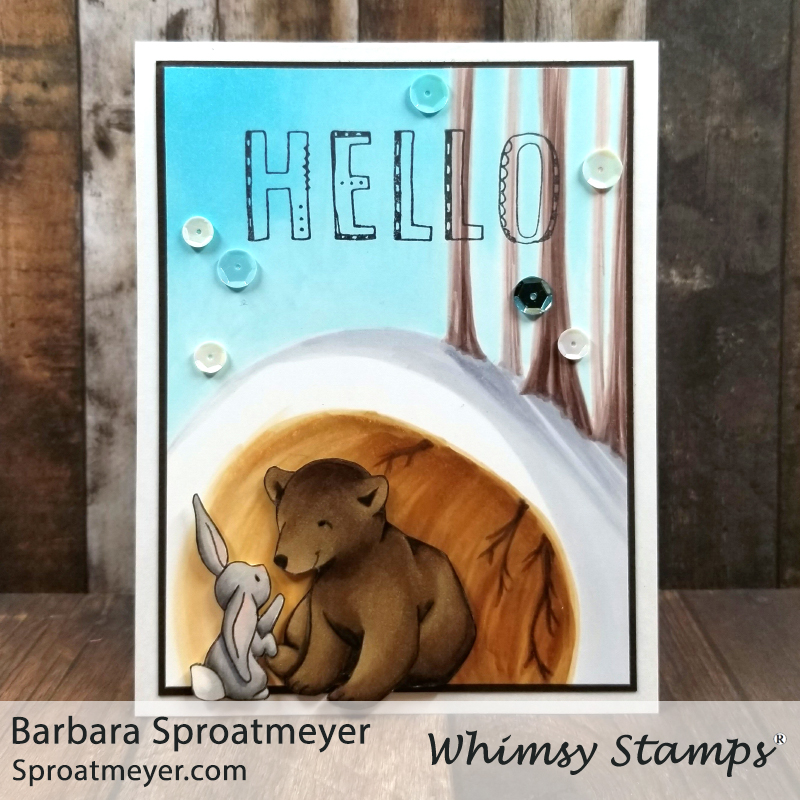
Part of the new digital stamps release this month are these cute friends – Hare Bear Friends. I drew these friends for Valentines but then as I was coloring the card, I thought it would be a great “hello spring” card too. Continue reading for more details on how it was created using these key products:
With the original artwork, I didn’t want to toss it out and my pile of drawn images is getting high – so I thought I would color it up and use it on a card. It’s on sketch paper so I had to make sure to take care coloring it with my Copic markers. For the longest time, I colored all my digi stamps on type paper because my printer doesn’t handle card stock very well. Lately, I’ve been taking it to FedEx to print but sometimes it’s easier to revert back to those skills and color on whatever kind of paper I have.With Hare Bear Friends colored, I wanted to create a fun yet simple scene. I decided a little cave would be fun and then I added some tall whimsical trees on top. To help the cave look like a cave, I added tree roots. The sky I decided I would keep it simple and have a split warm (the lower half) and cool (top half) card with the color choices. Lastly I stamped Hello using the AlFaDoodles and some sequins.
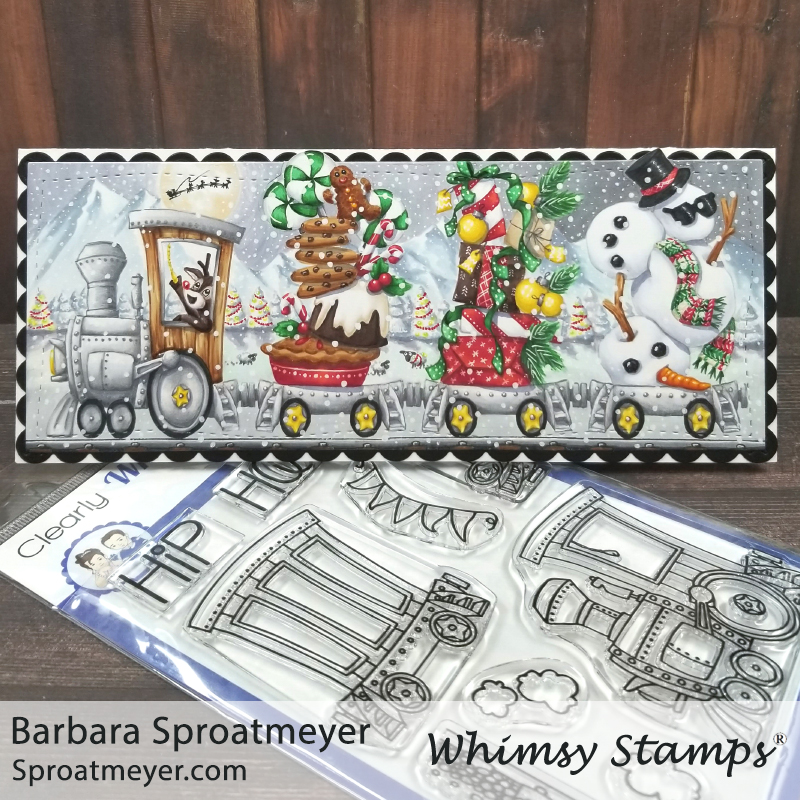
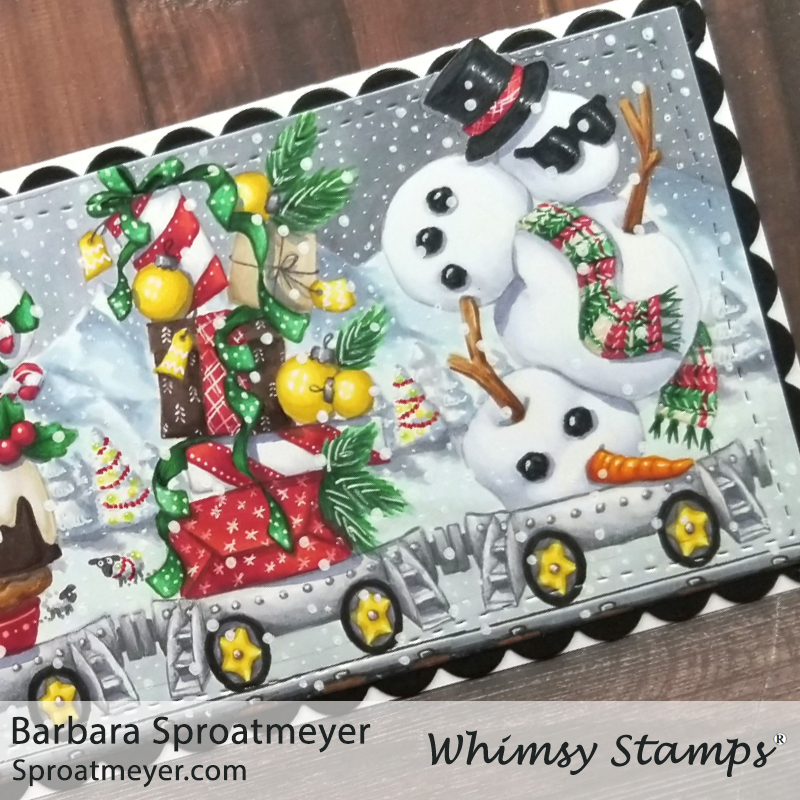
Here’s one last Christmas card that I made this year using Linking Train and it has quite a story to go with it. I wasn’t sure how it was going to turn out but just like life, it’s surprising. Read below for more details on how this card came about using these key products:
The Linking Train set is one of my favorites because it can be used all year around and the empty train cars give it “loads” of possibilities. For this project, I started with the train engine and three empty cars. Then I grabbed the accessory stamps from Polka Dot Pals Brianna and Polka Dot Pals Uzuri for two of the cars. The middle one was a Whimsy Stamp’s retreat freebie this year and worked great to complete the theme. I then added the train tracks on the bottom.Coloring the train went quickly and I stuck with a simple color theme – red and green, gold for accents, and browns and grays for the rest. After it was colored, I added some details with the white gel pen by giving patterns to the presents, ribbon and pie dish; and adding accents to the baubles, candy, berries and scarf. Next was to tackle the background and I wasn’t sure how I was going to do that… so I posted the unfinished picture on Facebook and asked for suggestions. Most of the suggestions were to keep it simple – maybe some hills or trees and a light sky. But one suggestion cracked me up and I had to go with it… Annabel suggested: “Station, bedecked with fairy lights. Pop a reindeer/Santa in the cab, have it floating thru the night sky? Delivering gifts? Long line of fir trees covered in snow, occasionally one dressed like a Christmas tree with baubles. Inside of the tunnel it is going thru, with icicles hanging down… Field behind filled with festive sheep and bemused sheep dog?” I wasn’t sure how I was going to get that ALL in there but I added as many details as I could. The bemused sheep dog is currently behind the pie laughing his ears off at the festive sheep. This was one fun card and the background was just as much fun as the Linking Train. Thanks Annabel for the inspiration. 😉
The last post featured details on how I carved and created this one of a kind stamp using a Rubber Block and Carving Tools kit I bought on Amazon. Today I’m showing how I used it to create a card. I had to give it a good “test” before sending it off, right? Continue reading for more details on how I created this carding using these key products:
With this time of year, it might be easy to assume I carved Santa – but nope! He’s not the only one with a long beard so I was eager to stamp something up and debunk that misconception. This stamp was commissioned by a teacher who wanted to personalize the paper he graded. As a gift to him, I created this card and colored it to his likeness. I wanted to create a dark background and then have the face colored and stand out in the corner. To do the background, I stamped the heads all around and then colored the background with gray using markers, stencils, alcohol, distressed inks and brushes to get the grunge look. Then I stamped and colored the head on a separate paper and added it to the card front with foam tape. It turned out perfectly if I can say so myself.
I thought I would try something different and carve a one of a kind stamp. This was commissioned by a teacher who wanted to personalize the assignments he was grading so it’s the size is 1.75″ tall and 1″ wide. It’s small. However, it was a lot of fun and easier than I thought it would be. Continue reading for more details on how it was created using these tools:
The concept started with a picture that the teacher wanted me to create into a stamp. Since I’ve manufactured stamps and have a stamp pressing machine in the garage, it was natural to be asked. However, that process is expensive for individual stamps and reserved for mass production. Because this was going to be a one-off, it seemed like a better idea to carve one. I’ve never done that before so why not?!I purchased a basic carving tool set and rubber block from Amazon. After I drew the image, got it approved and then transferred it to the rubber (reversed image, by the way so don’t forget to do that if you carve something), then I began the process of carving. Out of all the tools in the rubber carving set, I ended up only using the one tool that had a deep V-shape. I’m not sure how to use the others but perhaps on a larger image they would come in handy. I was surprised how easy it way to carve out the blank areas and I didn’t have to dig as deep as I thought. My initial plan was to just remove what I could then deepen it later but that really wasn’t necessary.I avoided stamping and testing it out until I thought I was finished. I didn’t want to risk covering up my lines with the ink and then losing the image that still needed to be carved. So when I got to the end, I was finally able to test it out and see how it worked. Wow, it turned out a lot better than I thought – even the mistakes look good and I’m happy with how it turned out. I think I’ll be trying this again!
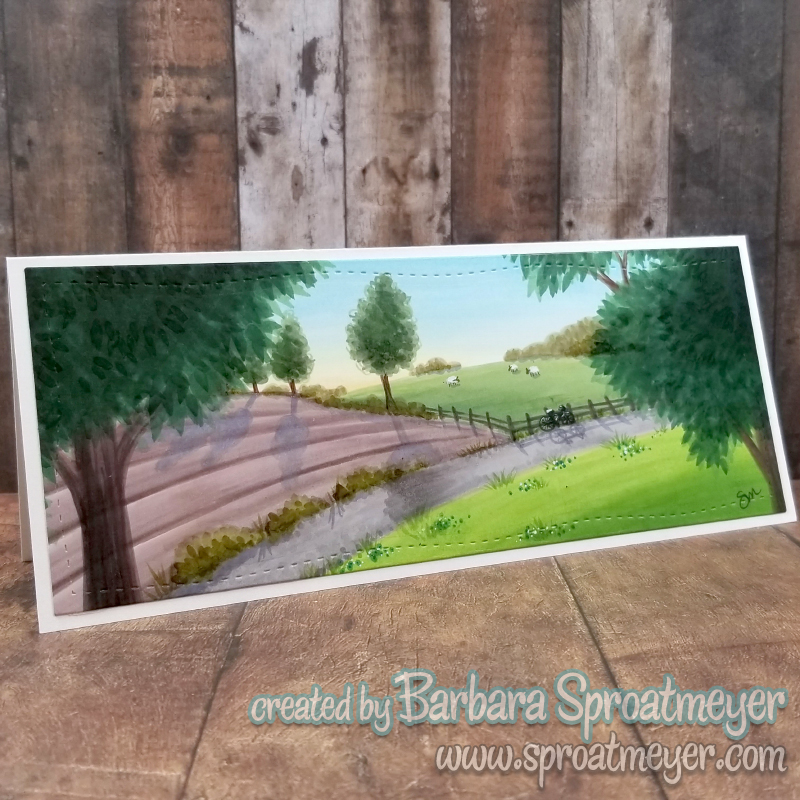
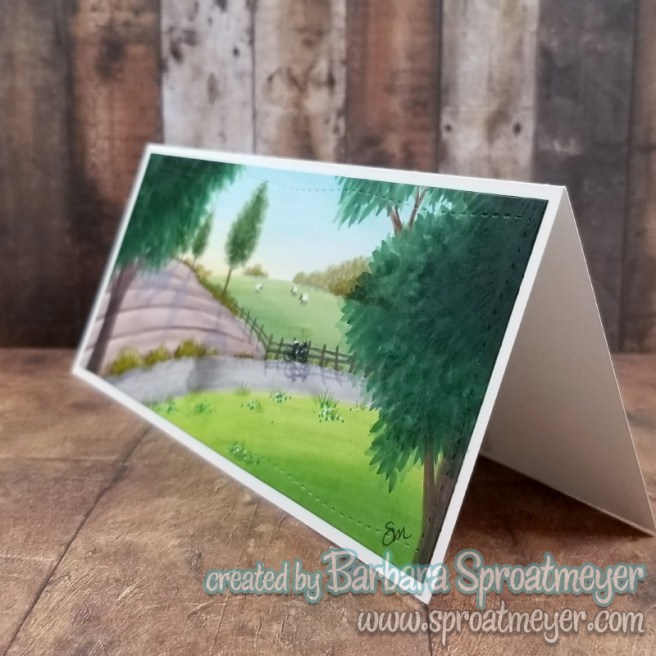
Winners are announced below. For this project, I pulled out the Slimline Card Builder Die and created a scene with my markers. No stamps used on this one. Continue reading below on how this card was created using they featured products:
Winner of the Polka Dot Pals Raden winter-fication card previously posted is … earthtofaye! Congratulations Faye! Email me your mailing address and I’ll get it in the mail. 😉
All other winners from the DigiMojo event are posted on Facebook.I created this scene by first sketching it out lightly with a pencil. I started coloring the sky and most of the background elements then worked my way forward. The trees in the foreground, I knew was going to be darker so I didn’t mind coloring the whole background before they were added. The bike was small so I used a marker then added some highlights with a white marker. Lastly the image was cut down to size using the Slimline Card Builder Die and placed on a card front.