

I don’t have a card yet but I did want to share the technique I tried out on this background below. First of all my tip is to get in the habit of opening up your Copic markers on the side of your project instead of over it. I had refilled one of my markers too much and discovered this tip the hard way on another image when two giant blue ink drops splattered on my nearly finished project! Anyway, back to the background technique – here’s the image first:
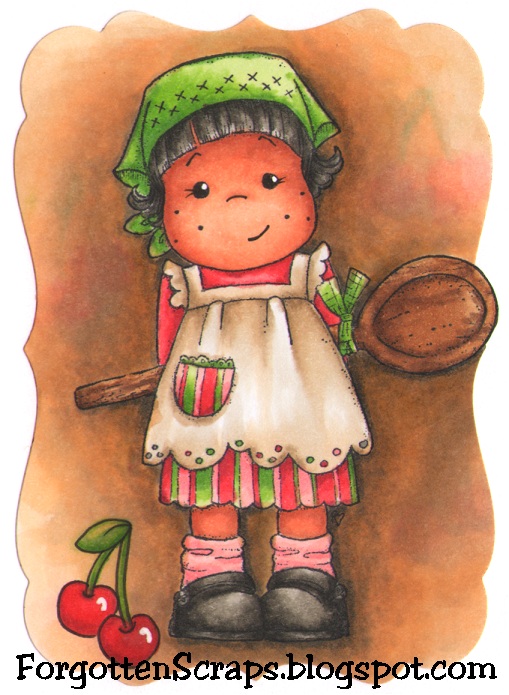
I wanted to create a rich earthy backdrop like I would see in a studio photograph. To do this I used over dozen different colors and kept building it up, layer upon layer, color upon color. When I started it would dry out in between colors but towards the end the paper stayed wet and allowed me to push and blend the colors more freely. I started with a couple spots in red and green (G24, R24) and then added browns (E40, E41, E42, E43, E50, E51, E53). Most of the red and green areas were “washed out” so next time I’ll add more. Once the browns were built up I went back in with Toner Gray (T0, T2, T4) and used the lighter browns to help blend it. Each color was added several times and worked through until I liked what I saw. If you give it a try I hope it works out – Good luck!

I LOVE IT! Can't wait to see this in person. I will have to try this out!
LikeLike
By the way, I really like how your colored her dress and cut the shape of your picture. It will be fun to see the card made up.
LikeLike
This is a great tip Barbara! I love the way the background looks… I will definitely try it!Arabella
LikeLike
hahhaa – I forget to open my pens off to the side too!!Great background! what paper did you use? just curious. lol
LikeLike
I used plain copy paper. ;D
LikeLike
I used plain copy paper. ;D
LikeLike
omg, this looks SO cool!! How on earth did you manage it without some of the colours bleeding into the image??Oh, and I AM making notes on how you do Tilda faces…one day I WILL try myself. If I only wasn't so crap at drawing..HugsAnnika
LikeLike