InStyle Stamps teamed up with Glue Arts this week and generously provided us with Glue Arts products to use and review. Want some? Be sure to check out InStyle Stamps Blog for more details and a chance to win some Glue Arts products this week!
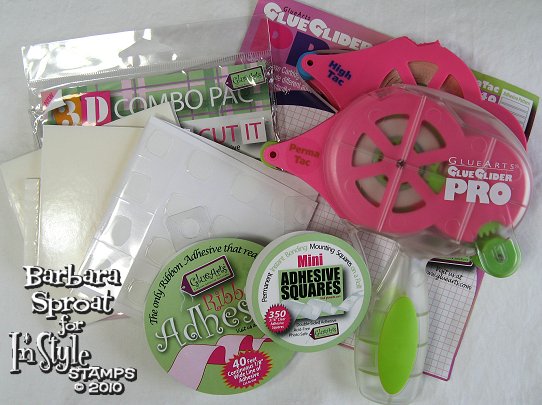
Thanks to InStyle Stamps and Glue Arts, I received the Glue Glider Pro, Ribbon Adhesive, 3D Combo Pack and Mini Adhesive Squares. I used them on all my InStyle Stamps cards this week, which are Firefly Chloe today, Amelia Chloe on Thursday and finally Janice on Friday. Below list the details on where I used them on these projects and how they worked out for me.

[1] On each of my cards I used the Glue Glider Pro adhesive gun with the Perma Tac cartridge. At first the despensor was awkward because I’m used to the small Tombo design for Mono Adhesive, and in comparison, this one dwarfed that model. However, toward the end of my projects I was able to handle it gracefully and even got good at using the built-in brake. The adhesive sticks well and has a nice secure bond. I give this product a thumbs-up and will continue to use it.
[2] The 3D Combo Pac included Raisen’s, double-sided adhesive squares, and UCutIt, 3D adhesive foam sheets. The Raisen’s has the same feel and stick as the stuff on a gift card when you buy it from a store. You know the rubbery silicone stuff that keeps the card to the paper? Although it didn’t hold any of my embellishments, it would be good to use for a temporary application, such as gift cards or bookmarks that are meant to come off. I attempted to use it on the butterfly button, flower charm and paper ticket but finally had to use something else.
I used the UCutIt 3D foam to add dimension to each of the cards, including the paper ticket, but since I had to go through the effort of cutting it, I’d rather use foam dots. With that said, however, the foam sheets would be perfect for specialized applications such as shaker cards. My suggestion for both? Keep a pack on hand for specialized applications but it wasn’t helpful to me for my everyday card making.
[3] I tried using the Ribbon Adhesive Spool on the black and pink orandy ribbon. The stick was very good and would have held the ribbon well. However, I couldn’t easily access the tape without making a big ball of a mess. The spool edges were too high and kept me from pressing the ribbon into the tape, and when cutting off a strip, it would stick to the scissors and separate from the backing before I could transfer it to the ribbon. In the end, I finally set it aside and left the ribbon to hold on its own accord.
[4] Finally I tried out the Mini Adhesive Squares but had the same trouble accessing the squares on the spool. I ended up carefully taking them off with my fingers to apply them. This is what I finally used on the butterfly button, flower charm and paper dragonflies. They worked just as well as the small Glue Dots but without the thoughout packaging. It was still handy to use so I’ll be able to finish the product but I’m going to tear off one side of the spool.