Renew

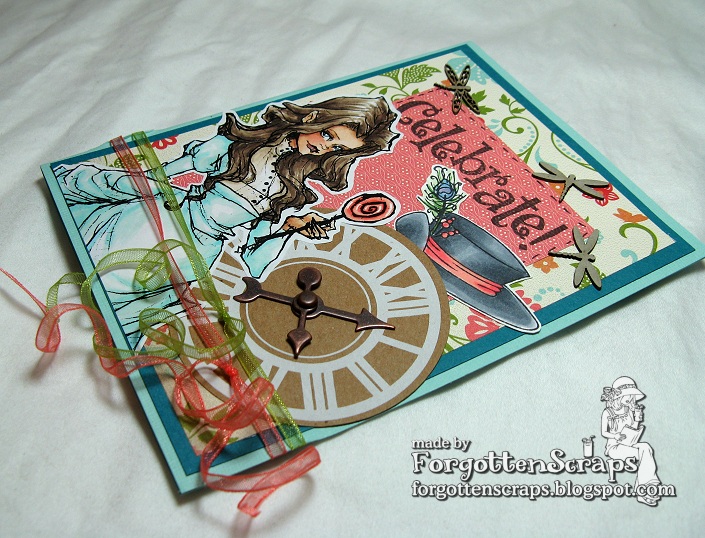
I have a fun project today using one of the gorgeous Nouveau Girls from Some Odd Girl!  This one is Renew and she was released last month in a clear stamp.  I love using real stamps because I can be posh about the paper I use – unfortunately, my printer is too picky about the paper it will accept when printing digi stamps so it’s always blissful to enjoy a good blending card stock.  😀  Anyway, back to my project… today is my day to post a project on the SOG Blog and whit is what I made.

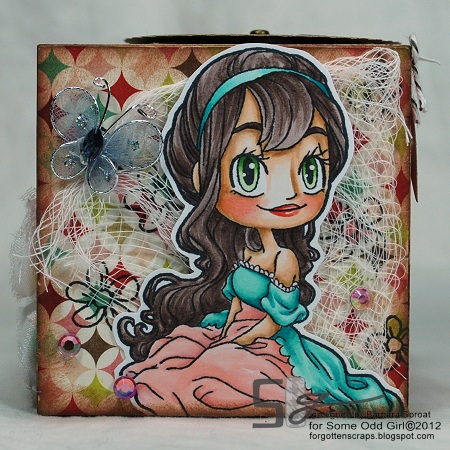
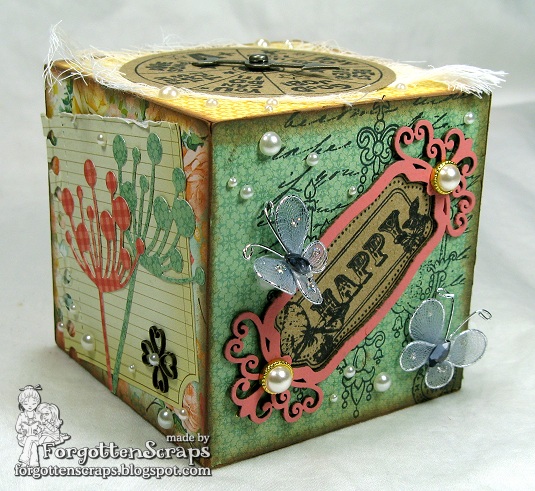
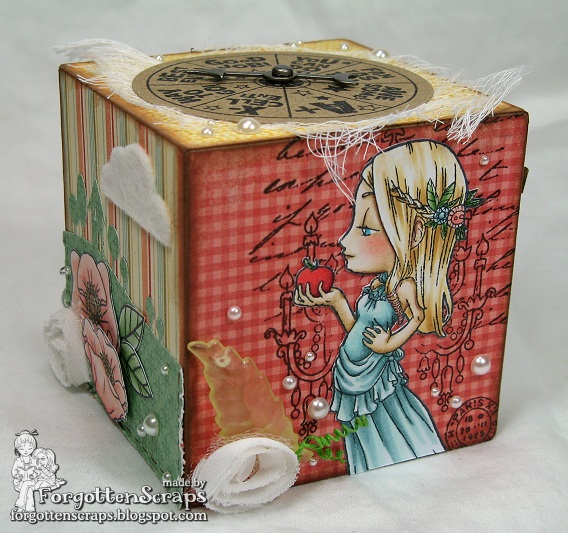
The project I made today is a gift for a teacher which I call an A+ Grading Block and can be very helpful when grading papers!  All the teacher has to do is spin the dial on the top to figure out which grade to give to the students.  LOL  I thought it would be a fun desk decoration and even the students would love to come up and give it a spin, I’m sure.

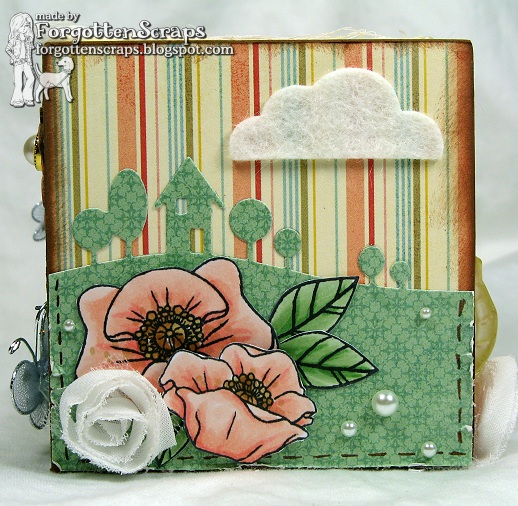
I had made a similar one before using Grow (click HERE) but I needed at least one more so my girls would stop fighting over which one got to give it to their teacher.  😀  Luckily it was Teacher Appreciation week last week so they each got a block with some goodies.  I started off with a 3″x3″ wooden cube and covered each side with decorative paper.  Then I used an inkpad to age the edges with a dark brown.

The image on the top is Take a Spin from Stampin’ Up and I added a spinner I found in my stash.  This time I mounted the spinning wheel on a petite scalloped circle and added a banner tag on the top with a charm.  The spinning wheel is popped up to leave room for the twine and still give it a flat plane to spin freely.

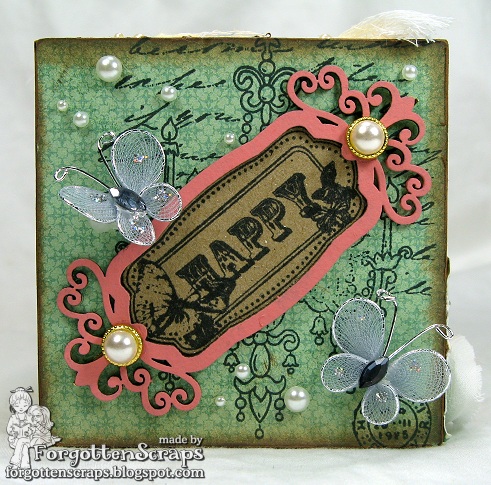
On one of the sides I stamped a label with the Chandelier from Stampavie then wrapped the label around the corner to spill over on the other side. This side uses a busy decorative paper and I wanted rulers to show so I tried not to cover them up too much and added some ribbon roses and a few sparkling gems.

The side that the label spins over on I added more details and also used the daisy accessory stamps that come with Renew from Some Odd Girl.  Then I used a couple more diecuts including the grass and dress form which I covered with burlap linen fabric.  This side was basically finished except I had two ribbon roses left over and couldn’t let them go to waste.  The grass diecut was just the right size to wrap around the other side of the block so I thought why not?!

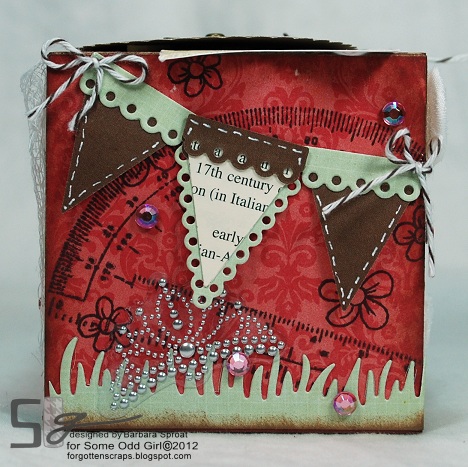
The final side uses a Protractor stamp from Jenni Bowlin which I also thought was perfect to tie in with the teacher theme.  I don’t remember where the banner diecut came from but I used dimensions to apply them to the block then added two Baker’s Twine bows on the end.  Then to fill in some gaps I used more of the daisy stamps from Renew, some gems plus a tiara sticker.

I think that sums up everything I used for the project.  It was actually really simple to make and a lot like making five different tags.  They were a big hit with the teachers so I’m glad that they enjoyed them.  Now I have two more cubes left and will have to come up with something new… any ideas?

Thanks for coming by and checking out my project.  I hope you’ve been inspired and don’t forget about the fun festivities coming up with weekend too – it’s going to be a smashing fun day!  (May 19, SOG FB Party).

Payton

Can you believe it’s Thursday already?  I can’t believe I’m off another day this week – where is the time going?!  Today is an inspirational day at Little Miss Muffet Stamps and even though I’m a little late (hay, I’m the boss so it’s ok this time.  LOL), I don’t want to miss out sharing one of my Father’s Day cards this year.  Check it out…

The image I used is Payton from Little Miss Muffet Stamps and is the perfect image for my dad who loves to fish.  In fact, this could possibly have be me when I was a kid which is why it’s perfect for Father’s day.  The dragonfly chippies are from Make it Crafty and the Papa sentiment stamp is from Stampin’ Up.

I don’t remember the paper I used but I thought the wood going horizontal would look a little like a dock and the browns would help the card look more masculine.  I also tried to stay away from curved lines but the circle fans in the decorative paper still help give it a soft look without screaming “feminine.”

If you get a chance make sure to head on over to the Little Miss Muffet Blog to see the design team’s inspiration – it’s a day we all got to play so there are some wonderful ideas!  Thanks for dropping by.  *Hugs

I’d like to enter this into the following challenges:
 Cards for Men Challenge #9 – Texture (wood grain – visual)

Chef Ariel


It’s going to be an exciting week this week with new releases galore!  I’m starting off the week a bit behind and somehow lost one of my days in the weekend – shame on it!  And I was so looking forward to having a full weekend too.  LOL  Anyway, let’s get the previews started, shall we?!

Today at Simply B Stamps we’re previewing Chef Ariel from a new line of Jude and the Rockers Just for Fun.  These Jude and the Rockers are some of my favorites and I can’t wait to show them all off to you!  Make sure you head on over to the SBS Blog for all the other design team samples because this is one versatile girl – she can make cakes for birthdays, babies, weddings and anniversaries.  😀

I’ve been needing more birthday cards again so this week I am excited to say I’ve added a few to my box.  For my project I went with a birthday theme and even added a spinner to my card.  😀  The spinner is from Stampin’ Up and I think the spinner dials are from Tim Holts.  Lastly I wrapped it up with Baker’s Twine and added a little faux stitching around image.  Thanks for dropping by and I hope you enjoyed her!

Grow

Today is my day to show off a project over at the Some Odd Girl Blog and I’ve got a fun project to share using one of the Nouveau Girls from Some Odd Girl… Grow! Check it out…


I’ve had four cubes for the longest time and was going to do decorate something with the word “READ” for the bookshelf. However, when I was cleaning, I had place them next to a spinner I had stamps and well, one thing led to another and I sacrificed one of the reading cubes to make this block.


I thought this would be a great teacher gift (yes, I need lots of those!) and so I chose to use the image Grow from Some Odd Girl because of the apple. I also used the flowers from Believe, another of the Nouveau Girls from Some Odd Girl. The other stamps on this block that I used are Stylized Notables 1 and coordinating die from Whimsy plus the N1 Fancy Frame chipboard from Make it Crafty. The top of the block uses Take a Spin from Stampin’ Up and on two of the side I used the Chandelier from Stampavie in the background.

Here are the five decorated sides going around the block…


The paper I used is from My Mind’s Eye (Howdy Doody) and I started the block by glueing down a square on each of the sides. Then I sanded down the edges/corners so the paper wasn’t sticking out (but next time i’ll just cut it a bit smaller for the same effect) and then used brown ink to smudge around the edges. After that, each side it was like decorating a tiny card or small tag!


There are a few metal dies I used including two news ones I got this week from Memory Box… Modern Landscape Border and Chloe Stem. It was also fun to dig out the Notebook Edge and Flat-Bottom Clouds from My Favorite Things.

I think that’s about all the details on the block. 😀 I hope you enjoyed it and thanks so much for stopping by and for your wonderful comments. *Hugs

Little Lavinia

I seem to be playing catch up this week but at least I’ve got something to do. LOL This project is for the Simply B Stamps Challenge #3 and the theme is to “Celebrate!” We want to see your celebration projects – any celebration too: Birthday, baby shower, wedding, Holiday.. anything goes just pick a celebration! And you have oodles of time but no procrastinating is allowed. 😀


I’ve used Little Lavinia from Simply B Stamps as the main focus. The sentiment stamp is from Stampin’ Up! as are the ribbons, papers and decorative papers too. The little hat is one of the Hatter Hats from Little Miss Muffet Stamps which I had on my desk and thought it looked great with the clock. Lastly, the dragonfly chippies are from Make it Crafty.


I didn’t know it but the ribbon can be curled with a pair of scissors, just like the packaging ribbon! I got the idea off of a Stampin’ Up! Demonstrator site but I can’t find the link now – it’s just a neat idea that I had to try it out. 😀

Hope you’ve enjoyed this bit of inspiration and thanks for stopping by! *Hugs

Sage

The challenge at Little Miss Muffet Stamps this week is to make “Easel, Shaped or Step Card” which was inspired directly by our very own DT member… Leah Ann! She always makes the most wonderful easel cards and sometimes I need an excuse to get out of the norm and this was perfect! So here is my easel card…


I used Sage from Little Miss Muffet Stamps to be the center focus of this card. For the top and inside of the card, I pretty much used the same layout, papers and embellishments. I could have added more and went all out but one step at a time. ;D The best part is, after looking at one of Leah Ann’s cards, I had to get my own and so it was fitting to use it on this card too. Thanks for the inspiration!


The sentiment stamp is from Stampin’ Up but I don’t remember which set it’s from – it’s a single stamp I have set aside because it use it more often. 😀 There’s not much more to say about the card that you can see already. LOL But I will say… come back on Sunday for the New Releases from Little Miss Muffet Stamps this month!!

I’d like to enter this into the following challenges:

Ruby’s Rainbow Challenge #24 – Lace
Ladybug Crafts Ink TLT Challenge – Anything Goes
Simon Says Stamp and Show Challenge – Anything Goes
Everybody Art Challenge #184 – Easel Cards
Craft Your Passion Challenge #101 – Easel Cards