Sunbonnet Fireman Puppy from Little Miss Muffet Stamps

I just finished recording this coloring session featuring Sunbonnet Fireman Puppy rubber stamp from Little Miss Muffet Stamps. There were a few differences from my other card and I think most noticeably is the sentiment and the size of the fire hydrant. I like the sentiment on this one better but the fire hydrant size on the first card. I’m sure if I was create a third that it would also look completely different.

Anyway, there are still some spots left for this class which is now available on YouTube. You can sign up for it and others HERE.

The sentiment is HUG from the Big Hugs Word die from Whimsy Stamps and is a fun shape to add. You can add any sentiment you want. The last card I created (which you can see HERE, by the way) is one I purposed for a sympathy card. I think this card lends well to a variety of themes. One thing I forgot to do was add a shadow to the sidewalk under the boy and dog. Oops! So check out the first card for what that looks like and grab your BV23 to add that on.

List of Common Supplies

Stamp:
Sunbonnet Fireman Puppy rubber stamps from Little Miss Muffet Stamps
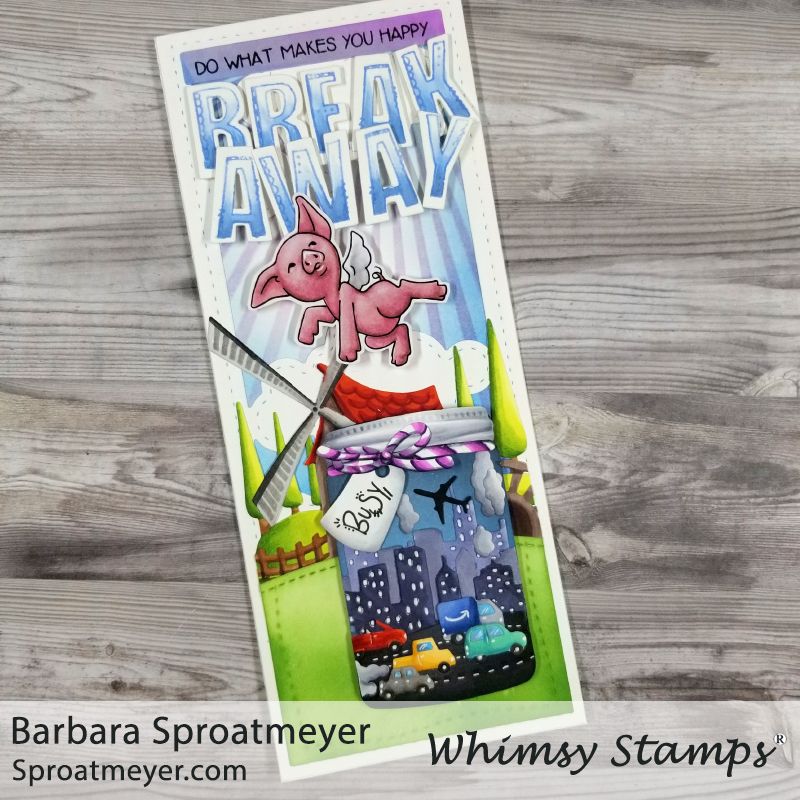
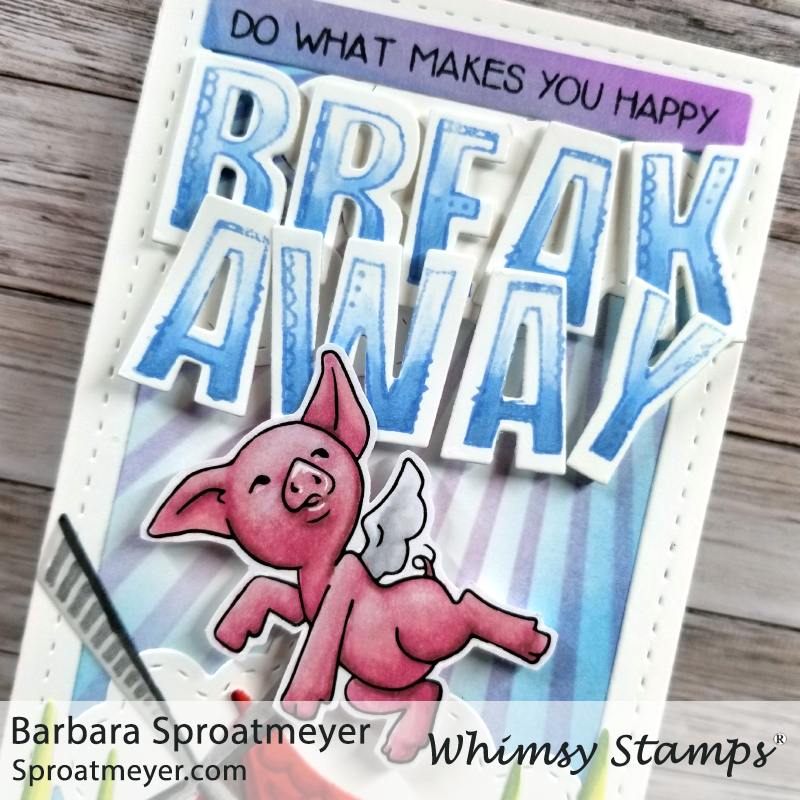
Big Hugs Word die

Copic Markers:
0, C1, 3, 6, W1, 2, 3, 4, 7, 9
R05, 12, 24, 27, 39, 46
YG17, 21, 25, 61, 63
G28
E23, 25, 31, 41, 42, 44
Y35
YR09, 11, 16, 32
BV23
B41

Atlas Jar Die from Whimsy Stamps

Take a break and do what makes you happy! We all need a break from our every day life and this card came about with that type of theme. I started with the Slimline Cityscape Die and tried to think of a fun way to use it – that’s when the Atlas Mason Jar Die came in mind to create a city scene inside. But one thing led to another and I ended up using seven different die sets, three stamps and one stencil to create this mega slimline scene. Read below for more details on how I create it featuring Pigs Can Fly Too as the star piglet in my story…

The city in a jar was created using the Atlas Mason Jar Die and Slimline Cityscape Die. I cut all the dies out in white cardstock so I could color them individually instead of searching for that many different colors to coordinate. Sometimes grabbing a marker or brush is quicker and it allows me to add more details such as the coloring the details on the jar’s lid or adding color to the ribbon/twine.
After my jar was created, I started to work on the background. Since I had a city in a jar theme, I wanted the outside to be the opposite. That’s when I grabbed the Stitched Border Trio Die, Slimline Woodland Cottage Die and Slimline Clouds Die to create the background scene. I added color throughout such as stenciling the background with the Sun Rays Stencil and coloring the foreground elements.
I love this Atlas Mason Jar Die! This could have been a great card to use lots of foam tape and really build up the layers but I decided to keep it simple and no more than two. On the first level, I raised the jar and BREAK lettering. On the second level, I raised the lid, bow and tag on the jar, then also the pig and the AWAY letting above that.

List of Common Supplies

Whimsy Stamps
Pigs Can Fly Too
Atlas Mason Jar Die
Slimline Cityscape Die
Slimline Woodland Cottage Die
Slimline Clouds Die
Stitched Border Trio Die
Bold ABC Die and AlFaDoodles Alphabet Clear Set
Simple Sentiments Strips Die and Simple Sentiments Strips Clear Set
Sun Rays Stencil

Polka Dot Pals Louisa from Whimsy Stamps

I set out to create a non-holiday green and red card but this is what I ended up with with – a little more than just green and red! But it’s very cheery and great for a birthday card. I used Polka Dot Pals Louisa as the main focal point with a face selected from Polka Dot Pals Faces set. Since she was sitting, I needed to find something for her to sit on and that’s how the rest of this scene came about… Polka Dot Pals Nour had the milk jug and goat to add. So in searching the the rest of my Pals, I found Polka Dot Pals Brianna with the lamb.

Polka Dot Pals Louisa and the accessories were stamped in a no-lines coloring ink. This is great that I don’t have to mask any of my stamps but sometimes it’s difficult to see unless I have great lighting. Because I had a lot of accessories and a larger scene, I decided to keep the background simple and put more time into the creation of the card.
To assemble the card, I used a whole bunch of dies. Oh yea! The green Bandana decorative paper and main scene was cut using the Wonky Stitched Rectangles dies. The BIG word comes from the Big Words die set. The CELEBRATE and YOU’RE TOTALLY AMAZING sentiment came from the Simple Sentiment Strips set and Simple Sentiment Strips coordinating dies. I can tell that’s going to be a fun combination to use! Lastly, I was able to color up and add a few of the Slimline Bunting Border (I cut them in white then colored them with my markers and white gel pen).

List of Common Supplies

Whimsy Stamps:
Polka Dot Pals Louisa
Polka Dot Pals Faces
Polka Dot Pals Nour
Polka Dot Pals Brianna
Bandana Decorative Paper
Wonky Stitched Rectangles
Big Hugs Word
Simple Sentiment Strips Words
Simple Sentiment Strips Dies
Slimline Bunting Border

Copic Markers

Fill a Truck from Whimsy Stamps

So happy together! While coloring up the Pigs Can Fly Too digital stamp, I thought it would be perfect sitting in the back of the Fill a Truck clear stamp – especially with the hooves sticking over the sides. So I began the process to make this card. I colored up the piglet in blacks and then went with a red truck. I actually colored in the license plate with details but then found some fun Americana paper from Pebbles which had license plates that were the perfect size! (I have the remaining plates stored with my Fill a Truck clear stamp for the next time too.)

To create the sentiment, I decided I would use the Happy Together words found in the Fill a Wagon clear set. Since the paper was Americana, I chose to also use the bunting stamp for the back of the truck. After stamping and coloring it, I cut it out and cut off the stars so the piglet could still fit in the back of the truck.
I never attached the piglet and thought it would be fun to have it pop in and out of the truck – so I cut the top of the truck and glued it down and then back of the truck is popped up on foam tape. Now it acts and looks like a pocket. Ha! The last few products I used are a sheet of Rainbow Designer Papers for the ground and the Stitched Border Trio Die and FaDoodle Frames Scalloped Rectangles to create the card. So happy with the results.

List of Common Supplies

Whimsy Stamps:
Pigs Can Fly Too
Fill a Truck
Fill a Wagon
Stitched Border Trio Die
FaDoodle Frames Scalloped Rectangles
Rainbow Designer Papers

Copic Markers:
B02, 05, 37, 39
YR15, 18
Y11, 35
R01, 05, 24, 39, 46
C3, 4
W3, 5, 7
BG11
BV23

Polka Dot Pals Zachary from Whimsy Stamps

HELLO friend! Are you ready for another Polka Dot Pals Zachary? This is the one I colored last night in the live session I had in Zoom. My challenge was to color the eye so it was looking up – this was my first attempt and seems to work out. However, I can now “see” some mistakes I made and ways to make it better next time. Sometimes it’s a process and the results are achieved one step at a time. For me, this was step one.

In the Polka Dot Pals Zachary set, comes the two squirrels, leaves and side tree. To stamp the images, I first stamped the squirrel on the head then masked it before stamping the boy. After that I masked those to stamp the tree. Finally I stamped the second squirrel on his foot.
To assemble the card, I used the Bold ABC Die, Wonky Stitched Rectangles, and Comic Speech Bubbles dies. The speech bubble serves as the tree leaves and a speech bubble. Then I stamped a few extra leaves from Polka Dot Pals Zachary and then the AlFaDoodles Alphabet for the HELLO. I also had a pine scented scratch and sniff sticker so I placed one on the tree. Mmmm fresh pine!

List of Common Supplies

Whimsy Stamps:
Polka Dot Pals Zachary
AlFaDoodles Alphabet
Bold ABC Die
Wonky Stitched Rectangles
Comic Speech Bubbles

Copic Markers:
100, N1, 2, W3, 5, 7
BV23, 25, 27
G28, 29, 43, 85
YG17, 21, 25, 45, 99
BG11, 13, 32, 75
YR15, 21, 31
R05, 12, 27, 59
E04, 23, 25, 30, 31, 35, 47, 49, 55, 57, 71, 74, 79

Pigs Can Fly Too from Whimsy Stamps

Sooie! Are you ready for more cuteness with the new Pigs Can Fly Too digital stamp? I was and I even have another card on my table because this little gal is so fun to play with. For this project, I chose to combine her with the fence from Polka Dot Pals Fern and reuse the Piggy Background to create this fun scene.

To make this card, I started with a card base then added a layer with the Quilted Rainbow Inlaid die. I layered that with a white paper that I colored with E04. Then on top of that is another layer with the Piggy Background stamp that I colored with R11 and R12. On top of that, I stamped the fence from Polka Dot Pals Fern on the tan paper and popped that on top.
The sentiment was created using the Bold ABC die set and AlFaDoodles clear set which were popped on top of the large Comic Speech Bubbled die. The final element is the cute Pigs Can Fly Too stamp set and some glitter glue for some sparkle.

List of Common Supplies

Whimsy Stamps:
Pigs Can Fly Too digital stamp
Piggy Background rubber stamp
Polka Dot Pals Fern clear stamp
AlFaDoodles clear set
Bold ABC die set
Quilted Rainbow Inlaid die
Comic Speech Bubbled die set

Copic Markers:
E04, R11, 12, 20
BG10, 15, 32, 57