Polka Dot Pals Brianna

I am joining Ute at Bastel-Traum on this Advent day.  I have used Polka Dot Pals Brianna and Polka Dot Pals Add-on Faces from Little Miss Muffet Stamps.  Below you’ll find a quick guide on how to mask and stamp a Polka Dot Pals Add-on Face for this Pal.  I have also used the sentiment stamp from the Merry and Bright kit from Queen and Company.

When adding a face to the stamp, occasionally something blocks part of the face so creating a mask is needed.  To do this, after I stamped the main Polka Dot Pal, I stamped again on a scratch paper.  Because I was using grey, it was barely noticeable but that was all I needed to cut around the packages. Then I stamped the Polka Dot Pals Add-on Face with the masking in place. I removed the mask and then I could start to color.

I should have known better than to use a scratch paper for this demonstration… because it wasn’t long after that I was tempted to color.  I ended up coloring her anyway and then created this card. I should have also stamped the whole image… but it made for a nice change.

Girl Sitting

I’ve been wanting to try out the Polka Dot Pals Add-on Faces with other stamps and so for this project I pulled out some stamps by hÄnglar and stÄnglar.  I don’t know the name of their stamp and they are rare on the internet that I wasn’t able to Google it.  It might be called “Friendship” or simply “Girl Sitting” but I have no clue.  (If you do, leave a comment and I can update the name.)

Here’s a close up of the face.  To get the face stamped, I inked up the hAnglar girl then used a cotton swab to remove ink from the eye dots.  Then I selected a Polka Dot Pals Add-on Faces stamp that I thought would work best.  Some looked too large but this one fit nicely.

The sentiment I used is a Kid’s Quote by Inkadinkado.  I thought the “smile” worked to draw attention to the face.  😀  Hope you like it and thanks for dropping by today.

Easy Mini Albums

A new linking challenge at Little Miss Muffet Stamps today – hop on over and link up one of your projects from today in the Anything Goes Challenge!

My project uses the Easy Mini Albums booklet to create this envelope gift. This is the outside which features a pocket on the side for a personal note. The image I used is From Me To You by Whimsy.

When it opens from the back, this is what it looks like… and another envelope to follow.  On the bottom panel I used the Party Banner metal die from Little Miss Muffet Stamps and the words are chipboard embellishments from Make it Crafty that have been painted black then covered with Sparkles glitter gel.

Looking at the center part of this panel, the nested envelope part, I’ve used Polka Dot Pals Tanzen rubber stamp with the Polka Dot Pals Add-on Faces. The cupcake are Cupcakes ‘n Books from Little Miss Muffet Stamps as well.

This last envelop reveals the inside.  In the center, I also used the Party Banner metal die plus the Needle and Thread from DoveArt Studios.  The sentiment is more chipboard embellishments from Make it Crafty.

When I cut around the needle, I cut off the thread part instead of fussy cutting around it.  Then I actually threaded the needle with Baker’s twine and glued it artistically to the background.  I thought that added a fun element.  I suppose I should have added a shadows with the marker as well so I’ll go back and do that before I give it away. 😀

On the bottom panel, I also used the Cupcakes ‘n Books stamp to replace one of the strawberries in the wagon. The girl is Sunbonnet Strawberry Wagon and I had stamped two wagons to create a train instead of one.  Now this project is nearly complete – I just need to write a letter to tuck into the front then I’m done.  Yay!

Swings ‘n Slides Slurp

My project uses the Polka Dot Pals Add-on Faces and gives this tyke a new face, Swings ‘n Slides Slurp. I inked up the stamp then used a cotton swap to clear off the face before I stamped it. Then I selected one of the Add-on Faces and gave him a new smile.

Come join the Anything Goes Challenge – link up one of your projects this week!

Here’s a comparison of the original and the end result. The left one was fabulously colored by Faye who does an amazing job with blending!  But you’ll have to look past that to see their faces and how the new Add-on Face looks on Slurp.

Here are the Copic markers I used:
E79, 74, 71
E27, 23, 31, 00, 04, R02, 08
YG99, 23, 01, 25, 17
B93, 91
T1, 3, 5, 7, 9, BV23
YR18, 15, 24
 

Polka Dot Pals Add-on Faces

It’s the last day of the Polka Dot Pals Add-on Faces release. There have been some amazing projects uploaded by our Honored Guests and the Little Misses design team and today is no exception. Make sure to visit their pages and also on the LMMS Facebook group.
Laura Nehring (Honored Guest)
Bridget Curnow
Janice Wilson
Danni Bindel

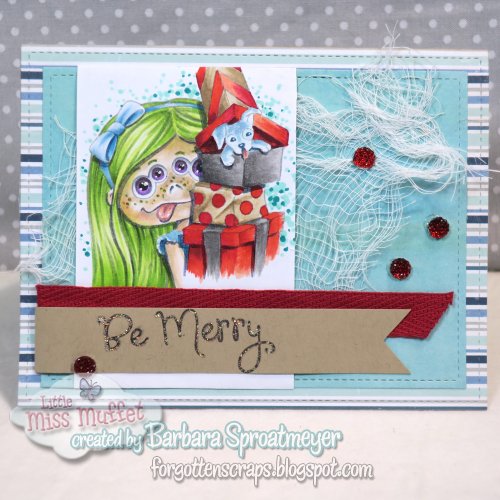
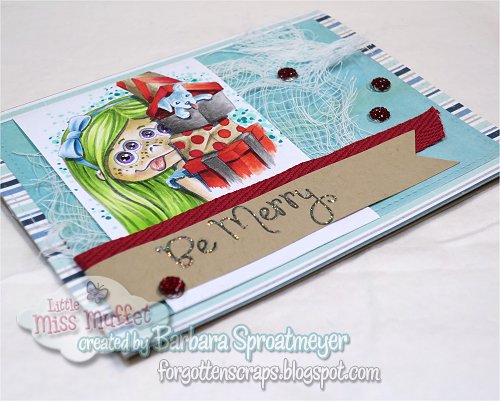
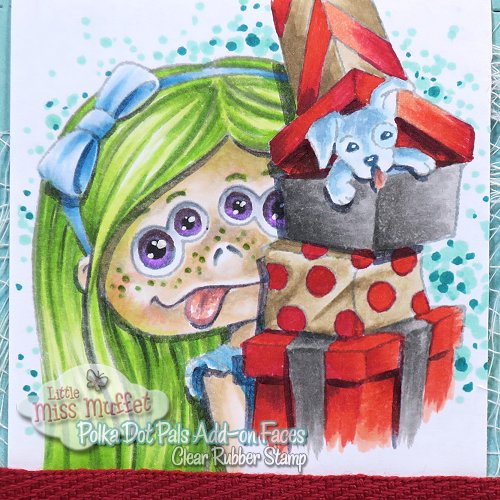
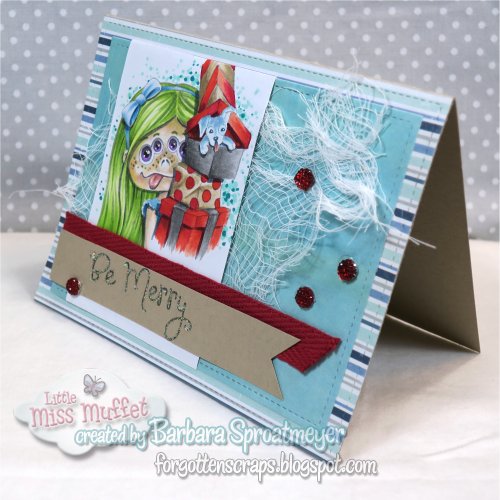
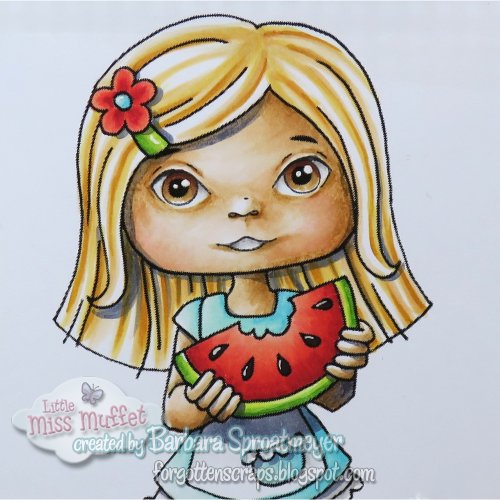
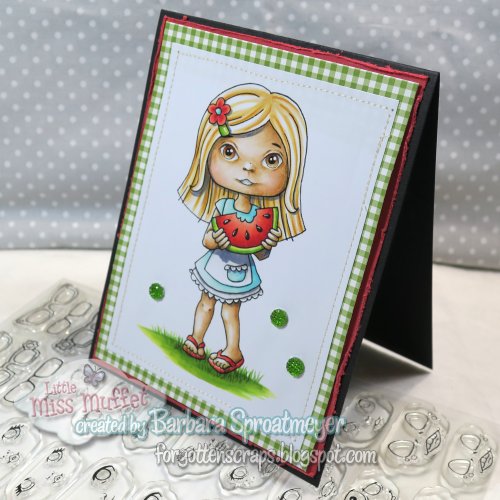
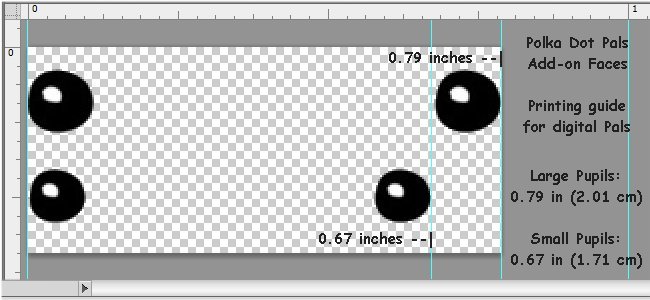
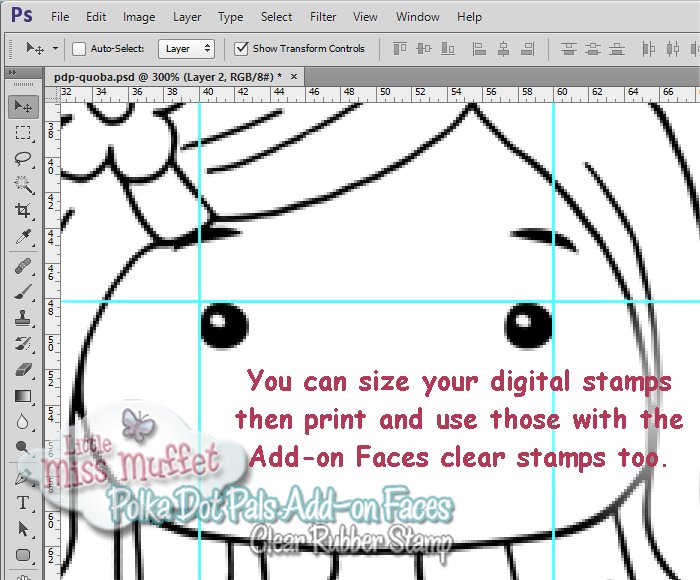
For my project I’ve used the Polka Dot Pals Add-on Faces clear stamps on two different stamps, Little Toadstools digital stamp from Make it Crafty and Hot Sip rubber stamp by DoveArt Studio.  I have quite the mix going on!  LOL

The main stamp is Little Toadstools from Make it Crafty. One of the silly faces I used on the smaller mushroom actually has three eyes on the original stamp. However, after inking it, I used a cotton swap and wiped away the two outer eyes before I stamping. I thought a cyclops would be perfect and it helped narrow the face a little to fit better on the stem. The second face didn’t have half the pupils because that counterpart is on the Polka Dot Pals. This allowed me to change the position of the eyes a little. I think it makes him cuter.  😀

Colors were a hard choice and I was going to go with red and orange, but I decided something different would be fun so I went with green and blue. I was lucky to find some yellow decorative paper which was the perfect kind of color pow it needed.

These are the Copic colors I used:

E41, 42, 43, 44
B0000, 01, 52, 14
YG21, 01, 23, 05, 07
YG21, 01, 23, 05
T0, 1, 3, 5, 9, BV23
E04, 95, R02

Be sure to visit the LMMS Facebook group!
You’ll find a full glimpse set, tips on how to use it, and more.

Today is the last day to …

Buy the new Polka Dot Pals Add-on Faces and
you’ll also receive the Little Houses clear stamp FREE!

Plus 15% OFF all Little Miss Muffet brand stamps
(Check the Make it Crafty section too for some holiday sales)

Lastly, you’ll get FREE US shipping on mailable orders over $35.00 or
a $5.00 shipping credit for International Order.
There’s no better time to shop for rubber stamps at Little Miss Muffet Stamps. Oh yeah!

All promos are automatically added to the cart during checkout – no coupons needed!

Here’s my second project…

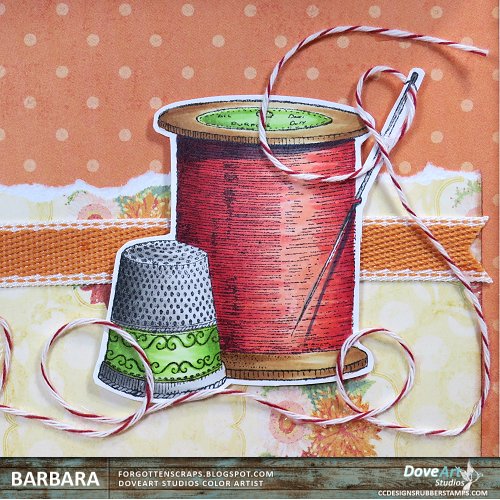
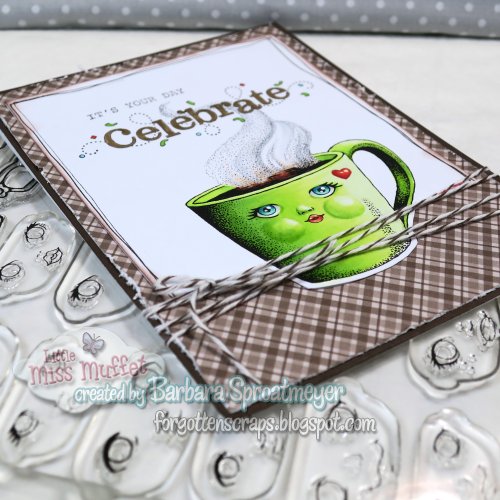
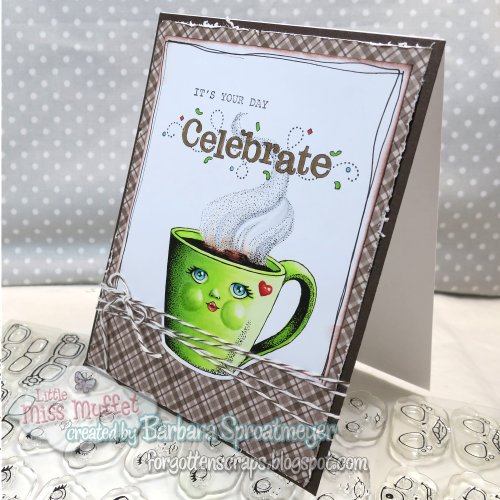
My second project uses the Add-on Faces on the Hot Sip by DoveArt Studio.  I thought a little face on this cuppa would make someone’s day.  I gave her puffy cheeks and a little heart.  Then I set the green up against browns to help give it a real center focus.

The Copic colors I used on this are:

YG25, 13, 01, 00, G20
BG07, 32, 11
C0, 1, 3, 5, 9
R12, 8, 2, 85, 46
E18, 11, E44

I’d like to submit these projects into the following challenges:

HLS November CAS Challenge
Love to Craft Challenge #16
Mix it Up Challenge #7
Rhedds Creative Spirit November Challenge
World Wide Open Design Team Challenge #27
Your Scrapbook Place November Challenge
Color Crazy Challenge #44
Creative Fingers Challenge #140
Emerald City Crafters Challenge #5
Fun Day Friday Challenge #213
Morgan’s Art World Challenge #22
Polkadoodle Craft Challenge #44

Polka Dot Pals Quoba

It’s day three of the Polka Dot Pals Add-on Faces!
Being Day 3, I’m sure you’re up on all the information.
However, today you’ll find tips on how to combine the digital Polka Dot Pals with the clear rubber Polka Dot Pals Add-on Faces. So be sure to visit the LMMS Facebook group for more tips!
Also check out what the Honored Guests and fabulous Little Misses have created:
Emma Louise (Honored Guest)
Katya Bess
Marika Gewalli (Honored Guest)
Lisa Johansen

For my project, I’ve used Polka Dot Pals Quoba.

I added one of the Add-on Faces and colored her in light colors.  The markers weren’t working well on this paper as you can see on the face and right arm. It has started to get gunky so I did the best I could to cover it up and then moved on.

These are the Copic colors that I used:

E0000, 00, 30, 31, 34, R11
YR24, 31, E30, 51, 53
R02, 14, 29
YG21, 17, 23
BG02, 10, 11
B31, 23, 39
T1, 3, 9, BV23
YG17, 21, 23, 67, 99

I kept the card simple. I found some green gingham paper which worked well with the watermelon theme.  Why is that? I don’t know but they seemed to fit. Then added a little red and black for the base of the card. I sewed the edges and added a couple gems.  Done!

The Polka Dot Pals Add-On Faces clear stamps can also be used with the digital Polka Dot Pals. Digital and rubber – how’s that possible?  No, that doesn’t mean you stamp your monitor. LOL

This is for those who know how to resize and manipulate your digital stamp. The process is simple – you’ll resize your digital stamp, print it, then stamp it with the clear stamp.  The measurements you’ll need to resize are listed below. Remember there are two different sizes of Add-on Faces so you can choose which one fits your project the best.

(Both images can be clicked on to make them larger.)

As you can see, the figures given are for the Polka Dot Pals pupils and measure from outside edge to outside edge. I like to rotate my digital Pal (if needed) so the pupils are level with each other. Then I’ll use the ruler bar and place guidelines where needed. For the large size, the dimensions of 0.79 worked out to be just over 20.1 millimeters. So I’ve set my guidelines just larger at 40 and 60 millimeters.  These guidelines make it super easy to size the pupils within the box.

As a tip, keep your project opened or saved so you can make minor adjustments if needed. After printing, the clear Add-on Faces are then easy to stamp on like normal.  Done!

Stay tuned for one more day of festivities – and tomorrow you’ll see how versatile these Add-on Faces are with other stamps – it’s just the beginning of possibilities!

I’d like to share this project in the following challenges:

AAA Cards Challenge #102
Stamped Blessings heARTful Challenge
Archi-scraps November Challenge
Card Mania Challenge #98
Classic Design Team Challenge #19
Copic Spain November Challenge
Crafty Girls Challenge #41
Cute as a Button Challenge #38