Boot House

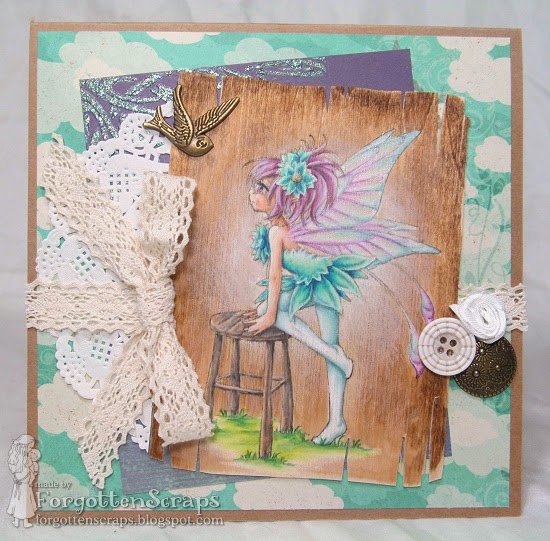
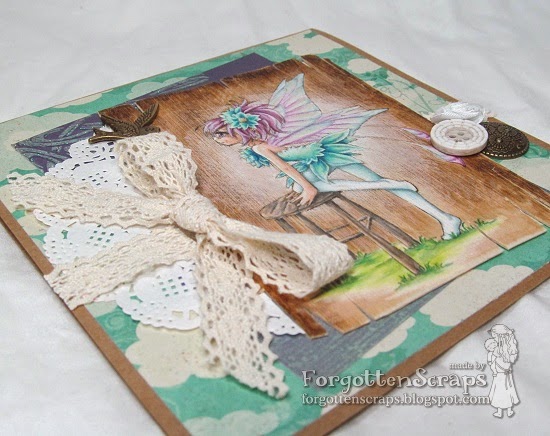
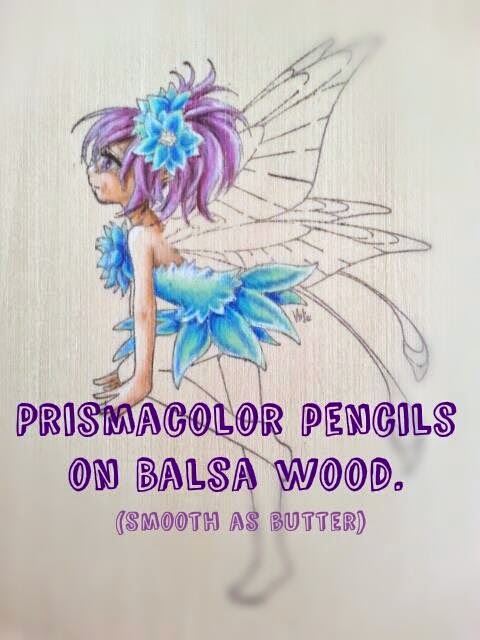
I’d like to think that maybe, just maybe, I might have inspired Zoe a tiny-wincy to create the impromptu Boot House challenge in the Facebook group; but I doubt that was the case.  In any regards, this is one of the images I colored when Zoe was here visiting.  Coloring the Boot House wasn’t enough so she also challenged me to color a marble sky.  This was done with Prismacolor Pencils on white paper.

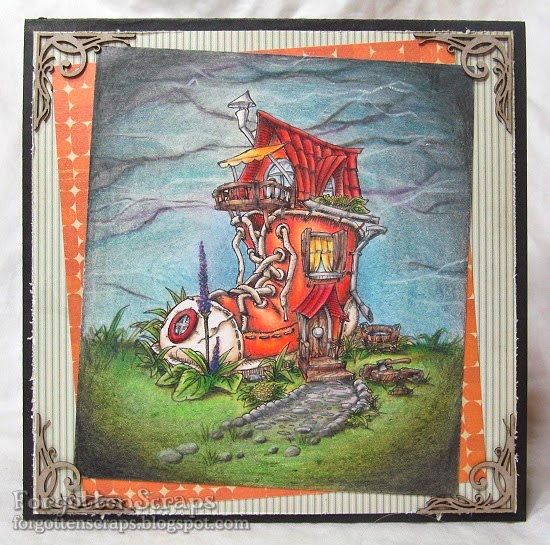
I think it worked for the first try but I certainly have some ideas on how to improve it for the next try.  Marble was a tough one and even though I think the effect I got is cool, I’m not sure if it looks like real marble. It was a fun challenge… and now I have a challenge for you too…  you need to get Zoe to post her marble image too!  He he he

Make it Crafty Images:
(plus chipboard corners)
To see the post on the Make it Crafty page, click HERE to view post.

Poinsettia Fairy

As you know the two challenges for this month are (1) coloring with teal and purple and/or (2) coloring on something non-white cardstock.   I went with both and colored the Poinsettia Fairy on a thin sheet of  Balsa Wood.  I also used the Wooden Stool from the Spring release, also by Make it Crafty.  The colors of course, are purple and teal.  This fairy was stamped in black ink then colored with Prisimacolor pencils. 

The pencils were tricky to get used to because the first few layers had to be very light.  However, once the foundation was set, applying pressure with the lighter colors made these pencils blend as smooth as butter.  The background was then colored with Copic colors but I didn’t like how dark it was so I went back with some lighter pencils to help lighten it up. 

Coloring on the Balsa wood was very enjoyable and I imagine I’ll do it again.  😀

Make it Crafty Images:
To see the post on the Make it Crafty page, click HERE to view post.

Fairy Poinsettia and Tress Dancing

There is a new challenge that started this month at Make it Colourful and as usual there are two levels.  The first level is to use the colors purple and turquoise.  The harder level is to color on something other than white cardstock.  I’ve colored two images to share today, one for each challenge, and hope they inspire you to play along!

Easy Challenge – Purple & Turquoise

Hard Challenge – Colored on Balsa Wood

 I’ll finish these projects and share them later on this month.  But in the mean time, get out your coloring and come play along!  😀 

Hopping Tilda

It’s warming up outside and I’m getting ready for some spring gardening!  I was tempted to do it last week but I thought I’d wait a little bit longer just to make sure a surprise freeze doesn’t kill the plants.  Anyway, I thought this would be a great card to share… it’s using Daffodil Del from Make it Crafty (and one of the rubber stamps that I’ve selected to stock in the Little Miss Muffet Stamps store too!)

The other image is Hopping Tilda (or Jumping Tilda?) from Magnolia.  You may not recognize it as a Magnolia stamp but with some ECP (Extreme Color Placement) on the face, I’ve been able to add a little more character and tried to go for a joyful expression.  Here’s a side-by-side of the stamp and the colored version:

I like using the Daffodil Del stamp because the flowers are on the side which make it perfect to place an image in the center.  It’s one of those background stamps that go so well together that it looks like one large scene stamp. Here are some close up and also a closer view of the dress (also colored with ECP).

Thanks for dropping by and I hope you’re having a great week!

Pot Plants and Wooden Stools

Sometimes I color an image and I just don’t like how the coloring turned out and this was one of those instances.  I thought the colors were ok and even some areas the texture was good… but I just had too much ink!  But I was prepared to continue on and proceeded to create a card.  Then one of those happy accidents happen occurred and what once was bleah is now oh’yeah!

Make it Crafty Images:

Check out the Make it Crafty blog for all sorts of inspiration!
Here’s the original side:

The scene was created using an image from Pot Plans and also Wooden Stools from Make it Crafty.  When I was applying the sticky tape to adhere it to my card, I saw how the back of it turned out and decided I liked it much better!

So this is actually the reverse side of the image I colored!  I went back in a few areas that didn’t have any color, but for the most part, I kept it as-is.  And it even looks like I went through the effort to color with no-lines.  Who knew?!

Blossom Tree and Candy Floss

Blossom Tree and Candy Floss?! What a combination but they work together when putting these two projects together.  I have used Blossom Tree from Make ti Crafty along with Candy Floss from Mo Manning (plus a few buttons of my own) to re-create these pencils.  I had a few logo pencils to use, you know, the unsightly ones with the business logo or moto on them?  Very boring and they needed some pizzas!

I printed my images out on regular printer paper and sized it to what I thought pencil would be, giving a little extra fudging room.  Then I colored it using Prismacolor pencils and cut it down to size so I could roll the new paper on the pencil.  On one side, I left a little extra white paper and that’s the part I glued down first on the pencil.  Then when that was dry, I added a little more glue to the paper and rolled the rest of it on the pencil using the table to make sure it was a tight roll.  Be careful with the glue too – you’ll want enough to glue all the paper to the pencil but not too much to make it messy.

Lastly, take care in sharpening them.  I found that if the paper is loose then it really tears it up at the bottom.  But if the paper is tightly attached to the pencil then an electric pencil sharpener worked well.