Skull Castle Jude & Beach Time Betty Munster

It’s release day and a blog hop for the Teen Scene Summer Fun from Simply B Stamps and I have a journal page to share today!  But before we get to the pictures, make sure you remember to visit the SBS Blog for the release details.  😀

You should have arrived here from the incredible ALISON!
(or for the complete hop list, click HERE)

For my project today I combined three images to create this scene…. Beach Time Betty Munster and Skull Castle Jude (the new releases) from Simply B Stamps and Island Hideaway from Make it Crafty.  For the “photos” on the side I originally had the icecream but I think that was too washed out so I went back in and added the “Sweet Sunshine” one instead.  However, you can see the icecream ones below.  ;D

This has been a fun release and I’ve enjoyed combining the images to create little scenes.  😀  It’s so hard to pick a favorite but I think Beach Time Betty Munster was the funnest to color with so many possibilities to add color!  Do you have a favorite image?  I’m afraid I’m usually one to answer “I love them all!”  He he he

Your next stop on the hop is the talented BETTY
Thanks so much for dropping by and I hope you’ve been inspired!

Beach Time Chris Munster & Water Balloon London

Welcome back to some more Teen Scene Summer Fun with Simply B Stamps!!  Today I have combined two new images, Beach Time Chris Munster and Water Balloon London, to create this sherbet inspired summer card.  Don’t forget to head on over to the SBS Blog for more design team inspiration and I’ll have one more project this week to share for this release too.  😀

One of the sheets of decorative paper I used for this project had the old-fashioned photo prints and I knew I wanted to use those!  It took a little juggling around on the layout but I finally got three of them on there and I think it turned out better than I had originally thought.  I’ve used them again on my final project too – they’re just so fun!  😀 

How about a game?  It will be kinda like a Truth or Dare!  What are the top 10 things you want to know about me OR want me to make/create/color?  Leave your answers in the comments and I’ll pick one for tomorrow!  {GRIN}

Underwater Mermaid Scene

Welcome to the Make it Crafty blog hop where we are celebrating not only a new release, but our new illustrator Marina!  She has a whimsical style and will be bringing us lots of gorgeous backgrounds and characters! There are many images in the current release ‘Under the Sea’ that you don’t want to miss and I’ve even seen a few sneak peeks at some fairies that are awesome!

You should have arrived here from the incredible DELPHINE!

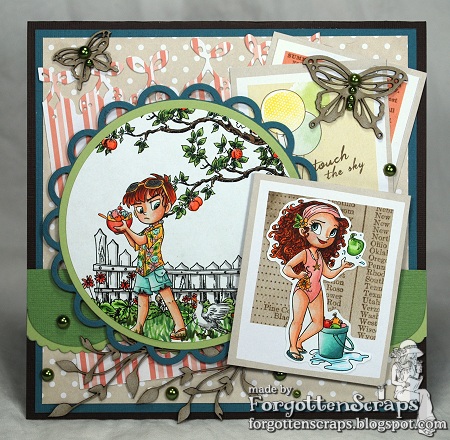
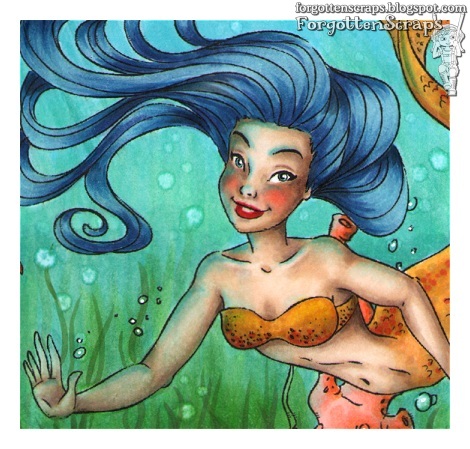
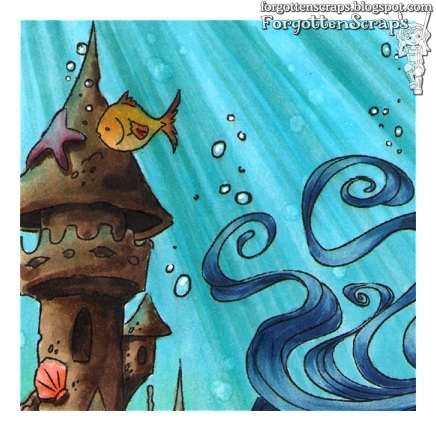
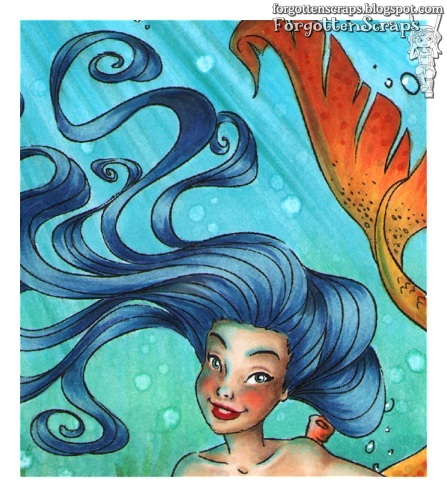
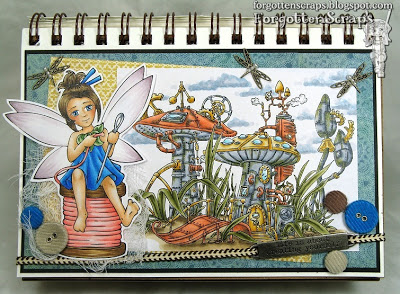
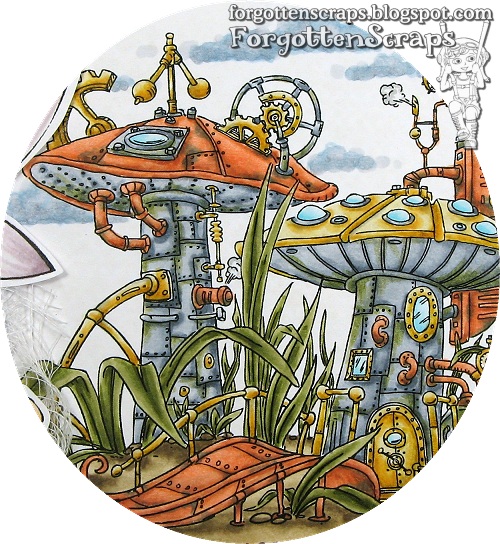
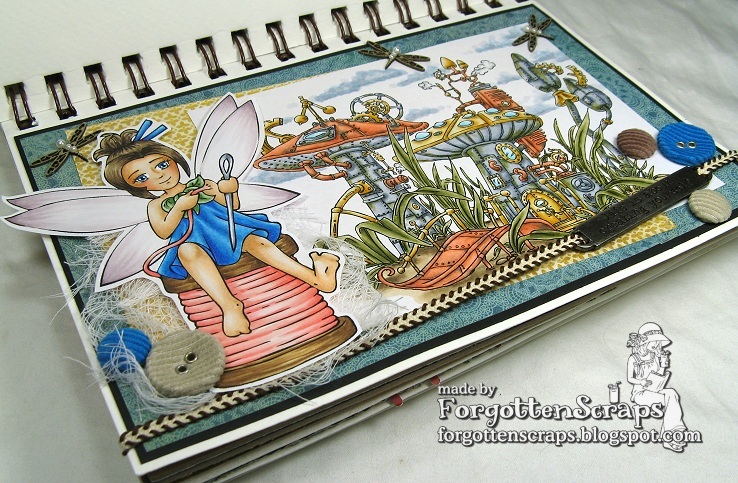
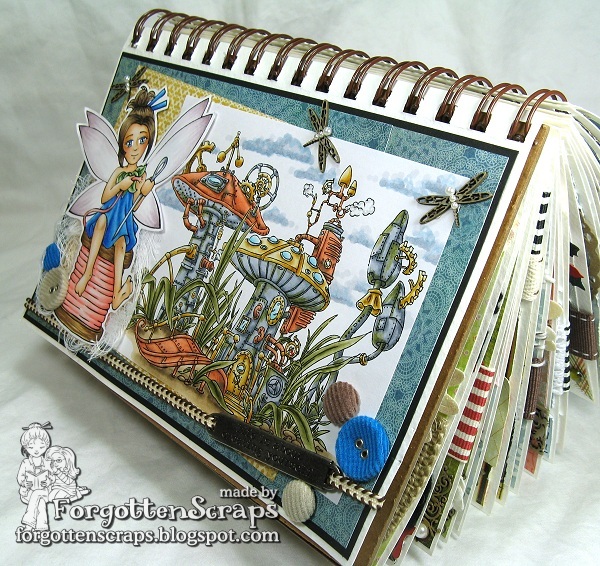
For my project I used Underwater Mermaid Scene and printed it out to fill out the card because I knew I wanted to do more coloring that card making.  He he he.  I first started with the water and figured if I messed that up then it would be easy to start over.  The inspiration I used for this was an image I found through Google and can be found HERE.  If you can believe it, the hardest part to color was the sand… it was left for last and taunted me throughout.  LOL

PRIZES: The best part about a blog hop are the prizes!!  Each of us have selected one image to give away to a random commenter on our blog and the image I chose is the one I’ve used… Underwater Mermaid Scene!!  You have until Sunday May 6h to finish the hop and we’ll post the winners on Monday!

But that’s not all the prizes either! Make sure to visit everyone on the hop and also leave a comment on the main MIC Store Blog for a chance to win the entire collection – how awesome is that!  😀  Zoe has three prizes over there that you don’t want to miss.  Good luck!

Here’s the complete hop roster:

Alyce – http://kitandclowder.blogspot.com/
Julie – http://stampincabin.blogspot.com/
Delphine – http://delphinesplace.blogspot.com/
Barbara – {here you are}
Sandie – http://sandieshores.blogspot.com/
Elaine (Special Guest) – http://quixoticcards.com/blog/
Tracy P – http://crafteezee.blogspot.com/
Debbie – http://www.debbiepsplace.blogspot.com/
Jane – http://janesboxofcolours.blogspot.com/
Zoe – http://makeitcrafty.com/crafts-blog/zoes-blog
Store Blog – http://www.makeitcrafty.com/store-blog/

The last stop in the hop is the new Make it Crafty Store Blog that is full of inspiration, tutorials, tips and tricks.  The Store DT have already posted some fantastic projects and I know there are more to come.  😀  Be sure to “Subscribe via Email” and enter your name for a chance to win the mega blog candy Zoe has listed.  Take a short detour and check out all those details HERE.

Your next stop on the hop is the fantastic SANDIE!!

If you can believe it, I actually wrote down the Copics I used on this project.  Shock!

Stamp: Make it Crafty Underwater Mermaid Scene
Water: BG0000, 000, B01, BG57, 53, 34, YG45, 11, 13, 17, G85, BG96, 0
Hair/Blues: B52, 34, 37, 39, N6
Fish/Scales: Y02, YR30, 31, Y23, 26, 28, YR 12, 15, 18
Skin: E0000, 000, 41, 42, 70, 71, 31 then added E93, R11, 12, 02, 17, 39, plus BG53, 10, B000
Purples: RV91, 93, 95, R59, RV99
Pinks: R11, R12, YR65, YR14
Sand: E43, 44, 47, 49, N4, 6 plus BG11, 53

Zombie Teen Summer

Are you ready for some fun zombie time?!  Simply B Stamps is having a limited digi release of of the Zombie Teen Summer images and I’m bringing them your way for some summer inspiration!!  Well, actually these are the “before” shots of the zombies before they became zombies.  😀 

The papers I used are from Cosmo Cricket Salt Air with a dark brown mat over kraft paper.  (I don’t know why but this has been a difficult paper pack to work with but it’s the only water/summer theme I have – so I guess it’s time to go shopping this weekend. Yeah!!  LOL)  I used a various range of diecuts including some from Spellbinders, Stampin Up, and My Favorite Things.  Then I finished off the cards with some Baker’s Twine and a few odds and ends like charms, clocks, clouds, suns, tickets and dew drops.

For these projects, I chose to un-zombie-fy the images before printing them out.  So I removed all the zombie elements such as bones, scars and brains then printed them out.  A couple I merged with other images and created a little scene.  I did this once to the Christmas Teen Scene Zombies and drew in any missing lines.  However, this time, because the images were smaller in size, I didn’t need to do any extra drawing.

 (with Beach Umbrella from Make it Crafty)

This is another gift set that will be perfect as a gift especially as the summer months come around and it starts to get super hot.  I’m more of a winter and cold kind of person so I’m not really looking forward to it.  But we have lots of shade in our backyard and some fans installed over the patio area so maybe this year will be a little more bearable.

(with Tropical Beach from Make it Crafty)

I hope you’ve enjoyed the Zombie Teen Summer inspiration and remember these are available as digi stamps for a limited time at Simply B Stamps.  You can keep them as Zombies or show them reminicing of times past before they were corpses.  He he he

Yee Haw Ali & Giddy Up Oscar

Are you ready for some more Jude and the Rockers Just for Fun from Simply B Stampss?!  Well, today I have two for you that I’ve combined on a journal page – they were just perfect together and I’ve been excited to start a new journal book all week!


For my project I used Yee Haw Ali and combined her with Giddy Up Oscar from Simply B Stamps. In the background I used Garden Picket Fence from Make it Crafty which I colored in black and white to give a contrast between the foreground and background.  Then I loaded it up with embellishments and what nots… yeah!

Let’s see here, the main paper is Nana’s Kitchen from DCWV but I don’t remember where the Bingo paper is from.  I also used the Tim Holtz clock die and a printed clock face from stash.  The best part, however, is the ribbon which I found in the dollar section at my local scrapbook store – it looks just perfect for a western theme, don’t you think?

Here’s a close up of Yee Haw Ali blowing bubbles…

And a close up of Giddy Up Oscar too…

Thanks fro dropping by and I hope you’ve been enjoying this release as much as I have.  Don’t forget to check out the SBS Blog for more inspiration and thanks for dropping by.  😀

I’d like to enter this into the following challeges:
Inky Impressions Challenge – Anything Goes

Metal Shroom & Breena Stitching

I’ve finally got around to making some more journal pages and I’m happy to share one with you today.  😀  This is for the Make it Colourful challenge this week which is to practice color metals, specifically to color copper!  Think you can handle that?  Well, it’s pretty simple and we even give you a couple color combinations to try out.  Come on over and check out the MiC Gallery!


 For my project I used the Metal Shrooms from Make it Crafty with some Dragonfly chippies then paired it with Breena Stitching from Little Miss Muffet Stamps. The corduroy buttons are from Stampin’ Up and the metal embellishment sentiment is from Tim Holtz.  I don’t remember where the paper came from but the ribbon was something I picked up at the local scrapbook store.  Other than the cheesecloth, I think that pretty much covers all the supplies.


Now down to the metal coloring part and for my image I experimented with copper, brass and steel.  A little back history… when I was a wee kid, I used to help my Father when he was making repairs.  I might have been in the way a little more than I knew but I always felt like the important assistant holding the tools and passing along the wrenches.  Anyway, we’d work a lot with copper, new and aged, so my color combination came from my memories of what copper looks like.


The colors I used for the copper is E13, E93, E95, E97 and E99 then for the aged look I added BG93 and BG96.   I put the BG color near seams and places water might frequently drip down.  I think it would be great to have more of a shine but sometimes copper has a dull finish to it so I guess it’s still acceptable.   


The fairy I used was already colored and I thought would be fun to pair up with the shrooms.  Of course, fairies and mushrooms are always a great combination but the contrast between soft textiles (the thread) and the metal was an interesting combination that I wanted to explore.  Actually, I had both images colored up and on the side of my desk so it felt good to get some of those used. 


That’s about it… come on over and play this week at Make it Colourful and let’s see what color combinations you use!  By the way, this is my last page in my journal book and I’m excited to start a new one!!  LOL  Thanks for dropping by and have a great weekend.  😀