Jude Valentine

It’s been a long time since I’ve created a journal page and these three characters came together perfectly for the scene!  They’re part of the Jude Valentine release from Simply B Stamps and I thought made a great story.  Now tell me, with of the two girls do you think is the most mischievous and instigator of this Valentine crime scene?  LOL

The three images, from left to right, are Ariel Cupid, Jude’s Heart and Brittany’s Bag of Valentines from Simply B Stamps.  Then I also used a ribbon slide chippie from Make it Crafty called Fancy Ribbon Sliders. And I just found a fun way to use those sliders by cutting them in half and using them as tags sticking out from behind a layer – it looks awesome!  I used one HERE on my Frenchie Claudine project.

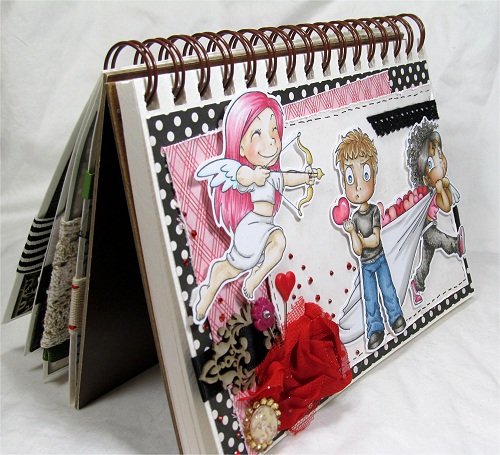
I have forgotten how fun it is to create pages in my journal and how much the extra space gives way for background, stories and trying new techniques.  See all those blank pages… yes, I will have to do that again.  ;D  I would like to enter this into the Simply Challenged Challenges “Anything Goes” themed challenge.

Fancy Marci

Remember the skin tone step-by-step guide I did a couple days ago using a La-La Land Craft image?  We’ll, as promised I finally put her on a card and wanted to share it with you this weekend.  To see the tutorial just click HERE and that even shows all the Copic colors I used on this sweetie.   Check out my finished project which is both perfect for Valentines and spring…

Isn’t she just adorable!  The images I used are Fancy Marci from La-La Land Crafts and That’s the Ticket stamp and punch from Stampin’ Up! The dragonfly chipboard embellishments are from Make it Crafty in a set called Dragonflies (of course!  LOL).

For the hexagon aspect, I used a beehive stencil and sprayed Iridescent Spray & Sparkle over the background.  (Thank you Ruby!!)  The light reflects on it and really adds an interesting element.  I’ve also colored the chipboard dragonflies and covered the wings with pink Stickles.

  
QUESTION: Some of you may be wondering if coloring Marci with a facial personality is allowed – and the ANSWER is: YES of course!!  The terms of use state no altering of the image so I’ve deliberately left the line art alone and printed the image the way it downloaded – nothing was change.  Now I can safely color using only Copic markers and some “mad coloring skills.”  Also check the other awesome examples on the La-La Land Crafts Blog that show fantastic ways to use your coloring!  Such as plaids, fuzzy texture, camouflage, hair strands and fabric folds – there so much you can do with your Copics and that’s what makes them so fun!!

I’d like to enter this into the following challenges:
Crafty Ribbons Challenge #38 – Anything with Ribbon
Copic Marker Europe – Anything with Copic
Make it Monday Linking #126 – Anything Goes
Oozak Challenge #11 – Anything Goes with Favorite Color (Pink/Brown)
Stamp and Create February Challenge – Spring

Update: I was a chosen winner for this project at 7 Kids College Fund!

Frenchie Claudine

We’re having a Valentine Blog Hop with Make it Crafty and if you haven’t started at the beginning be sure to back up in this hop and check out everyone’s projects because this is the end!

You should have arrived here from the incredible STEPHANIE!!

For my project I’ve merged Frenchie Claudine with the Fair Carousel which are both from Make it Crafty.  Plus I one of the chipboard embellishments up in the corner from Fancy Ribbon Sliders that I thought would be fun as a type of “tag” sticking out the corner.  Did you notice the red stitching!!  Boohya!  What you didn’t know was I’ve only had one bobbin spool for my sewing machine until today – now I’m setup with four and spooled the first one with red thread!  😀  Yea, I’m excited for that – thanks Mom!!

Ok, so like I mentioned before, I’m the last on the blog hop but here the complete list so you can make sure you’ve seen all the awesome Valentine projects today!

Our Guest – Emily
Barbara {here}

Thanks for dropping by and be sure to leave a comment as there are 6 hidden prizes across the blog hop each PLUS you can use the coupon code VAL10 to get 10% off ALL digi stsamps (valid until Monday 11th).   Have a great weekend!

Spencer’s Bucket of Love

Shhh… don’t tell anyone that I’m awake!  LOL  I should be sleeping or at the very least doing my homework but I couldn’t resist posting this fun project that I made using one of the newest rubber stamps at Little Miss Muffet Stamps!!  I’ve been playing with these adorable images since they arrived at my doorstep back in January and it’s been a blast.  ;D  So today, I’m featuring a layout for the latest LMM Challenge and bringing you Spencer…

There are two images on this project which are Spencer’s Bucket of Love and Swings ‘n Slides Sweet Sentiments from Little Miss Muffet Stamps.  Both of them were part of the Valentine release this year and work perfectly together.  The sentiment is large enough that I stamped it on special paper and colored the “Sweet” letters using the same reds that are used in the Spencer image.  Then I used my white gel pen and added a few accents. 
 

Make sure you get a chance to pop on over to the Little Miss Muffet Challenge Blog to see all the other gorgeous creations using this layout and be sure to come play along in the challenge this round!!  Anyone can play but for those who want to show off a LMMS you can choose to follow the layout theme or submit anything goes – it’s a bonus just for LMM fans!!  😀 

Fancy Marci

Good morning!  In light of Black History Month I thought I would share a combination of skin tones using my Copic markers and give a step-by-step on how to use them.  For this image I went with a dark brown skin tone and you might be surprised at what colors I used for blush!  This image is Fancy Marci from La-La Land Crafts and I’ll make a card with her later on this week and share it once it’s finished.

Update: See the finished project HERE.  😀

Because the LLLC images come with a pupil, I started out coloring the iris so Marci could be watching me color.  Plus it also helped me to define the areas I should not color with the skin tone.  From the bottom going up, I added the colors listed on the side – starting with the darkest colors and working my way up to the lightest.

Then for blush and her lips, instead of using pink, I prefer to use a slightly brown-ish or orange-ish color which blends better with the brown – in this case it was R02 and E04.  Lastly, shadows were given with W5 and W6.  The colors for the dress were selected by glancing at my stack of Valentine papers on my desk so that’s a pretty sure guess at what theme the finished card will look like!  LOL  Until then, enjoy and hope this color combination helps you figure out your next project.  ;D

Quinceañera Daydream

I just wanted to tune in and show how to add pimples to an image!  Pimples?  Well, yes, even the best teenagers can try to cover up their blemishes but there is always that “one” picture that shows them off.  So in this image, I’ve used some orange, pinks and brown and added a couple blemishes.  The image is Quinceañera Daydream from Little Miss Muffet Stamps – check her out…

When adding them you want to find a spot on the face that they will stand out in addition to typical areas where pimples are found.  That’s generally anywhere except just below the eyes and near the hairline – although they’ll pop up there too.  LOL  Pimples can be more black or red or even a little white so have a little fun and experiment with your next teenager card!  Enjoy!