Dreamy Dragon

This looks like the perfect Saturday afternoon activity so I couldn’t resit choosing this pal to color. This is Dreamy Dragon from Whimsy Stamps.  As I was looking for inspiration, I noticed this is usually colored in green, blue or purple. So I challenged myself to use a different color and a fiery orange came to mind.

These are the Copic markers I used on Dream Dragon:
 B000, 00, 01, BG10, 11
E42, 43, 44, 47
N4, 6, 8
YR30, 31, 15, 07, Y32, R05
BV23
R11, 21, 83
YG23, 17
This and other Whimsy Stamps are also available at Little Miss Muffet Stamps.

Peggy

For my project today I was inspired by Nicolette’s bunny project and wanted to use the same layout. I found some of my pastel papers and then colored Peggy from Whimsy Stamps to use as the center focus. I added a couple die cut clouds and pasted it all together.

Here are the colors I used on Peggy:
YG21, 23, 17
BV23, 20, B41, C00, 1, 3
R00, E0000, 00, 30, 31
E30, 31, Y21, YR23, 24
E49, 27
E93, 95, 97, R02
B41, 12
This an other Whimsy Stamps are also available at Little Miss Muffet Stamps.

Sonny Honeycloud My Buddy

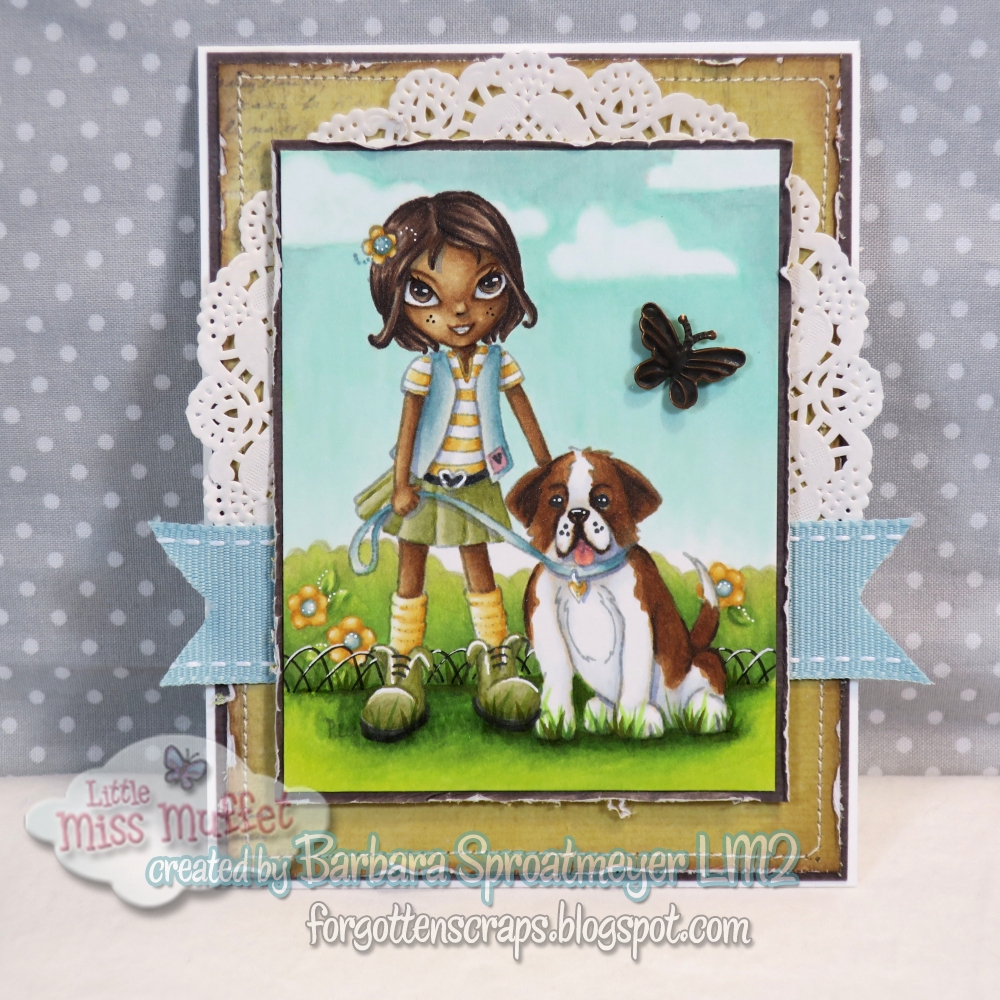
For my project today I’ve used Sonny Honeycloud My Buddy rubber stamp and the new Garden Border digital stamp from Little Miss Muffet Stamps.  I wanted to create a simple background that would help me fill out the white paper I stamped on yet allow for a vibrant colors to be added. So the Garden Border is what I came up with. 

These are the Copic markers I used on Sonny Honeycloud My Buddy and Garden Border:
YG97, 91, 63, 67, 23, 21
E31, 35, 37
E37, 21, 49, C3, 1, T7, 9
R02, E04
E49, 47, 44
YG95, 93, 91
YR23, 24, 30, 31
BG90, 72, 57
BG11, 10, 72
BV23, 0

To combine the digital and rubber stamps, I would print out the background to size in a very light gray.  Then I could stamp the rubber stamp directly over it and coloring would hide the light gray background. The fence would be colored with a darker color and on mine I also used a white gel pen.