

Katya Bess
Marika Gewalli (Honored Guest)
Lisa Johansen
For my project, I’ve used Polka Dot Pals Quoba.

I added one of the Add-on Faces and colored her in light colors. The markers weren’t working well on this paper as you can see on the face and right arm. It has started to get gunky so I did the best I could to cover it up and then moved on.
These are the Copic colors that I used:
E0000, 00, 30, 31, 34, R11
YR24, 31, E30, 51, 53
R02, 14, 29
YG21, 17, 23
BG02, 10, 11
B31, 23, 39
T1, 3, 9, BV23
YG17, 21, 23, 67, 99

I kept the card simple. I found some green gingham paper which worked well with the watermelon theme. Why is that? I don’t know but they seemed to fit. Then added a little red and black for the base of the card. I sewed the edges and added a couple gems. Done!

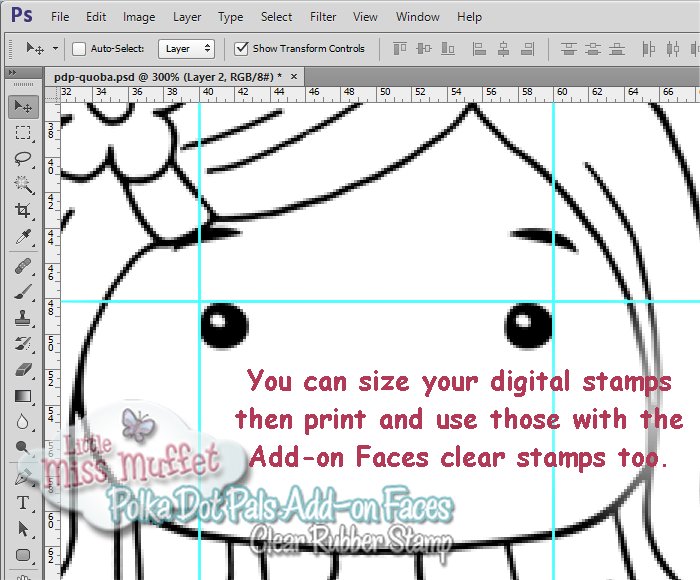
The Polka Dot Pals Add-On Faces clear stamps can also be used with the digital Polka Dot Pals. Digital and rubber – how’s that possible? No, that doesn’t mean you stamp your monitor. LOL
This is for those who know how to resize and manipulate your digital stamp. The process is simple – you’ll resize your digital stamp, print it, then stamp it with the clear stamp. The measurements you’ll need to resize are listed below. Remember there are two different sizes of Add-on Faces so you can choose which one fits your project the best.
(Both images can be clicked on to make them larger.)

As you can see, the figures given are for the Polka Dot Pals pupils and measure from outside edge to outside edge. I like to rotate my digital Pal (if needed) so the pupils are level with each other. Then I’ll use the ruler bar and place guidelines where needed. For the large size, the dimensions of 0.79 worked out to be just over 20.1 millimeters. So I’ve set my guidelines just larger at 40 and 60 millimeters. These guidelines make it super easy to size the pupils within the box.
As a tip, keep your project opened or saved so you can make minor adjustments if needed. After printing, the clear Add-on Faces are then easy to stamp on like normal. Done!
Stay tuned for one more day of festivities – and tomorrow you’ll see how versatile these Add-on Faces are with other stamps – it’s just the beginning of possibilities!
I’d like to share this project in the following challenges:
AAA Cards Challenge #102
Stamped Blessings heARTful Challenge
Archi-scraps November Challenge
Card Mania Challenge #98
Classic Design Team Challenge #19
Copic Spain November Challenge
Crafty Girls Challenge #41
Cute as a Button Challenge #38

I love your colouring on this card – so bright and cheerful! Thanks for playing along with us at AAA Cards!
LikeLike
I appreciate the mini-tutorial on sizing the digistamp – sometimes it is so hard to get things to print the way you think they should. I'm more likely to scan the face and add it digitally before printing (but then what would be the point of having the physical stamps?) Thanks for entering the HeARTful Stamping Challenge!
LikeLike
This is very sweet love the image Thank you for sharing with us over here today at the Classic Open Design Team Challenge and best of luck with your entry.Michelle DT Owner/Admin for http://classicdesignteamchallenge.blogspot.com.au/…
LikeLike
This is very sweet love the image Thank you for sharing with us over here today at the Classic Open Design Team Challenge and best of luck with your entry.Michelle DT Owner/Admin for http://classicdesignteamchallenge.blogspot.com.au/…
LikeLike
Adorable image and fabulous colouring..Thank you for sharing with us over here today at the Classic Open Design Team Challenge and best of luck with your entry.Chrissy DT http://classicdesignteamchallenge.blogspot.com.au/…
LikeLike
sweet card, beautiful coloring! thanks for sharing with us at AAA Cards!
LikeLike
This is really pretty – love the tutorial too,hugz Tinz
LikeLike